We are pleased to confirm that the issue has been resolved and the module is now available again 👍
For more information and any assistance required please refer to this GitHub issue
Introduction
Value Proposition
Azure Verified Modules (AVM) is an initiative to consolidate and set the standards for what a good Infrastructure-as-Code module looks like.
Modules will then align to these standards, across languages (Bicep, Terraform etc.) and will then be classified as AVMs and available from their respective language specific registries.
AVM is a common code base, a toolkit for our Customers, our Partners, and Microsoft. It’s an official, Microsoft driven initiative, with a devolved ownership approach to develop modules, leveraging internal & external communities.
Azure Verified Modules enable and accelerate consistent solution development and delivery of cloud-native or migrated applications and their supporting infrastructure by codifying Microsoft guidance (WAF), with best practice configurations.
Modules
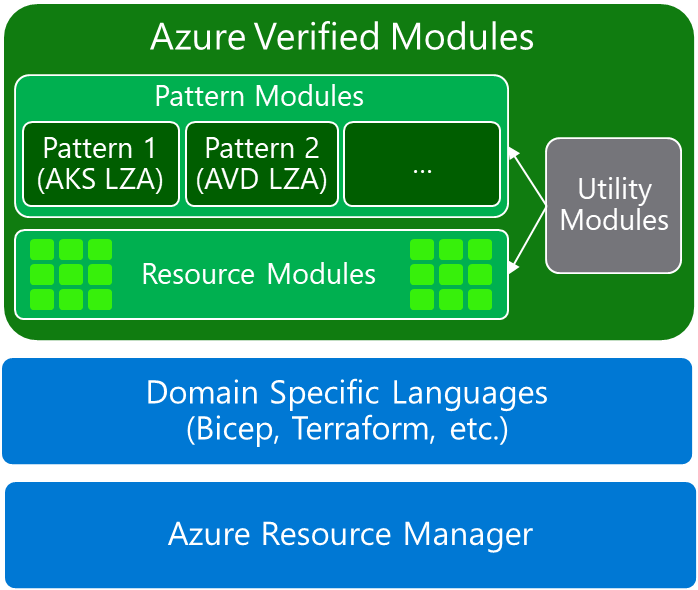
Azure Verified Modules provides two types of modules: Resource and Pattern modules.
AVM modules are used to deploy Azure resources and their extensions, as well as reusable architectural patterns consistently.
Modules are composable building blocks that encapsulate groups of resources dedicated to one task.
Flexible, generalized, multi-purpose
Integrates child resources
Integrates extension resources
AVM improves code quality and provides a unified customer experience.
Important
AVM is owned, developed & supported by Microsoft, you may raise a GitHub issue on this repository or the module’s repository directly to get support or log feature requests.
You can also log a support ticket and if the issue is not related to the Azure platform, you will be redirected to submit a GitHub issue for the module owner(s) or the AVM team.
Azure Verified Modules (AVM), as “One Microsoft”, we want to provide and define the single definition of what a good IaC module is;
How they should be constructed and built
Enforcing consistency and testing where possible
How they are to be consumed
What they deliver for consumers in terms of resources deployed and configured
And where appropriate aligned across IaC languages (e.g. Bicep, Terraform, etc.).
Mission Statement
Our mission is to deliver a comprehensive Azure Verified Modules library in multiple IaC languages, following the principles of the well-architected framework, serving as the trusted Microsoft source of truth. Supported by Microsoft, AVM will accelerate deployment time for Azure resources and architectural patterns, empowering every person and organization on the planet on their IaC journey.
Definition of “Verified” Summary
The modules are supported by Microsoft, across it’s many internal organizations, as described in Module Support
Modules are aligned to clear specifications that enforces consistency between all AVM modules. See the ‘Specifications & Definitions’ section in the menu
Modules will continue to stay up-to-date with product/service roadmaps owned by the module owners and contributors
Modules will provide clear documentation alongside examples to promote self-service consumption
Modules will be tested to ensure they comply with the specifications for AVM and their examples deploy as intended
Why Azure Verified Modules?
This effort to create Azure Verified Modules, with a strategy and definition, is required based on the sheer number of existing attempts from all areas across Microsoft to try and address this same area for our customers and partners. Across Microsoft there are many initiatives, projects and repositories that host and provide IaC modules in several languages, for example Terraform. Each of these come with differing code styling and standards, consumption methods and approaches, testing frameworks, target personas, contribution guidelines, module definitions and most importantly support statements from their owners and maintainers.
However, none of these existing attempts have ever made it all the way through to becoming a brand and the go to place for IaC modules from Microsoft that consumers can trust (mainly around longevity and support), build upon and contribute back to.
Performing this effort now to create a shared single aligned strategy and definition for IaC modules from Microsoft, as One Microsoft, will allow us to accelerate existing and future projects, such as Application Landing Zone Accelerators (LZAs), as well as providing the building blocks via a library of modules, in the language of the consumers choice, that is consistent, trusted and supported by Microsoft. This all leads to consumers being able to accelerate faster, no matter what stage of their IaC journey they are on.
We also know, from our customers, that well defined support statements from Microsoft are required for initiatives like this to succeed at scale, especially in larger enterprise customers. We have seen over the past FY that this topic alone is important and is one that has led to confusion and frustration to customers who are consuming modules developed by individuals that in the end are not “officially” Microsoft supported and this unfortunately normally occurs at a critical point in time for the project being worked on, which amplifies frustrations.
How will we create, support and enforce Azure Verified Modules?
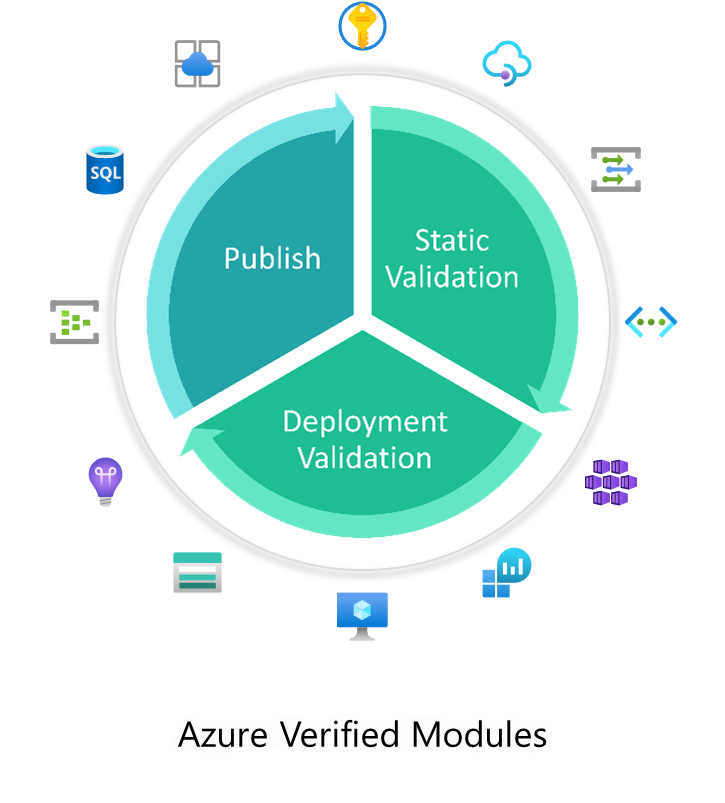
Azure Verified Modules will achieve this, and its mission statement, by implementing and enforcing the following; driven by the AVM Core Team:
Publishing AVM modules to their respective public registries for consumption
This page contains various views of the module index (catalog) for Terraform Resource Modules. To see these views, click on the expandable sections with the “➕” sign below.
To see the full, unfiltered, unformatted module index on GitHub, click here.
Modules listed below that aren’t shown with the status of Module Available 🟢, are currently in development and are not yet available for use. For proposed modules, see the Proposed modules section below.
Published modules - 🟢 & 🟡
➕ Published Modules - Module names, status and owners
This page contains various views of the module index (catalog) for Terraform Pattern Modules. To see these views, click on the expandable sections with the “➕” sign below.
To see the full, unfiltered, unformatted module index on GitHub, click here.
Modules listed below that aren’t shown with the status of Module Available 🟢, are currently in development and are not yet available for use. For proposed modules, see the Proposed modules section below.
Published modules - 🟢 & 🟡
➕ Published Modules - Module names, status and owners
This page contains various views of the module index (catalog) for Terraform Utility Modules. To see these views, click on the expandable sections with the “➕” sign below.
To see the full, unfiltered, unformatted module index on GitHub, click here.
Modules listed below that aren’t shown with the status of Module Available 🟢, are currently in development and are not yet available for use. For proposed modules, see the Proposed modules section below.
Published modules - 🟢 & 🟡
➕ Published Modules - Module names, status and owners
This page is a work in progress and will be updated as we improve & finalize the content. Please check back regularly for updates.
When developing an Azure solution using AVM modules, there are several aspects to consider. This page covers important concepts and provides guidance the technical decisions. Each concept/topic referenced here will be further detailed in the corresponding Bicep or Terraform specific guidance.
Language-agnostic concepts
Topics/concepts that are relevant and applicable for both Terraform.
Module Sourcing
Public Registry
Leveraging the public registries (i.e., the Bicep Public Registry or the Terraform Public Registry) is the most common and recommended approach.
This allows you to leverage the latest and greatest features of the AVM modules, as well as the latest security updates. While there aren’t any prerequisites for using the public registry - no extra software component or service needs to be installed and no configuration is needed - the client machine the deployment is initiated from will need to have access to the public registry.
Private Registry (synced)
A private registry - that is hosted in your own environment - can store modules originating from the public registry. Using a private registry still grants you the latest version of AVM modules while allowing you to review each version of each module before admitting them to your private registry. You also have control over who can access your own private registry. Note that using a private registry means that you’re still using each module as is, without making any changes.
Inner-sourcing
Inner-sourcing AVM means maintaining your own, synchronized copy of AVM modules in your own internal private registry, repositories or other storage option. Customers normally look to inner-source AVM modules when they have strict security and compliance requirements, or when they want to publish their own lightly wrapped versions of the modules to meet their specific needs; for example changing some allowed or default values for parameter or variable inputs.
This is a more complex approach and requires more effort to maintain, but it can be beneficial in certain scenarios, however, it should not be the default approach as it can lead to a lot of overhead and maintenance and requires significant skills and resources to set up and maintain.
There are many ways to approach inner-sourcing AVM modules for both Terraform. The AVM team will be publishing guidance on this topic, based on customer experience and learnings.
Tip
You can see the AVM team talking about inner-sourcing on the AVM February 2025 community call on YouTube.
Solution Development
This section provides advanced guidance for developing solutions using Azure Verified Modules (AVM). It covers technical decisions and concepts that are important for building and deploying Azure solutions using AVM modules.
Planning your solution
When implementing infrastructure in Azure leveraging IaaS and PaaS services, there are multiple options for Azure deployments. In this article we assume that a decision has been made to implement your solution, using Infrastructure-as-Code (IaC). This is best suited to allow programmatic declarative control of the target infrastructure and is ideal for projects that require repeatability and idempotency.
Choosing an Infrastructure-as-Code language
There are multiple language choices when implementing your solution using IaC in Azure. The Azure Verified Modules project currently supports Terraform. The following guidance summarizes considerations that can help choose the option that best suits your requirements.
Reasons to choose Bicep
Bicep is the Microsoft 1st party offering for IaC deployments. It supports Generally Available (GA) and preview features for all Azure resources and allows for modular composition of resources and solution templates. The use of simplified syntax makes IaC development intuitive and the use of the Bicep extension for VSCode provides IntelliSense and syntax validation to assist with coding. Finally, Bicep is well suited for infrastructure projects and teams that don’t require management of other cloud platforms or services outside of Azure. For a more detailed read on reasons to choose Bicep, read this article from the Bicep documentation.
Reasons to choose Terraform
HashiCorp’s Terraform is an extensible 3rd party platform that can be used across multiple cloud and on-premises platforms using multiple provider plugins. It has widespread adoption due to its simplified human-readable configuration files, common functionality, and the ability to allow a project to span multiple provider spaces.
In Azure, support is provided through two primary providers called AzureRM and AzAPI respectively. The default provider for many Azure use cases is AzureRM which is co-developed between Microsoft and HashiCorp. It includes support for generally available (GA) features, while support for new and preview features might be slightly delayed following their initial release. AzAPI is developed exclusively by Microsoft and supports all preview and GA features while being more complex to use due to the more direct interaction with Azure’s APIs. While it is possible to use both providers in a single project as needed, the best practice is to standardize on a single provider as much as is reasonable.
Projects typically choose Terraform when they bridge multiple cloud infrastructure platforms or when the development team has previous experience coding in Terraform. Modern Integrated Development Environments (IDE) - such as Visual Studio Code - include extension support for Terraform features as well as additional Azure specific extensions. These extensions enable syntax validation and highlighting as well as code formatting and HashiCorp Cloud Platform (HCP) integration for HashiCorp Cloud customers. For a more detailed read on reasons to choose Terraform, read this article from the Terraform on Azure documentation.
Architecture design
Before starting the process of codifying infrastructure, it is important to develop a detailed architecture of what will be created. This should include details for:
Organizational elements such as management groups, subscriptions, and resource groups as well as any tagging and Role Based Access (RBAC) configurations for each.
Infrastructure services that will be created along with key configuration details like sku values, network CIDR range sizes, or other solution specific configuration.
Any relationship between services that will be codified as part of the deployment.
Identify inputs to your solution for designs that are intended to be used as templates.
Note
For a production grade solution, you need to
follow the recommendations of the Cloud Adoption Framework (CAF) and have your platform and application landing zones defined, as per Azure Landing Zones (ALZ);
follow the recommendations of the Azure Well-Architected Framework (WAF) to ensure that your solution is compliant with and integrates into your organization’s policies and standards. This includes considerations for security, identity, networking, monitoring, cost management, and governance.
Sourcing content for deployment
Once the architecture is agreed upon, it is time to plan the development of your IaC code. There are several key decision points that should be considered during this phase.
Content creation methods
The two primary methods used to create your solutions module are:
Using base resources (“vanilla resources”) from scratch or
Leveraging pre-created modules from the AVM library to minimize the time to value during development.
The trade-off between the two options is primarily around control vs. speed. AVM works to provide the best of both options by providing modules with opinionated and recommended practice defaults while allowing for more detailed configuration as needed. In our sample exercise we’ll be using AVM modules to demonstrate building the example solution.
AVM module type considerations
When using AVM modules for your solution, there is an additional choice that should be considered. The AVM library includes both pattern and resource module types. If your architecture includes or follows a well-known pattern then a pattern module may be the right option for you. If you determine this is the case, then search the module index for pattern modules in your chosen language to see if an option exists for your scenario. Otherwise, using resource modules from the library will be your best option.
In cases where an AVM resource or pattern module isn’t available for use, review the Bicep or Terraform provider documentation to identify how to augment AVM modules with standalone resources. If you feel that additional resource or pattern modules would be useful, you can also request the creation of a pattern or resource module by creating a module proposal issue on the AVM github repository.
Module source considerations
Once the decision has been made to use AVM modules to help accelerate solution development, a decision about where those modules will be sourced from is the next key decision point. A detailed exploration of the different sourcing options can be found in the Module Sourcing section of the Concepts page. Take a moment to review the options discussed there.
For our solution we will leverage the Public Registry option by sourcing AVM modules directly from the respective Terraform and Bicep public registries. This will avoid the need to fork copies of the modules for private use.
Subsections of Solution Development
Terraform - Solution Development
Introduction
Azure Verified Modules (AVM) for Terraform are a powerful tool that leverage the Terraform domain-specific language (DSL), industry knowledge, and an Open Source community, which altogether enable developers to quickly deploy Azure resources that follow Microsoft’s recommended practices for Azure. In this article, we will walk through the Terraform specific considerations and recommended practices on developing your solution leveraging Azure Verified Modules. We’ll review some of the design features and trade-offs and include sample code to illustrate each discussion point.
Prerequisites
title: “Terraform Prerequisites” description: “Learn about the prerequisites for using Terraform to deploy Azure Verified Modules or develop them.”
You will need the following tools and components to complete this guide:
Before you begin, ensure you have these tools installed in your development environment.
Planning
Good module development should start with a good plan. Let’s first review the architecture and module design prior to developing our solution.
Solution Architecture
Before we begin coding, it is important to have details about what the infrastructure architecture will include. For our example, we will be building a solution that will host a simple application on a Linux virtual machine (VM).
In our design, the resource group for our solution will require appropriate tagging to comply with our corporate standards. Resources that support Diagnostic Settings must also send metric data to a Log Analytics workspace, so that the infrastructure support teams can get metric telemetry. The virtual machine will require outbound internet access to allow the application to properly function. A Key Vault will be included to store any secrets and key artifacts, and we will include a Bastion instance to allow support personnel to access the virtual machine if needed. Finally, the VM is intended to run without interaction, so we will auto-generate an SSH private key and store it in the Key Vault for the rare event of someone needing to log into the VM.
Based on this narrative, we will create the following resources:
A resource group to contain all the resources with tagging
A random string resource for use in resources with global naming (Key Vault)
A Log Analytics workspace for diagnostic data
A Key Vault with:
Role-Based Access Control (RBAC) to allow data access
Logging to the Log Analytics workspace
A virtual network with:
A virtual machine subnet
A Bastion subnet
Network Security Group on the VM subnet allowing SSH traffic
Logging to the Log Analytics workspace
A NAT Gateway for enabling outbound internet access
Associated to the virtual machine subnet
A Bastion service for secure remote access to the Virtual Machine
Logging to the Log Analytics workspace
A virtual machine resource with
A single private IPv4 interface attached to the VM subnet
A randomly generated admin account private key stored in the Key Vault
Metrics sent to the log Analytics workspace
Solution template (root module) design
Since our solution template (root module) is intended to be deployed multiple times, we want to develop it in a way that provides flexibility while minimizing the amount of input necessary to deploy the solution. For these reasons, we will create our module with a small set of variables that allow for deployment differentiation while still populating solution-specific defaults to minimize input. We will also separate our content into variables.tf, outputs.tf, terraform.tf, and main.tf files to simplify future maintenance.
Based on this, our file system will take the following structure:
Module Directory
terraform.tf - This file holds the provider definitions and versions.
variables.tf - This file contains the input variable definitions and defaults.
outputs.tf - This file contains the outputs and their descriptions for use by any external modules calling this root module.
main.tf - This file contains the core module code for creating the solutions infrastructure.
development.tfvars - This file will contain the inputs for the instance of the module that is being deployed. Content in this file will vary from instance to instance.
Note
Terraform will merge content from any file ending in a .tf extension in the module folder to create the full module content. Because of this, using different files is not required. We encourage file separation to allow for organizing code in a way that makes it easier to maintain. While the naming structure we’ve used is common, there are many other valid file naming and organization options that can be used.
In our example, we will use the following variables as inputs to allow for customization:
location - The location where our infrastructure will be deployed.
name_prefix - This will be used to preface all of the resource naming.
virtual_network_prefix - This will be used to ensure IP uniqueness for the deployment.
tags - The custom tags to use for each deployment.
Finally, we will export the following outputs:
resource_group_name - This will allow for finding this deployment if there are multiples.
virtual_machine_name - This can be used to find and login to the vm if needed.
Identifying AVM modules that match our solution
Now that we’ve determined our architecture and module configurations, we need to see what AVM modules exist for use in our solution. To do this, we will open the AVM Terraform pattern module index and check if there are any existing pattern modules that match our requirement. In this case, no pattern modules fit our needs. If this was a common pattern, we could open an issue on the AVM github repository to get assistance from the AVM project to create a pattern module matching our requirements. Since our architecture isn’t common, we’ll continue to the next step.
When a pattern module fitting our needs doesn’t exist for a solution, leveraging AVM resource modules to build our own solution is the next best option. Review the AVM Terraform published resource module index for each of the resource types included in your architecture. For each AVM module, capture a link to the module to allow for a review of the documentation details on the Terraform Registry website.
Note
Some of the published pattern modules cover multi-resource configurations that can sometimes be interpreted as a single resource. Be sure to check the pattern index for groups of resources that may be part of your architecture and that don’t exist in the resource module index. (e.g., Virtual WAN)
For our sample architecture, we have the following AVM resource modules at our disposal. Click on each module to explore its documentation on the Terraform Registry.
We can now begin coding our solution. We will create each element individually, to allow us to test our deployment as we build it out. This will also allow us to correct any bugs incrementally, so that we aren’t troubleshooting a large number of resources at the end.
Creating the terraform.tf file
Let’s begin by configuring the provider details necessary to build our solution. Since this is a root module, we want to include any provider and Terraform version constraints for this module. We’ll periodically come back and add any needed additional providers if our design includes a resource from a new provider.
Open up your development IDE (Visual studio code in our example) and create a file named terraform.tf in your root directory.
Always click on the “Copy to clipboard” button in the top right corner of the Code sample area in order not to have the line numbers included in the copied code.
This specifies that the required Terraform binary version to run your module can be any version between 1.9 and 2.0. This is a good compromise for allowing a range of binary versions while also ensuring support for any required features that are used as part of the module. This can include things like newly introduced functions or support for new key words.
Since we are developing our solution incrementally, we should validate our code. To do this, we will take the following steps:
Open up a terminal window if it is not already open. In some IDE’s this can be done as a function of the IDE.
Change directory to the module directory by typing cd and then the path to the module. As an example, if the module directory was named example we would run cd example.
Run terraform init to initialize your provider file.
You should now see a message indicating that Terraform has been successfully initialized. This indicates that our code is error free and we can continue on. If you get errors, examine the provider syntax for typos, missing quotes, or missing brackets.
Creating a variables.tf file
Because our module is intended to be reusable, we want to provide the capability to customize each module call with those items that will differ between them. This is done by using variables to accept inputs into the module. We’ll define these inputs in a separate file named variables.tf.
Go back to the IDE, and create a file named variables.tf in the working directory.
Add the following code to your variables.tf file to configure the inputs for our example:
➕ Expand Code
1variable"name_prefix" {
2description = "Prefix for the name of the resources" 3type = string 4default = "example" 5}
6 7variable"location" {
8description = "The Azure location to deploy the resources" 9type = string10default = "East US"11}
1213variable"virtual_network_cidr" {
14description = "The CIDR prefix for the virtual network. This should be at least a /22. Example 10.0.0.0/22"15type = string16}
1718variable"tags" {
19description = "Tags to be applied to all resources"20type = map(string)
21default = {}
22}
Note
Note that each variable definition includes a type definition to guide module users on how to properly define an input. Also note that it is possible to set a default value. This allows module consumers to avoid setting a value if they find the default to be acceptable.
We should now test the new content we’ve created for our module. To do this, first re-run terraform init on your command line. Note that nothing has changed and the initialization completes successfully. Since we now have module content, we will attempt to run the plan as the next step of the workflow.
Type terraform plan on your command line. Note that it now asks for us to provide a value for the var.virtual_network_cidr variable. This is because we don’t provide a default value for that input so Terraform must have a valid input before it can continue. Type 10.0.0.0/22 into the input and press enter to allow the plan to complete. You should now see a message indicating that Your infrastructure matches the configuration and that no changes are needed.
Creating a development.tfvars file
There are multiple ways to provide input to the module we’re creating. We will create a tfvars file that can be supplied during plan and apply stages to minimize the need for manual input. tfvars files are a nice way to document inputs as well as allow for deploying different versions of your module. This is useful if you have a pipeline where infrastructure code is deployed first for development, and then is deployed for QA, staging, or production with different input values.
In your IDE, create a new file named development.tfvars in your working directory.
Now add the following content to your development.tfvars file.
Note that each variable has a value defined. Although, only inputs without default values are required, we include values for all of the inputs for clarity. Consider doing this in your environments so that someone looking at the tfvars files has a full picture of what values are being set.
Re-run the terraform apply, but this time, reference the .tfvars file by using the following command: terraform plan -var-file=development.tfvars. You should get a successful completion without needing to manually provide inputs.
Creating the main.tf file
Now that we’ve created the supporting files, we can start building the actual infrastructure code in our main file. We will add one AVM resource module at a time so that we can test each as we implement them.
Return to your IDE and create a new file named main.tf.
Add a resource group
In Azure, we need a resource group to hold any infrastructure resources we create. This is a simple resource that typically wouldn’t require an AVM module, but we’ll include the AVM module so we can take advantage of the Role-Based Access Control (RBAC) interface if we need to restrict access to the resource group in future versions.
Note the Provision Instructions box on the right-hand side of the page. This contains the module source and version details which allows us to copy the latest version syntax without needing to type everything ourselves.
Now review the Readme tab in the middle of the page. It contains details about all required and optional inputs, resources that are created with the module, and any outputs that are defined. If you want to explore any of these items in detail, each element has a tab that you can review as needed.
Finally, in the middle of the page, there is a drop-down menu named Examples that contains functioning examples for the AVM module. These showcase a good example of using copy/paste to bootstrap module code and then modify it for your specific purpose.
Now that we’ve explored the registry content, let’s add a resource group to our module.
First, copy the content from the Provision Instructions box into our main.tf file.
➕ Expand Code
1module"avm-res-resources-resourcegroup" {
2source = "Azure/avm-res-resources-resourcegroup/azurerm"3version = "0.2.1"4 # insert the 2 required variables here
5}
On the modules documentation page, go to the inputs tab. Review the Required Inputs tab. These are the values that don’t have defaults and are the minimum required values to deploy the module. There are additional inputs in the Optional Inputs section that can be used to configure additional module functionality. Review these inputs and determine which values you would like to define in your AVM module call.
Now, replace the # insert the 2 required variables here comment with the following code to define the module inputs. Our main.tf code should look like the following:
Note how we’ve used the prefix variable and Terraform interpolation syntax to dynamically name the resource group. This allows for module customization and re-use. Also note that even though we chose to use the default module name of avm-res-resources-resourcegroup, we could modify the name of the module if needed.
After saving the file, we want to test our new content. To do this, return to the command line and first run terraform init. Notice how Terraform has downloaded the module code, as well as providers that the module requires. In this case, you can see the azurerm, random, and modtm providers were downloaded.
Let’s now deploy our resource group. First, let’s run a plan operation to review what will be created. Type terraform plan -var-file=development.tfvars and press enter to initiate the plan.
Add the features block
Notice that we get an error indicating that we are Missing required argument and that for the azurerm provider, we need to provide a features argument. The addition of the resource group AVM resource requires that the azurerm provider be installed to provision resources in our module. This provider requires a features block in its provider definition that is missing in our configuration.
Return to the terraform.tf file and add the following content to it. Note how the features block is currently empty. If we needed to activate any feature flags in our module, we could add them here.
Re-run terraform plan -var-file=development.tfvars now that we have updated the features block.
Set the subscription ID
Note that we once again get an error. This time, the error indicates that subscription_id is a required provider property for plan/apply operations. This is a change that was introduced as part of the version 4 release of the AzureRM provider. We need to supply the ID of the deployment subscription where our resources will be created.
First, we need to get the subscription ID value. We will use the portal for this exercise, but using the Azure CLI, PowerShell, or the resource graph will also work to retrieve this value.
Enter Subscriptions in the search field at the top middle of the page.
Select Subscriptions from the services menu in the search drop-down.
Select the subscription you wish to deploy to, from the list of subscriptions.
Find the Subscription ID field on the overview page and click the copy button to copy it to the clipboard.
Secondly, we need to update Terraform so that it can use the subscription ID. There are multiple ways to provide a subscription ID to the provider including adding it to the features block or using environment variables. For this scenario we’ll use environment variables to set the values so that we don’t have to re-enter them on each run. This also keeps us from storing the subscription ID in our code since it is considered a sensitive value. Select a command from the list below based on your operating system.
(Linux/MacOS) - Run the following command with your subscription ID: export ARM_SUBSCRIPTION_ID=<your ID here>
(Windows) - Run the following command with your subscription ID: set ARM_SUBSCRIPTION_ID=<your ID here>
Finally, we should now be able to complete our plan operation by re-running terraform plan -var-file=development.tfvars. Note that the plan will create three resources, two for telemetry and one for the resource group.
Deploy the resource group
We can complete testing by implementing the resource group. Run terraform apply -var-file="development.tfvars" and type yes and press enter when prompted to accept the changes. Terraform will create the resource group and notify you with a Apply complete message and a summary of the resources that were added, changed, and destroyed.
Deploy the Log Analytics Workspace
We can now continue by adding the Log Analytics Workspace to our main.tf file. We will follow a workflow similar to what we did with the resource group.
Copy the module content from the Provision Instructions portion of the page into the main.tf file.
This time, instead of manually supplying module inputs, we will copy module content from one of the examples to minimize the amount of typing required. In most examples, the AVM module call is located at the bottom of the example.
Navigate to the Examples drop-down menu in the documentation and select the default example from the menu. You will see a fully functioning example code which includes the module and any supporting resources. Since we only care about the workspace resource from this example, we can scroll to the bottom of the code block and find the module "log_analytics_workspace" line.
Copy the content between the module brackets with the exception of the line defining the module source. Because these examples are part of the testing methodology for the module, they use a dot reference value (../..) for the module source value which will not work in our module call. To work around this, we copied those values from the provision instructions section of the module documentation in a previous step.
Update the location and resource group name values to reference outputs from the resource group module. Using implicit references such as these allow Terraform to determine the order in which resources should be built.
Update the name field using the prefix variable to allow for customization using a similar pattern to what we used on the resource group.
The Log Analytics module content should look like the following code block. For simplicity, you can also copy this directly to avoid multiple copy/paste actions.
Again, we will need to run terraform init to allow Terraform to initialize a copy of the AVM Log Analytics module.
Now, we can deploy the Log Analytics workspace by running terraform apply -var-file="development.tfvars", typing yes and pressing enter. Note that Terraform will only create the new Log Analytics resources since the resource group already exists. This is one of the key benefits of deploying using Infrastructure as Code (IAC) tools like Terraform.
Note
Note that we ran the terraform apply command without first running terraform plan. Because terraform apply runs a plan before prompting for the apply, we opted to shorten the instructions by skipping the explicit plan step. If you are testing in a live environment, you may want to run the plan step and save the plan as part of your governance or change control processes.
Deploy the Azure Key Vault
Our solution calls for a simple Key Vault implementation to store virtual machine secrets. We’ll follow the same workflow for deploying the Key Vault as we used for the previous resource group and Log Analytics workspace resources. However, since Key Vaults require data roles to manage secrets and keys, we will need to use the RBAC interface and a data resource to configure Role-Based Access Control (RBAC) during the deployment.
Note
For this exercise, we will provision the deployment user with data rights on the Key Vault. In your environment, you will likely want to either provide additional roles as inputs or statically assign users, or groups to the Key Vault data roles. For simplicity we also set the Key Vault to have public access enabled due to us not being able to dictate a private deployment environment. In your environment where your deployment machine will be on a private network it is recommended to restrict public access for the Key Vault.
Before we implement the AVM module for the Key Vault, we want to use a data resource to read the client details about the user context of the current Terraform deployment.
Add the following line to your main.tf file and save it.
Key vaults use a global namespace which means that we will also need to add a randomization resource to allow us to randomize the name to avoid any potential name intersection issues with other Key Vault deployments. We will use Terraform’s random provider to generate the random string which we will append to the Key Vault name. Add the following code to your main module to create the random_string resource we will use for naming.
Copy the module content from the Provision Instructions portion of the page into the main.tf file.
This time, we’re going to select relevant content from the Create secret example to fill out our module.
Copy the name, location, enable_telemetry, resource_group_name, tenant_id, and role_assignments value content from the example and paste it into the new Key Vault module in your solution.
Update the name value to be "${var.prefix}-kv-${random_string.name_suffix.result}"
Update the location and resource_group_name values to the same implicit resource group module references we used in the Log Analytics workspace.
Set the enable_telemetry value to true.
Leave the tenant_id and role_assignments values to the same values that are in the example.
Our architecture calls for us to include a diagnostic settings configuration for each resource that supports it. We’ll use the diagnostic-settings example to copy this content.
Return to the documentation page and select the diagnostic-settings option from the examples drop-down.
Locate the Key Vault resource in the example’s code block and copy the diagnostic_settings value and paste it into the Key Vault module block we’re building in main.tf.
Update the name value to use our prefix variable to allow for name customization.
Update the workspace_resource_id value to be an implicit reference to the output from the previously implemented Log Analytics module (module.avm-res-operationalinsights-workspace.resource_id in our code).
Finally, we will allow public access, so that our deployer machine can add secrets to the Key Vault. If your environment doesn’t allow public access for Key Vault deployments, locate the public IP address of your deployer machine (this may be an external NAT IP for your network) and add it to the network_acls.ip_rules list value using CIDR notation.
Set the network_acls input to null in your module block for the Key Vault.
Your Key Vault module definition should now look like the following:
One of the core values of AVM is the standard configuration for interfaces across modules. The Role Assignments interface we used as part of the Key Vault deployment is a good example of this.
Continue the incremental testing of your module by running another terraform init and terraform apply -var-file="development.tfvars" sequence.
Deploy the NAT Gateway
Our architecture calls for a NAT Gateway to allow virtual machines to access the internet. We will use the NAT Gateway resource_id output in future modules to link the virtual machine subnet.
Copy the module definition and source from the Provision Instructions card from the module main page.
Copy the remaining module content from the default example excluding the subnet associations map, as we will do the association when we build the vnet.
Update the location and resource_group_nameusing implicit references from our resource group module.
Then update each of the name values to use the name_prefix variables.
Review the following code to see each of these changes.
Continue the incremental testing of your module by running another terraform init and terraform apply -var-file="development.tfvars" sequence.
Deploy the Network Security Group
Our architecture calls for a Network Security Group (NSG) allowing SSH access to the virtual machine subnet. We will use the NSG AVM resource module to accomplish this task.
Copy the module definition and source from the Provision Instructions card from the module main page.
Copy the remaining module content from the example_with_NSG_rule example.
Update the location and resource_group_nameusing implicit references from our resource group module.
Update the name value using the name_prefix variable interpolation as we did with the other modules.
Copy the map entry labeled rule02 from the locals nsg_rules map and paste it between two curly braces to create the security_rules attribute in the NSG module we’re building.
Make the following updates to the rule details:
Rename the map key to "rule01" from "rule02".
Update the name to use the var.prefix interpolation and SSH to describe the rule.
Update the destination_port_ranges list to be ["22"].
Upon completion the code for the NSG module should be as follows:
Continue the incremental testing of your module by running another terraform init and terraform apply -var-file="development.tfvars" sequence.
Deploy the Virtual Network
We can now continue the build-out of our architecture by configuring the virtual network (vnet) deployment. This will follow a similar pattern as the previous resource modules, but this time, we will also add some network functions to help us customize the subnet configurations.
Copy the module definition and source from the Provision Instructions card from the module main page.
After looking through the examples, this time, we’ll use the complete example as a source to copy our content.
Copy the resource_group_name, location, name, and address_space lines and replace their values with our deployment specific variables or module references.
We’ll copy the subnets map and duplicate the subnet0 map for each subnet.
Now we will update the map key and name values for each subnet so that they are unique.
Then we’ll use the cidrsubnet function to dynamically generate the CIDR range for each subnet. You can explore the function documentation for more details on how it can be used.
We will also populate the nat_gateway object on subnet0 with the resource_id output from our NAT Gateway module.
To configure the NSG on the VM subnet we need to link it. Add a network_security_group attribute to the subnet0 definition and replace the value with the resource_id output from the NSG module.
Finally, we’ll copy the diagnostic settings from the example and update the implicit references to point to our previously deployed Log Analytics workspace.
After making these changes our virtual network module call code will be as follows:
Note how the Log Analytics workspace reference ends in resource_id. Each AVM module is required to export its Azure resource ID with the resource_id name to allow for consistent references.
Continue the incremental testing of your module by running another terraform init and terraform apply -var-file="development.tfvars" sequence.
Deploy the Bastion service
We want to allow for secure remote access to the virtual machine for configuration and troubleshooting tasks. We’ll use Azure Bastion to accomplish this objective following a similar workflow to our other resources.
Copy the module definition and source from the Provision Instructions card from the module main page.
Copy the remaining module content from the Simple Deployment example.
Update the location and resource_group_nameusing implicit references from our resource group module.
Update the name value using the name_prefix variable interpolation as we did with the other modules.
Finally, update the subnet_id value to include an implicit reference to the bastion keyed subnet from our virtual network module.
Our architecture calls for diagnostic settings to be configured on the Azure Bastion resource. In this case, there aren’t any examples that include this configuration. However, since the diagnostic settings interface is one of the standard interfaces in Azure Verified Modules, we can just copy the interface definition from our virtual network module.
Locate the virtual network module and copy the diagnostic_settings value from it.
Paste the diagnostic_settings value into the code for our Bastion module.
Update the diagnostic setting’s name value from vnet to Bastion.
The new code we added for the Bastion resource will be as follows:
Pay attention to the subnet_id syntax. In the virtual network module, the subnets are created as a sub-module allowing us to reference each of them using the map key that was defined in the subnets input. Again, we see the consistent output naming with the resource_id output for the sub-module.
Continue the incremental testing of your module by running another terraform init and terraform apply -var-file="development.tfvars" sequence.
Deploy the virtual machine
The final step in our deployment will be our application virtual machine. We’ve had good success with our workflow so far, so we’ll use it for this step as well.
Copy the module definition and source from the Provision Instructions card from the module main page.
Copy the remaining module content from the linux_default example.
Update the location and resource_group_nameusing implicit references from our resource group module.
To be compliant with Well Architected Framework guidance we encourage defining a zone if your region supports it. Update the zone input to 1.
Update the sku_size input to “Standard_D2s_v5”.
Update the name values using the name_prefix variable interpolation as we did with the other modules and include the output from the random_string.name_suffix resource to add uniqueness.
Set the account_credentials.key_vault_configuration.resource_id value to reference the resource_id output from the Key Vault module.
Update the private_ip_subnet_resource_id value to an implicit reference to the subnet0 subnet output from the virtual network module.
Because the default Linux example doesn’t include diagnostic settings, we need to add that content in a different way. Since the diagnostic settings interface has a standard schema, we can copy the diagnostic_settings input from our virtual network module.
Locate the virtual network module in your code and copy the diagnostic_settings map from it.
Paste the diagnostic_settings content into your virtual machine module code.
Update the name value to reflect that it applies to the virtual machine.
The new code we added for the virtual machine resource will be as follows:
Continue the incremental testing of your module by running another terraform init and terraform apply -var-file="development.tfvars" sequence.
Creating the outputs.tf file
The final piece of our module is to export any values that may need to be consumed by module users. From our architecture, we’ll export the resource group name and the virtual machine resource name.
Create an outputs.tf file in your IDE.
Create an output named resource_group_name and set the value to an implicit reference to the resource group modules name output. Include a brief description for the output.
Create an output named virtual_machine_name and set the value to an implicit reference to the virtual machine module’s name output. Include a brief description for the output.
The new code we added for the outputs will be as follows:
➕ Expand Code
1output"resource_group_name" {
2value = module.avm-res-resources-resourcegroup.name3description = "The resource group name where the resources are deployed"4}
56output"virtual_machine_name" {
7value = module.avm-res-compute-virtualmachine.name8description = "The name of the virtual machine"9}
Because no new modules were created, we don’t need to run terraform init to test this change. Run terraform apply -var-file="development.tfvars" to see the new outputs that have been created.
Update the terraform.tf file
It is a recommended practice to define the required versions of the providers for your module to ensure consistent behavior when it is being run. In this case we are going to be slightly permissive and allow increases in minor and patch versions to fluctuate, since those are not supposed to include breaking changes. In a production environment, you would likely want to pin on a specific version to guarantee behavior.
Run terraform init to review the providers and versions that are currently installed.
Update your terraform.tf file’s required providers field for each provider listed in the downloaded providers.
The updated code we added for the providers in the terraform.tf file will be as follows:
Congratulations on successfully implementing a solution using Azure Verified Modules! You were able to build out our sample architecture using module documentation and taking advantage of features like standard interfaces and pre-defined defaults to simplify the development experience.
Note
This was a long exercise and mistakes can happen. If you’re getting errors or a resource is incomplete and you want to see the final main.tf, expand the following code block to see the full file.
AVM modules provide several key advantages over writing raw Terraform templates:
Simplified Resource Configuration: AVM modules handle much of the complex configuration work behind the scenes
Built-in Recommended Practices: The modules implement many of Microsoft’s recommended practices by default
Consistent Outputs: Each module exposes a consistent set of outputs that can be easily referenced
Reduced Boilerplate Code: What would normally require hundreds of lines of Terraform code can be accomplished in a fraction of the space
As you continue your journey with Azure and AVM, remember that this approach can be applied to more complex architectures as well. The modular nature of AVM allows you to mix and match components to build solutions that meet your specific needs while adhering to Microsoft’s Well-Architected Framework.
By using AVM modules as building blocks, you can focus more on your solution architecture and less on the intricacies of individual resource configurations, ultimately leading to faster development cycles and more reliable deployments.
Additional exercises
For additional learning, it can be helpful to experiment with modifying this solution. Here are some ideas you can try if you have time and would like to experiment further.
Use the managed_identities interface to add a system assigned managed identity to the virtual machine and give it Key Vault Administrator rights on the Key Vault.
Use the tags interface to assign tags directly to one or more resources.
Add an Azure Monitoring Agent extension to the virtual machine resource.
Add additional inputs like VM sku to your module to make it more customizable. Be sure to update the code and tfvars files to match.
Clean up your environment
Once you have completed this set of exercises, it is a good idea to clean up your resources to avoid incurring costs for them. This can be done typing terraform destroy -var-file=development.tfvars and entering yes when prompted.
Solution Development
Considerations and steps of Solution Development
Decide on the IaC language (Bicep or Terraform)
Decide on the module sourcing method (public registry, private registry, inner-sourcing)
Decide on the orchestration method (template or pipeline)
Identify the resources needed for the solution (are they all available in AVM?)
Implement, validate, deploy, test the solution
Questions to cover on this page
Pick a realistically complex solution and demonstrate how to build it using AVM modules
Best practices for coding (link to official language specific guidance AND AVM specs where/if applicable)
Best practices for input and output parameters
Next steps
To be covered in separate, future articles.
To make this solution enterprise-ready, you need to consider the following:
Deploy with DevOps tools and practices (e.g., CI/CD in Azure DevOps, GitHub Actions, etc.)
Deploy into Azure Landing Zones (ALZ)
Make sure the solution follows the recommendations of the Well-Architected Framework (WAF) and it’s compliant with and integrates into your organization’s policies and standards, e.g.:
Don’t use latest, but a specific version of the module
Don’t expose secrets in output parameters/command line/logs/etc.
Don’t use hard-coded values, but use parameters and variables
Quickstart Guide
This QuickStart guide offers step-by-step instructions for integrating Azure Verified Modules (AVM) into your solutions. It includes the initial setup, essential tools, and configurations required to deploy and manage your Azure resources efficiently using AVM.
The AVM Key Vault resource module, used as an example in this chapter, simplifies the deployment and management of Azure Key Vaults, ensuring secure storage and access to your secrets, keys, and certificates.
Leveraging Azure Verified Modules
Using AVM ensures that your infrastructure-as-code deployments follow Microsoft’s best practices and guidelines, providing a consistent and reliable foundation for your cloud solutions. AVM helps accelerate your development process, reduce the risk of misconfigurations, and enhance the security and compliance of your applications.
Using default values
The default values provided by AVM are generally safe, as they follow best practices and ensure a secure and reliable setup. However, it is important to review these values to ensure they meet your specific requirements and compliance needs. Customizing the default values may be necessary to align with your organization’s policies and the specific needs of your solution.
Exploring examples and module features
You can find examples and detailed documentation for each AVM module in their respective code repository’s README.MD file, which details features, input parameters, and outputs. The module’s documentation also provides comprehensive usage examples, covering various scenarios and configurations. Additionally, you can explore the module’s source code repository. This information will help you understand the full capabilities of the module and how to effectively integrate it into your solutions.
Subsections of Quickstart
Terraform Quickstart Guide
Introduction
This guide explains how to use an Azure Verified Modules (AVM) in your Terraform workflow. With AVM modules, you can quickly deploy and manage Azure infrastructure without writing extensive code from scratch.
In this guide, you will deploy a Key Vault resource and generate and store a key.
This article is intended for a typical ‘infra-dev’ user (cloud infrastructure professional) who is new to Azure Verified Modules and wants to learn how to deploy a module in the easiest way using AVM. The user has a basic understanding of Azure and Terraform.
Before you begin, ensure you have these tools installed in your development environment.
Module Discovery
Find your module
In this scenario, you need to deploy a Key Vault resource and some of its child resources, such as a key. Let’s find the AVM module that will help us achieve this.
There are two primary ways for locating published Terraform Azure Verified Modules:
The easiest way to find published AVM Terraform modules is by searching the Terraform Registry. Follow these steps to locate a specific module, as shown in the video above.
In the search bar at the top of the screen type avm. Optionally, append additional search terms to narrow the search results. (e.g., avm key vault for AVM modules with Key Vault in the name.)
Select see all to display the full list of published modules matching your search criteria.
Find the module you wish to use and select it from the search results.
Note
It is possible to discover other unofficial modules with avm in the name using this search method. Look for the Partner tag in the module title to determine if the module is part of the official set.
Use the AVM Terraform Module Index
Searching the Azure Verified Modules indexes is the most complete way to discover published as well as planned modules - shown as proposed. As presented in the video above, use the following steps to locate a specific module on the AVM website:
Expand the Module Indexes menu item and select the Terraform sub-menu item.
Select the menu item for the module type you are searching for: Resource, Pattern, or Utility.
Note
Since the Key Vault module used as an example in this guide is published as an AVM resource module, it can be found under the resource modules section in the AVM Terraform module index.
A detailed description of each module classification type can be found under the related section here.
Select the Published modules link from the table of contents at the top of the page.
Use the in-page search feature of your browser (in most Windows browsers you can access it using the CTRL + F keyboard shortcut).
Enter a search term to find the module you are looking for - e.g., Key Vault.
Move through the search results until you locate the desired module. If you are unable to find a published module, return to the table of contents and expand the All modules link to search both published and proposed modules - i.e., modules that are planned, likely in development but not published yet.
After finding the desired module, click on the module’s name. This link will lead you to the official HashiCorp Terraform Registry page for the module where you can find the module’s documentation and examples.
Module details and examples
Once you have identified the AVM module in the Terraform Registry you can find detailed information about the module’s functionality, components, input parameters, outputs and more. The documentation also provides comprehensive usage examples, covering various scenarios and configurations.
Explore the Key Vault module’s documentation and usage examples to understand its functionality, input variables, and outputs.
Note the Examples drop-down list and explore each example
Review the Readme tab to see module provider minimums, a list of resources and data sources used by the module, a nicely formatted version of the inputs and outputs, and a reference to any submodules that may be called.
Explore the Inputs tab and observe how each input has a detailed description and a type definition for you to use when adding input values to your module configuration.
Explore the Outputs tab and review each of the outputs that are exported by the AVM module for use by other modules in your deployment.
Finally, review the Resources tab to get a better understanding of the resources defined in the module.
In this example, your will to deploy a secret in a new Key Vault instance without needing to provide other parameters. The AVM Key Vault resource module provides these capabilities and does so with security and reliability being core principles. The default settings of the module also apply the recommendations of the Well Architected Framework where possible and appropriate.
Note how the create-key example seems to do what you need to achieve.
Create your new solution using AVM
Now that you have found the module details, you can use the content from the Terraform Registry to speed up your development in the following ways:
Option 1: Create a solution using AVM module examples: duplicate a module example and edit it for your needs. This is useful if you are starting without any existing infrastructure and need to create supporting resources like resource groups as part of your deployment.
Option 2: Create a solution by changing the AVM module input values: add the AVM module to an existing solution that already includes other resources. This method requires some knowledge of the resource(s) being deployed so that you can make choices about optional features configured in your solution’s version of the module.
Each deployment method includes a section below so that you can choose the method which best fits your needs.
Note
For Azure Key Vaults, the name must be globally unique. When you deploy the Key Vault, ensure you select a name that is alphanumeric, twenty-four characters or less, and unique enough to ensure no one else has used the name for their Key Vault. If the name has been used previously, you will get an error.
Option 1: Create a solution using AVM module examples
Leverage the following steps as a template for how to leverage examples for bootstrapping your new solution code. The Key Vault resource module is used here as an example, but in practice you may choose any module that applies to your scenario.
Locate and select the Examples drop down menu in the middle of the Key Vault module page.
From the drop-down list select an example whose name most closely aligns with your scenario - e.g., create-key.
When the example page loads, read the example description to determine if this is the desired example. If it is not, return to the module main page, and select a different example until you are satisfied that the example covers the scenario you are trying to deploy. If you are unable to find a suitable example, leverage the last two steps in the option 2 instructions to modify the inputs of the selected example to match your requirements.
Scroll to the code block for the example and select the Copy button on the top right of the block to copy the content to the clipboard.
➕ Click here to copy the sample code from the video.
provider"azurerm" {
features {}
}
terraform {
required_version = "~> 1.9"required_providers {
azurerm = {
source = "hashicorp/azurerm"version = ">= 3.71" }
http = {
source = "hashicorp/http"version = "~> 3.4" }
random = {
source = "hashicorp/random"version = "~> 3.5" }
}
}
module"regions" {
source = "Azure/avm-utl-regions/azurerm"version = "0.1.0"}# This allows us to randomize the region for the resource group.
resource"random_integer""region_index" {
max = length(module.regions.regions) -1min = 0}# This ensures you have unique CAF compliant names for our resources.
module"naming" {
source = "Azure/naming/azurerm"version = "0.3.0"}
resource"azurerm_resource_group""this" {
location = module.regions.regions[random_integer.region_index.result].namename = module.naming.resource_group.name_unique}# Get current IP address for use in KV firewall rules
data"http""ip" {
url = "https://api.ipify.org/"retry {
attempts = 5max_delay_ms = 1000min_delay_ms = 500 }
}
data"azurerm_client_config""current" {}
module"key_vault" {
source = "Azure/avm-res-keyvault-vault/azurerm"name = module.naming.key_vault.name_uniquelocation = azurerm_resource_group.this.locationenable_telemetry = var.enable_telemetryresource_group_name = azurerm_resource_group.this.nametenant_id = data.azurerm_client_config.current.tenant_idpublic_network_access_enabled = truekeys = {
cmk_for_storage_account = {
key_opts = [
"decrypt",
"encrypt",
"sign",
"unwrapKey",
"verify",
"wrapKey" ]
key_type:"RSA"name = "cmk-for-storage-account"key_size = 2048 }
}
role_assignments = {
deployment_user_kv_admin = {
role_definition_id_or_name = "Key Vault Administrator"principal_id = data.azurerm_client_config.current.object_id }
}
wait_for_rbac_before_key_operations = {
create = "60s" }
network_acls = {
bypass = "AzureServices"ip_rules = ["${data.http.ip.response_body}/32"]
}
}
In your IDE - Visual Studio Code in our example - create the main.tf file for your new solution.
Paste the content from the clipboard into main.tf.
AVM examples frequently use naming and/or region selection AVM utility modules to generate deployment region and/or naming values as well as any default values for required fields. If you want to use a specific region name or other custom resource values, remove the existing region and naming module calls and replace example input values with the new desired custom input values.
Once supporting resources such as resource groups have been modified, locate the module call for the AVM module - i.e., module "keyvault".
AVM module examples use dot notation for a relative reference that is useful during module testing. However, you will need to replace the relative reference with a source reference that points to the Terraform Registry source location. In most cases, this source reference has been left as a comment in the module example to simplify replacing the existing source dot reference. Perform the following two actions to update the source:
Delete the existing source definition that uses a dot reference - i.e., source = "../../".
Uncomment the Terraform Registry source reference by deleting the # sign at the start of the commented source line - i.e., source = "Azure/avm-res-keyvault-vault/azurerm".
Note
If the module example does not include a commented Terraform Registry source reference, you will need to copy it from the module’s main documentation page. Use the following steps to do so:
Use the breadcrumbs to leave the example documentation and return to the module’s primary Terraform Registry documentation page.
Locate the Provision Instructions box on the right side of the module’s Terraform Registry page in your web browser.
Select the second line that starts with source = from the code block - e.g., source = "Azure/avm-res-keyvault-vault/azurerm". Copy it onto the clipboard.
Return to your code solution and Paste the clipboard’s content where you previously deleted the source dot reference - e.g., source = "../../".
AVM module examples use a variable to enable or disable the telemetry collection. Update the enable_telemetry input value to true or false. - e.g. enable_telemetry = true
Save your main.tf file changes and then proceed to the guide section for running your solution code.
Option 2: Create a solution by changing the AVM module input values
Click here to copy the sample code from the video.
Use the following steps as a guide for the custom implementation of an AVM Module in your solution code. This instruction path assumes that you have an existing Terraform file that you want to add the AVM module to.
Locate the Provision Instructions box on the right side of the module’s Terraform Registry page in your web browser.
Select the module template code from the code block and Copy it onto the clipboard.
Switch to your IDE and Paste the contents of the clipboard into your solution’s .tf Terraform file - main.tf in our example.
Return to the module’s Terraform Registry page in the browser and select the Inputs tab.
Review each input and add the inputs with the desired target value to the solution’s code - i.e., name = "custom_name".
Once you are satisfied that you have included all required inputs and any optional inputs, Save your file and continue to the next section.
Deploy your solution
After completing your solution development, you can move to the deployment stage. Follow these steps for a basic Terraform workflow:
Open the command line and login to Azure using the Azure cli
azlogin
If your account has access to multiple tenants, you may need to modify the command to az login --tenant <tenant id> where “<tenant id>” is the guid for the target tenant.
After logging in, select the target subscription from the list of subscriptions that you have access to.
Change the path to the directory where your completed terraform solution files reside.
Note
Many AVM modules depend on the AzureRM 4.0 Terraform provider which mandates that a subscription id is configured. If you receive an error indicating that subscription_id is a required provider property, you will need to set a subscription id value for the provider. For Unix based systems (Linux or MacOS) you can configure this by running export ARM_SUBSCRIPTION_ID=<your subscription guid> on the command line. On Microsoft Windows, you can perform the same operation by running set ARM_SUBSCRIPTION_ID="<your subscription guid>" from the Windows command prompt or by running $env:ARM_SUBSCRIPTION_ID="<your subscription guid>" from a powershell prompt. Replace the “<your subscription id>” notation in each command with your Azure subscription’s unique id value.
Initialize your Terraform project. This command downloads the necessary providers and modules to the working directory.
terraforminit
Before applying the configuration, it is good practice to validate it to ensure there are no syntax errors.
terraformvalidate
Create a deployment plan. This step shows what actions Terraform will take to reach the desired state defined in your configuration.
terraformplan
Review the plan to ensure that only the desired actions are in the plan output.
Apply the configuration and create the resources defined in your configuration file. This command will prompt you to confirm the deployment prior to making changes. Type yes to create your solution’s infrastructure.
terraformapply
Info
If you are confident in your changes, you can add the -auto-approve switch to bypass manual approval: terraform apply -auto-approve
Once the deployment completes, validate that the infrastructure is configured as desired.
Info
A local terraform.tfstate file and a state backup file have been created during the deployment. The use of local state is acceptable for small temporary configurations, but production or long-lived installations should use a remote state configuration where possible. Configuring remote state is out of scope for this guide, but you can find details on using an Azure storage account for this purpose in the Microsoft Learn documentation.
Clean up your environment
When you are ready, you can remove the infrastructure deployed in this example. Use the following command to delete all resources created by your deployment:
terraformdestroy
Note
Most Key Vault deployment examples activate soft-delete functionality as a default. The terraform destroy command will remove the Key Vault resource but does not purge a soft-deleted vault. You may encounter errors if you attempt to re-deploy a Key Vault with the same name during the soft-delete retention window. If you wish to purge the soft-delete for this example you can run az keyvault purge -n <keyVaultName> -l <regionName> using the Azure CLI, or Remove-AzKeyVault -VaultName "<keyVaultName>" -Location "<regionName>" -InRemovedState using Azure PowerShell.
Congratulations, you have successfully leveraged Terraform and AVM to deploy resources in Azure!
Tip
We welcome your contributions and feedback to help us improve the AVM modules and the overall experience for the community!
No specifications were changed in the last 30 days.
How to navigate the specifications?
The “Module Specifications” section uses tags to dynamically render content based on the selected attributes, such as the IaC language, module classification, category, severity and more. The tags are defined in header of each specification page.
To make it easier for module owners and contributors to navigate the documentation, the specifications are grouped to distinct pages by the IaC language (Bicep | Terraform) and module classification ( resource | pattern | utility). The specifications on each page are further ordered by the category (e.g., Composition, CodeStyle, Testing, etc.), severity of the requirements (MUST | SHOULD | MAY) and at what stage of the module’s lifecycle the specification is typically applicable (Initial | BAU | EOL).
To find what you need, simply decide which IaC language you’d like develop in and what classification your module falls under, then navigate to the respective page to find the specifications that are relevant to you.
Info
All specifications have a 4-9 character long unique ID - a combination of letters and numbers. These letters only carry legacy meaning only leveraged by the AVM core team and are no longer used to group the specifications in any visible way. The ID is used to reference the specification in the code, documentation, and discussions.
Specification Tags
The following tags are used to qualify the specifications:
Each tag is a concatenation of exactly one of the keys and one of the values, e.g., Language-Bicep, Class-Resource, Type-Functional, etc. When it’s marked as Multiple, it means that the tag can have multiple values, e.g., Language-Bicep, Language-Terraform, or Persona-Owner, Persona-Contributor, etc. When it’s marked as Single, it means that the tag can have only one value, e.g., Type-Functional, Lifecycle-Initial, etc.
➕ Click here to see the definition of the Severity, Persona, Lifecycle and Validation tags...
Who is this specification for? The Owner is the module owner, while the Contributor is anyone who contributes to the module.
Lifecycle
When is this specification mostly relevant?
The Initial stage is when the module is being developed first - e.g., naming related specs are labeled with Lifecycle-Initial as the naming of the module only happens once: at the beginning of their life.
The BAU (business as usual) stage is at any time during the module’s typical lifecycle - e.g., specs that describe coding standards are relevant throughout the module’s life, for any time a new module version is released.
The EOL (end of life) stage is when the module is being decommissioned - e.g., specs describing how a module should be retired are labeled with Lifecycle-EOL.
Validation
How is this specification checked/validated/enforced?
Manual means that the specification is manually enforced at the time of the module review (at the time of the first or any subsequent module version release).
CI/Informational means that the module is checked against the specification by a CI pipeline, but the failure is only informational and doesn’t block the module release.
CI/Enforced means that the specification is automatically enforced by a CI pipeline, and the failure blocks the module release.
Note: the BCP/ or TF/ prefix is required as shared (language-agnostic) specifications may have different level of validation/enforcement per each language - e.g., it is possible that a specification is enforced by a CI pipeline for terraform modules, while it is manually enforced for Terraform modules.
Why are there language specific specifications?
While every effort is being made to standardize requirements and implementation details across all languages (and most specifications in fact, are applicable to all), it is expected that some of the specifications will be different between their respective languages to ensure we follow the best practices and leverage features of each language.
How to read the specifications?
Important
The key words “MUST”, “MUST NOT”, “REQUIRED”, “SHALL”, “SHALL NOT”, “SHOULD”, “SHOULD NOT”, “RECOMMENDED”, “MAY”, and “OPTIONAL” in this document are to be interpreted as described in RFC 2119.
As you’re developing/maintaining a module as a module owner or contributor, you need to ensure that your module adheres to the specifications outlined in this section. The specifications are designed to ensure that all AVM modules are consistent, secure, and compliant with best practices.
There are 3 levels of specifications:
MUST: These are mandatory requirements that MUST be followed.
SHOULD: These are recommended requirements that SHOULD be followed, unless there are good reasons for not to.
MAY: These are optional requirements that MAY be followed at the module owner’s/contributor’s discretion.
Subsections of Module Specifications
Terraform Specifications
Specifications by Category and Module Classification
Any updates to existing or new specifications for Terraform must be submitted as a draft for review by Azure Terraform PG/Engineering(@Azure/terraform-avm) and AVM core team(@Azure/avm-core-team).
Important
Provider Versatility: Users have the autonomy to choose between AzureRM, AzAPI, or a combination of both, tailored to the specific complexity of module requirements.
What changed recently?
No specifications were changed in the last 30 days.
Subsections of Terraform
Terraform Interfaces
This chapter details the interfaces/schemas for the AVM Resource Modules features/extension resources as referenced in RMFR4 and RMFR5.
Diagnostic Settings
Important
Allowed values for logs and metric categories or category groups MUST NOT be specified to keep the module implementation evergreen for any new categories or category groups added by RPs, without module owners having to update a list of allowed values and cut a new release of their module.
variable"diagnostic_settings" {
type = map(object({
name = optional(string, null)
log_categories = optional(set(string), [])
log_groups = optional(set(string), ["allLogs"])
metric_categories = optional(set(string), ["AllMetrics"])
log_analytics_destination_type = optional(string, "Dedicated")
workspace_resource_id = optional(string, null)
storage_account_resource_id = optional(string, null)
event_hub_authorization_rule_resource_id = optional(string, null)
event_hub_name = optional(string, null)
marketplace_partner_resource_id = optional(string, null)
}))
default = {}
nullable = falsevalidation {
condition = alltrue([for_, vin var.diagnostic_settings: contains(["Dedicated", "AzureDiagnostics"], v.log_analytics_destination_type)])
error_message = "Log analytics destination type must be one of: 'Dedicated', 'AzureDiagnostics'." }
validation {
condition = alltrue(
[
for_, vin var.diagnostic_settings:v.workspace_resource_id!=null||v.storage_account_resource_id!=null||v.event_hub_authorization_rule_resource_id!=null||v.marketplace_partner_resource_id!=null ]
)
error_message = "At least one of `workspace_resource_id`, `storage_account_resource_id`, `marketplace_partner_resource_id`, or `event_hub_authorization_rule_resource_id`, must be set." }
description = <<DESCRIPTION A map of diagnostic settings to create on the Key Vault. The map key is deliberately arbitrary to avoid issues where map keys maybe unknown at plan time.
- `name` - (Optional) The name of the diagnostic setting. One will be generated if not set, however this will not be unique if you want to create multiple diagnostic setting resources.
- `log_categories` - (Optional) A set of log categories to send to the log analytics workspace. Defaults to `[]`.
- `log_groups` - (Optional) A set of log groups to send to the log analytics workspace. Defaults to `["allLogs"]`.
- `metric_categories` - (Optional) A set of metric categories to send to the log analytics workspace. Defaults to `["AllMetrics"]`.
- `log_analytics_destination_type` - (Optional) The destination type for the diagnostic setting. Possible values are `Dedicated` and `AzureDiagnostics`. Defaults to `Dedicated`.
- `workspace_resource_id` - (Optional) The resource ID of the log analytics workspace to send logs and metrics to.
- `storage_account_resource_id` - (Optional) The resource ID of the storage account to send logs and metrics to.
- `event_hub_authorization_rule_resource_id` - (Optional) The resource ID of the event hub authorization rule to send logs and metrics to.
- `event_hub_name` - (Optional) The name of the event hub. If none is specified, the default event hub will be selected.
- `marketplace_partner_resource_id` - (Optional) The full ARM resource ID of the Marketplace resource to which you would like to send Diagnostic LogsLogs.
DESCRIPTION } # Sample resource
resource"azurerm_monitor_diagnostic_setting""this" {
for_each = var.diagnostic_settingsname = each.value.name!=null? each.value.name:"diag-${var.name}"target_resource_id = azurerm_<MY_RESOURCE>.this.idstorage_account_id = each.value.storage_account_resource_ideventhub_authorization_rule_id = each.value.event_hub_authorization_rule_resource_ideventhub_name = each.value.event_hub_namepartner_solution_id = each.value.marketplace_partner_resource_idlog_analytics_workspace_id = each.value.workspace_resource_idlog_analytics_destination_type = each.value.log_analytics_destination_typedynamic"enabled_log" {
for_each = each.value.log_categoriescontent {
category = enabled_log.value }
}
dynamic"enabled_log" {
for_each = each.value.log_groupscontent {
category_group = enabled_log.value }
}
dynamic"enabled_metric" {
for_each = each.value.metric_categoriescontent {
category = enabled_metric.value }
}
}
In the provided example for Diagnostic Settings, both logs and metrics are enabled for the associated resource. However, it is IMPORTANT to note that certain resources may not support both diagnostic setting types/categories. In such cases, the resource configuration MUST be modified accordingly to ensure proper functionality and compliance with system requirements.
Role Assignments
variable"role_assignments" {
type = map(object({
role_definition_id_or_name = stringprincipal_id = stringdescription = optional(string, null)
skip_service_principal_aad_check = optional(bool, false)
condition = optional(string, null)
condition_version = optional(string, null)
delegated_managed_identity_resource_id = optional(string, null)
principal_type = optional(string, null)
}))
default = {}
nullable = falsedescription = <<DESCRIPTION A map of role assignments to create on the <RESOURCE>. The map key is deliberately arbitrary to avoid issues where map keys maybe unknown at plan time.
- `role_definition_id_or_name` - The ID or name of the role definition to assign to the principal.
- `principal_id` - The ID of the principal to assign the role to.
- `description` - (Optional) The description of the role assignment.
- `skip_service_principal_aad_check` - (Optional) If set to true, skips the Azure Active Directory check for the service principal in the tenant. Defaults to false.
- `condition` - (Optional) The condition which will be used to scope the role assignment.
- `condition_version` - (Optional) The version of the condition syntax. Leave as `null` if you are not using a condition, if you are then valid values are '2.0'.
- `delegated_managed_identity_resource_id` - (Optional) The delegated Azure Resource Id which contains a Managed Identity. Changing this forces a new resource to be created. This field is only used in cross-tenant scenario.
- `principal_type` - (Optional) The type of the `principal_id`. Possible values are `User`, `Group` and `ServicePrincipal`. It is necessary to explicitly set this attribute when creating role assignments if the principal creating the assignment is constrained by ABAC rules that filters on the PrincipalType attribute.
> Note: only set `skip_service_principal_aad_check` to true if you are assigning a role to a service principal.
DESCRIPTION }
locals {
role_definition_resource_substring = "providers/Microsoft.Authorization/roleDefinitions" } # Example resource declaration
resource"azurerm_role_assignment""this" {
for_each = var.role_assignmentsscope = azurerm_MY_RESOURCE.this.idrole_definition_id = strcontains(lower(each.value.role_definition_id_or_name), lower(local.role_definition_resource_substring)) ? each.value.role_definition_id_or_name:nullrole_definition_name = strcontains(lower(each.value.role_definition_id_or_name), lower(local.role_definition_resource_substring)) ?null: each.value.role_definition_id_or_nameprincipal_id = each.value.principal_idcondition = each.value.conditioncondition_version = each.value.condition_versionskip_service_principal_aad_check = each.value.skip_service_principal_aad_checkdelegated_managed_identity_resource_id = each.value.delegated_managed_identity_resource_idprincipal_type = each.value.principal_type }
Details on child, extension and cross-referenced resources:
Modules MUST support Role Assignments on child, extension and cross-referenced resources as well as the primary resource via parameters/variables
Resource Locks
variable"lock" {
type = object({
kind = stringname = optional(string, null)
})
default = nulldescription = <<DESCRIPTION Controls the Resource Lock configuration for this resource. The following properties can be specified:
- `kind` - (Required) The type of lock. Possible values are `\"CanNotDelete\"` and `\"ReadOnly\"`.
- `name` - (Optional) The name of the lock. If not specified, a name will be generated based on the `kind` value. Changing this forces the creation of a new resource.
DESCRIPTIONvalidation {
condition = var.lock!=null? contains(["CanNotDelete", "ReadOnly"], var.lock.kind) :trueerror_message = "Lock kind must be either `\"CanNotDelete\"` or `\"ReadOnly\"`." }
} # Example resource implementation
resource"azurerm_management_lock""this" {
count = var.lock!=null?1:0lock_level = var.lock.kindname = coalesce(var.lock.name, "lock-${var.lock.kind}")
scope = azurerm_MY_RESOURCE.this.idnotes = var.lock.kind =="CanNotDelete"?"Cannot delete the resource or its child resources.":"Cannot delete or modify the resource or its child resources." }
  lock = {
    name = "lock-{resourcename}" # optional
    type = "CanNotDelete"
  }
Details on child and extension resources:
Locks SHOULD be able to be set for child resources of the primary resource in resource modules
Details on cross-referenced resources:
Locks MUST be automatically applied to cross-referenced resources if the primary resource has a lock applied.
This MUST also be able to be turned off for each of the cross-referenced resources by the module consumer via a parameter/variable if they desire
An example of this is a Key Vault module that has a Private Endpoints enabled. If a lock is applied to the Key Vault via the lock parameter/variable then the lock should also be applied to the Private Endpoint automatically, unless the privateEndpointLock/private_endpoint_lock (example name) parameter/variable is set to None
Important
In Terraform, locks become part of the resource graph and suitable depends_on values should be set. Note that, during a destroy operation, Terraform will remove the locks before removing the resource itself, reducing the usefulness of the lock somewhat. Also note, due to eventual consistency in Azure, use of locks can cause destroy operations to fail as the lock may not have been fully removed by the time the destroy operation is executed.
Tags
variable"tags" {
type = map(string)
default = nulldescription = "(Optional) Tags of the resource." }
Details on child, extension and cross-referenced resources:
Tags MUST be automatically applied to child, extension and cross-referenced resources, if tags are applied to the primary resource.
By default, all tags set for the primary resource will automatically be passed down to child, extension and cross-referenced resources.
This MUST be able to be overridden by the module consumer so they can specify alternate tags for child, extension and cross-referenced resources, if they desire via a parameter/variable
If overridden by the module consumer, no merge/union of tags will take place from the primary resource and only the tags specified for the child, extension and cross-referenced resources will be applied
Managed Identities
variable"managed_identities" {
type = object({
system_assigned = optional(bool, false)
user_assigned_resource_ids = optional(set(string), [])
})
default = {}
nullable = falsedescription = <<DESCRIPTION Controls the Managed Identity configuration on this resource. The following properties can be specified:
- `system_assigned` - (Optional) Specifies if the System Assigned Managed Identity should be enabled.
- `user_assigned_resource_ids` - (Optional) Specifies a list of User Assigned Managed Identity resource IDs to be assigned to this resource.
DESCRIPTION } # Helper locals to make the dynamic block more readable
# There are three attributes here to cater for resources that
# support both user and system MIs, only system MIs, and only user MIs
locals {
managed_identities = {
system_assigned_user_assigned = (var.managed_identities.system_assigned|| length(var.managed_identities.user_assigned_resource_ids) >0) ? {
this = {
type = var.managed_identities.system_assigned&& length(var.managed_identities.user_assigned_resource_ids) >0?"SystemAssigned, UserAssigned": length(var.managed_identities.user_assigned_resource_ids) >0?"UserAssigned":"SystemAssigned"user_assigned_resource_ids = var.managed_identities.user_assigned_resource_ids }
} : {}
system_assigned = var.managed_identities.system_assigned? {
this = {
type = "SystemAssigned" }
} : {}
user_assigned = length(var.managed_identities.user_assigned_resource_ids) >0? {
this = {
type = "UserAssigned"user_assigned_resource_ids = var.managed_identities.user_assigned_resource_ids }
} : {}
}
} ## Resources supporting both SystemAssigned and UserAssigned
dynamic"identity" {
for_each = local.managed_identities.system_assigned_user_assignedcontent {
type = identity.value.typeidentity_ids = identity.value.user_assigned_resource_ids }
} ## Resources that only support SystemAssigned
dynamic"identity" {
for_each = identity.managed_identities.system_assignedcontent {
type = identity.value.type }
} ## Resources that only support UserAssigned
dynamic"identity" {
for_each = local.managed_identities.user_assignedcontent {
type = identity.value.typeidentity_ids = identity.value.user_assigned_resource_ids }
}
Reason for differences in User Assigned data type in languages:
We do not forsee the Managed Identity Resource Provider team to ever add additional properties within the empty object ({}) value required on the input of a User Assigned Managed Identity.
In Bicep we therefore have removed the need for this to be declared and just converted it to a simple array of Resource IDs
However, in Terraform we have left it as a object/map as this simplifies for_each and other loop mechanisms and provides more consistency in plan, apply, destroy operations
Especially when adding, removing or changing the order of the User Assigned Managed Identities as they are declared
Private Endpoints
# In this example we only support one service, e.g. Key Vault.
# If your service has multiple private endpoint services, then expose the service name.
# This variable is used to determine if the private_dns_zone_group block should be included,
# or if it is to be managed externally, e.g. using Azure Policy.
# https://github.com/Azure/terraform-azurerm-avm-res-keyvault-vault/issues/32
# Alternatively you can use AzAPI, which does not have this issue.
variable"private_endpoints_manage_dns_zone_group" {
type = booldefault = truenullable = falsedescription = "Whether to manage private DNS zone groups with this module. If set to false, you must manage private DNS zone groups externally, e.g. using Azure Policy." }
variable"private_endpoints" {
type = map(object({
name = optional(string, null)
role_assignments = optional(map(object({
role_definition_id_or_name = stringprincipal_id = stringdescription = optional(string, null)
skip_service_principal_aad_check = optional(bool, false)
condition = optional(string, null)
condition_version = optional(string, null)
delegated_managed_identity_resource_id = optional(string, null)
principal_type = optional(string, null)
})), {})
lock = optional(object({
kind = stringname = optional(string, null)
}), null)
tags = optional(map(string), null)
subnet_resource_id = stringsubresource_name = string # NOTE: `subresource_name` can be excluded if the resource does not support multiple sub resource types (e.g. storage account supports blob, queue, etc)
private_dns_zone_group_name = optional(string, "default")
private_dns_zone_resource_ids = optional(set(string), [])
application_security_group_associations = optional(map(string), {})
private_service_connection_name = optional(string, null)
network_interface_name = optional(string, null)
location = optional(string, null)
resource_group_name = optional(string, null)
ip_configurations = optional(map(object({
name = stringprivate_ip_address = string })), {})
}))
default = {}
nullable = falsedescription = <<DESCRIPTION A map of private endpoints to create on the Key Vault. The map key is deliberately arbitrary to avoid issues where map keys maybe unknown at plan time.
- `name` - (Optional) The name of the private endpoint. One will be generated if not set.
- `role_assignments` - (Optional) A map of role assignments to create on the private endpoint. The map key is deliberately arbitrary to avoid issues where map keys maybe unknown at plan time. See `var.role_assignments` for more information.
- `role_definition_id_or_name` - The ID or name of the role definition to assign to the principal.
- `principal_id` - The ID of the principal to assign the role to.
- `description` - (Optional) The description of the role assignment.
- `skip_service_principal_aad_check` - (Optional) If set to true, skips the Azure Active Directory check for the service principal in the tenant. Defaults to false.
- `condition` - (Optional) The condition which will be used to scope the role assignment.
- `condition_version` - (Optional) The version of the condition syntax. Leave as `null` if you are not using a condition, if you are then valid values are '2.0'.
- `delegated_managed_identity_resource_id` - (Optional) The delegated Azure Resource Id which contains a Managed Identity. Changing this forces a new resource to be created. This field is only used in cross-tenant scenario.
- `principal_type` - (Optional) The type of the `principal_id`. Possible values are `User`, `Group` and `ServicePrincipal`. It is necessary to explicitly set this attribute when creating role assignments if the principal creating the assignment is constrained by ABAC rules that filters on the PrincipalType attribute.
- `lock` - (Optional) The lock level to apply to the private endpoint. Default is `None`. Possible values are `None`, `CanNotDelete`, and `ReadOnly`.
- `kind` - (Required) The type of lock. Possible values are `\"CanNotDelete\"` and `\"ReadOnly\"`.
- `name` - (Optional) The name of the lock. If not specified, a name will be generated based on the `kind` value. Changing this forces the creation of a new resource.
- `tags` - (Optional) A mapping of tags to assign to the private endpoint.
- `subnet_resource_id` - The resource ID of the subnet to deploy the private endpoint in.
- `subresource_name` - The name of the sub resource for the private endpoint.
- `private_dns_zone_group_name` - (Optional) The name of the private DNS zone group. One will be generated if not set.
- `private_dns_zone_resource_ids` - (Optional) A set of resource IDs of private DNS zones to associate with the private endpoint. If not set, no zone groups will be created and the private endpoint will not be associated with any private DNS zones. DNS records must be managed external to this module.
- `application_security_group_resource_ids` - (Optional) A map of resource IDs of application security groups to associate with the private endpoint. The map key is deliberately arbitrary to avoid issues where map keys maybe unknown at plan time.
- `private_service_connection_name` - (Optional) The name of the private service connection. One will be generated if not set.
- `network_interface_name` - (Optional) The name of the network interface. One will be generated if not set.
- `location` - (Optional) The Azure location where the resources will be deployed. Defaults to the location of the resource group.
- `resource_group_name` - (Optional) The resource group where the resources will be deployed. Defaults to the resource group of the Key Vault.
- `ip_configurations` - (Optional) A map of IP configurations to create on the private endpoint. If not specified the platform will create one. The map key is deliberately arbitrary to avoid issues where map keys maybe unknown at plan time.
- `name` - The name of the IP configuration.
- `private_ip_address` - The private IP address of the IP configuration.
DESCRIPTION } # The PE resource when we are managing the private_dns_zone_group block:
resource"azurerm_private_endpoint""this" {
for_each = { fork, vin var.private_endpoints:k => vif var.private_endpoints_manage_dns_zone_group }
name = each.value.name!=null? each.value.name:"pep-${var.name}"location = each.value.location!=null? each.value.location: var.locationresource_group_name = each.value.resource_group_name!=null? each.value.resource_group_name: var.resource_group_namesubnet_id = each.value.subnet_resource_idcustom_network_interface_name = each.value.network_interface_nametags = each.value.tagsprivate_service_connection {
name = each.value.private_service_connection_name!=null? each.value.private_service_connection_name:"pse-${var.name}"private_connection_resource_id = azurerm_key_vault.this.idis_manual_connection = falsesubresource_names = ["MYSERVICE"] # map to each.value.subresource_name if there are multiple services.
}
dynamic"private_dns_zone_group" {
for_each = length(each.value.private_dns_zone_resource_ids) >0? ["this"] : []
content {
name = each.value.private_dns_zone_group_nameprivate_dns_zone_ids = each.value.private_dns_zone_resource_ids }
}
dynamic"ip_configuration" {
for_each = each.value.ip_configurationscontent {
name = ip_configuration.value.namesubresource_name = "MYSERVICE" # map to each.value.subresource_name if there are multiple services.
member_name = "MYSERVICE" # map to each.value.subresource_name if there are multiple services.
private_ip_address = ip_configuration.value.private_ip_address }
}
} # The PE resource when we are managing **not** the private_dns_zone_group block:
resource"azurerm_private_endpoint""this_unmanaged_dns_zone_groups" {
for_each = { fork, vin var.private_endpoints:k => vif!var.private_endpoints_manage_dns_zone_group } # ... repeat configuration above
# **omitting the private_dns_zone_group block**
# then add the following lifecycle block to ignore changes to the private_dns_zone_group block
lifecycle {
ignore_changes = [private_dns_zone_group]
}
} # Private endpoint application security group associations.
# We merge the nested maps from private endpoints and application security group associations into a single map.
locals {
private_endpoint_application_security_group_associations = { forassocin flatten([
forpe_k, pe_vin var.private_endpoints: [
forasg_k, asg_vinpe_v.application_security_group_associations: {
asg_key = asg_kpe_key = pe_kasg_resource_id = asg_v }
]
]) :"${assoc.pe_key}-${assoc.asg_key}" => assoc }
}
resource"azurerm_private_endpoint_application_security_group_association""this" {
for_each = local.private_endpoint_application_security_group_associationsprivate_endpoint_id = azurerm_private_endpoint.this[each.value.pe_key].idapplication_security_group_id = each.value.asg_resource_id } # You need an additional resource when not managing private_dns_zone_group with this module:
# In your output you need to select the correct resource based on the value of var.private_endpoints_manage_dns_zone_group:
output"private_endpoints" {
value = var.private_endpoints_manage_dns_zone_group?azurerm_private_endpoint.this:azurerm_private_endpoint.this_unmanaged_dns_zone_groupsdescription = <<DESCRIPTION A map of the private endpoints created.
DESCRIPTION }
The properties defined in the schema above are the minimum amount of properties expected to be exposed for Private Endpoints in AVM Resource Modules.
A module owner MAY chose to expose additional properties of the Private Endpoint resource.
However, module owners considering this SHOULD contact the AVM core team first to consult on how the property should be exposed to avoid future breaking changes to the schema that may be enforced upon them.
Module owners MAY chose to define a list of allowed value for the ‘service’ (a.k.a. groupIds) property.
However, they should do so with caution as should a new service appear for their resource module, a new release will need to be cut to add this new service to the allowed values.
Whereas not specifying allowed values will allow flexibility from day 0 without the need for any changes and releases to be made.
A module MUST have an owner that is defined and managed by a GitHub Team in the Azure GitHub organization.
Today this is only Microsoft FTEs, but everyone is welcome to contribute. The module just MUST be owned by a Microsoft FTE (today) so we can enforce and provide the long-term support required by this initiative.
Note
The names for the GitHub teams for each approved module are already defined in the respective Module Indexes. These teams MUST be created (and used) for each module.
ID: SNFR20 - Category: Contribution/Support - GitHub Teams Only
All GitHub repositories that AVM module are published from and hosted within MUST only assign GitHub repository permissions to GitHub teams only.
Each module MUST have separate GitHub teams assigned for module owners AND module contributors respectively. These GitHub teams MUST be created in the Azure organization in GitHub.
There MUST NOT be any GitHub repository permissions assigned to individual users.
Note
The names for the GitHub teams for each approved module are already defined in the respective Module Indexes. These teams MUST be created (and used) for each module.
The @Azure prefix in the last column of the tables linked above represents the “Azure” GitHub organization all AVM-related repositories exist in. DO NOT include this segment in the team’s name!
Important
Non-FTE / external contributors (subject matter experts that aren’t Microsoft employees) can’t be members of the teams described in this chapter, hence, they won’t gain any extra permissions on AVM repositories, therefore, they need to work in forks.
Naming Convention
The naming convention for the GitHub teams MUST follow the below pattern:
<hyphenated module name>-module-owners-<bicep/tf> - to be assigned as the GitHub repository’s Module Owners team
<hyphenated module name>-module-contributors-<bicep/tf> - to be assigned as the GitHub repository’s Module Contributors team
Note
The naming convention for terraform modules is slightly different than the naming convention for their respective GitHub teams.
Segments:
<hyphenated module name> == the AVM Module’s name, with each segment separated by dashes, i.e., avm-res-<resource provider>-<ARM resource type>
All officially documented module owner(s) MUST be added to the -module-owners- team. The -module-owners- team MUST NOT have any other members.
Any additional module contributors whom the module owner(s) agreed to work with MUST be added to the -module-contributors- team.
Unless explicitly requested and agreed, members of the AVM core team or any PG teams MUST NOT be added to the -module-owners- or -module-contributors- teams as permissions for them are granted through the teams described in SNFR9.
Grant Permissions - Bicep
Team memberships
Note
In case of terraform modules, permissions to the BRM repository (the repo of the Bicep Registry) are granted via assigning the -module-owners- and -module-contributors- teams to parent teams that already have the required level access configured. While it is the module owner’s responsibility to initiate the addition of their teams to the respective parents, only the AVM core team can approve this parent-child relationship.
Module owners MUST create their -module-owners- and -module-contributors- teams and as part of the provisioning process, they MUST request the addition of these teams to their respective parent teams (see the table below for details).
GitHub Team Name
Description
Permissions
Permissions granted through
Where to work?
<hyphenated module name>-module-owners-bicep
AVM Bicep Module Owners - <module name>
Write
Assignment to the avm-technical-reviewers-bicep parent team.
Examples - GitHub teams required for the Bicep resource module of Azure Virtual Network (avm/res/network/virtual-network):
avm-res-network-virtualnetwork-module-owners-bicep –> assign to the avm-technical-reviewers-bicep parent team.
avm-res-network-virtualnetwork-module-contributors-bicep –> assign to the avm-module-contributors-bicep parent team.
Tip
Direct link to create a new GitHub team and assign it to its parent: Create new team
Fill in the values as follows:
Team name: Following the naming convention described above, use the value defined in the module indexes.
Description: Follow the guidance above (see the Description column in the table above).
Parent team: Follow the guidance above (see the Permissions granted through column in the table above).
Team visibility: Visible
Team notifications: Enabled
CODEOWNERS file
As part of the “initial Pull Request” (that publishes the first version of the module), module owners MUST add an entry to the CODEOWNERS file in the BRM repository (here).
Note
Through this approach, the AVM core team will grant review permission to module owners as part of the standard PR review process.
Every CODEOWNERS entry (line) MUST include the following segments separated by a single whitespace character:
Path of the module, relative to the repo’s root, e.g.: /avm/res/network/virtual-network/
The -module-owners-team, with the @Azure/ prefix, e.g., @Azure/avm-res-network-virtualnetwork-module-owners-bicep
The GitHub team of the AVM Bicep reviewers, with the @Azure/ prefix, i.e., @Azure/avm-module-reviewers-bicep
Example - CODEOWNERS entry for the Bicep resource module of Azure Virtual Network (avm/res/network/virtual-network):
Module owners MUST assign the -module-owners-and -module-contributors- teams the necessary permissions on their Terraform module repository per the guidance below.
GitHub Team Name
Description
Permissions
Permissions granted through
Where to work?
<module name>-module-owners-tf
AVM Terraform Module Owners - <module name>
Admin
Direct assignment to repo
Module owner can decide whether they want to work in a branch local to the repo or in a fork.
Only the latest released version of a module MUST be supported.
For example, if an AVM Resource Module is used in an AVM Pattern Module that was working but now is not. The first step by the AVM Pattern Module owner should be to upgrade to the latest version of the AVM Resource Module test and then if not fixed, troubleshoot and fix forward from the that latest version of the AVM Resource Module onwards.
This avoids AVM Module owners from having to maintain multiple major release versions.
```shell
# Linux / MacOs# For Windows replace $PWD with your the local path or your repository#docker run -it -v $PWD:/repo -w /repo mcr.microsoft.com/powershell pwsh -Command '
#Invoke-WebRequest -Uri "https://zojovano.github.io/azure-verified-modules-copy/scripts/Set-AvmGitHubLabels.ps1" -OutFile "Set-AvmGitHubLabels.ps1"
$gh_version = "2.44.1"
Invoke-WebRequest -Uri "https://github.com/cli/cli/releases/download/v2.44.1/gh_2.44.1_linux_amd64.tar.gz" -OutFile "gh_$($gh_version)_linux_amd64.tar.gz"
apt-get update && apt-get install -y git
tar -xzf "gh_$($gh_version)_linux_amd64.tar.gz"
ls -lsa
mv "gh_$($gh_version)_linux_amd64/bin/gh" /usr/local/bin/
rm "gh_$($gh_version)_linux_amd64.tar.gz" && rm -rf "gh_$($gh_version)_linux_amd64"
gh --version
ls -lsa
gh auth login
$OrgProject = "Azure/terraform-azurerm-avm-res-kusto-cluster"
gh auth status
./Set-AvmGitHubLabels.ps1 -RepositoryName $OrgProject -CreateCsvLabelExports $false -NoUserPrompts $true
'```
By default this script will only update and append labels on the repository specified. However, this can be changed by setting the parameter -UpdateAndAddLabelsOnly to $false, which will remove all the labels from the repository first and then apply the AVM labels from the CSV only.
Make sure you elevate your privilege to admin level or the labels will not be applied to your repository. Go to repos.opensource.microsoft.com/orgs/Azure/repos/ to request admin access before running the script.
Full Script:
These Set-AvmGitHubLabels.ps1 can be downloaded from here.
[Diagnostics.CodeAnalysis.SuppressMessageAttribute("PSAvoidUsingWriteHost", "", Justification = "Coloured output required in this script")]
<#
.SYNOPSIS This script can be used to create the Azure Verified Modules (AVM) standard GitHub labels to a GitHub repository.
.DESCRIPTION This script can be used to create the Azure Verified Modules (AVM) standard GitHub labels to a GitHub repository.
By default, the script will remove all pre-existing labels and apply the AVM labels. However, this can be changed by using the -RemoveExistingLabels parameter and setting it to $false. The tool will also output the labels that exist in the repository before and after the script has run to a CSV file in the current directory, or a directory specified by the -OutputDirectory parameter.
The AVM labels to be created are documented here: TBC
.NOTES Please ensure you have specified the GitHub repositry correctly. The script will prompt you to confirm the repository name before proceeding.
.COMPONENT You must have the GitHub CLI installed and be authenticated to a GitHub account with access to the repository you are applying the labels to before running this script.
.LINK TBC
.Parameter RepositoryName
The name of the GitHub repository to apply the labels to.
.Parameter RemoveExistingLabels
If set to $true, the default value, the script will remove all pre-existing labels from the repository specified in -RepositoryName before applying the AVM labels. If set to $false, the script will not remove any pre-existing labels.
.Parameter UpdateAndAddLabelsOnly
If set to $true, the default value, the script will only update and add labels to the repository specified in -RepositoryName. If set to $false, the script will remove all pre-existing labels from the repository specified in -RepositoryName before applying the AVM labels.
.Parameter OutputDirectory
The directory to output the pre-existing and post-existing labels to in a CSV file. The default value is the current directory.
.Parameter CreateCsvLabelExports
If set to $true, the default value, the script will output the pre-existing and post-existing labels to a CSV file in the current directory, or a directory specified by the -OutputDirectory parameter. If set to $false, the script will not output the pre-existing and post-existing labels to a CSV file.
.Parameter GitHubCliLimit
The maximum number of labels to return from the GitHub CLI. The default value is 999.
.Parameter LabelsToApplyCsvUri
The URI to the CSV file containing the labels to apply to the GitHub repository. The default value is https://raw.githubusercontent.com/jtracey93/label-source/main/avm-github-labels.csv.
.Parameter NoUserPrompts
If set to $true, the default value, the script will not prompt the user to confirm they want to remove all pre-existing labels from the repository specified in -RepositoryName before applying the AVM labels. If set to $false, the script will prompt the user to confirm they want to remove all pre-existing labels from the repository specified in -RepositoryName before applying the AVM labels.
This is useful for running the script in automation workflows
.EXAMPLE Create the AVM labels in the repository Org/MyGitHubRepo and remove all pre-existing labels.
Set-AvmGitHubLabels.ps1 -RepositoryName "Org/MyGitHubRepo"
.EXAMPLE Create the AVM labels in the repository Org/MyGitHubRepo and do not remove any pre-existing labels, just overwrite any labels that have the same name.
Set-AvmGitHubLabels.ps1 -RepositoryName "Org/MyGitHubRepo" -RemoveExistingLabels $false
.EXAMPLE Create the AVM labels in the repository Org/MyGitHubRepo and output the pre-existing and post-existing labels to the directory C:\GitHubLabels.
Set-AvmGitHubLabels.ps1 -RepositoryName "Org/MyGitHubRepo" -OutputDirectory "C:\GitHubLabels"
.EXAMPLE Create the AVM labels in the repository Org/MyGitHubRepo and output the pre-existing and post-existing labels to the directory C:\GitHubLabels and do not remove any pre-existing labels, just overwrite any labels that have the same name.
Set-AvmGitHubLabels.ps1 -RepositoryName "Org/MyGitHubRepo" -OutputDirectory "C:\GitHubLabels" -RemoveExistingLabels $false
.EXAMPLE Create the AVM labels in the repository Org/MyGitHubRepo and do not create the pre-existing and post-existing labels CSV files and do not remove any pre-existing labels, just overwrite any labels that have the same name.
Set-AvmGitHubLabels.ps1 -RepositoryName "Org/MyGitHubRepo" -RemoveExistingLabels $false -CreateCsvLabelExports $false
.EXAMPLE Create the AVM labels in the repository Org/MyGitHubRepo and do not create the pre-existing and post-existing labels CSV files and do not remove any pre-existing labels, just overwrite any labels that have the same name. Finally, use a custom CSV file hosted on the internet to create the labels from.
Set-AvmGitHubLabels.ps1 -RepositoryName "Org/MyGitHubRepo" -OutputDirectory "C:\GitHubLabels" -RemoveExistingLabels $false -CreateCsvLabelExports $false -LabelsToApplyCsvUri "https://example.com/csv/avm-github-labels.csv"
#>#Requires-PSEdition Core [CmdletBinding()]
param (
[Parameter(Mandatory = $true)]
[string]$RepositoryName,
[Parameter(Mandatory = $false)]
[bool]$RemoveExistingLabels = $true,
[Parameter(Mandatory = $false)]
[bool]$UpdateAndAddLabelsOnly = $true,
[Parameter(Mandatory = $false)]
[bool]$CreateCsvLabelExports = $true,
[Parameter(Mandatory = $false)]
[string]$OutputDirectory = (Get-Location),
[Parameter(Mandatory = $false)]
[int]$GitHubCliLimit = 999,
[Parameter(Mandatory = $false)]
[string]$LabelsToApplyCsvUri = "https://zojovano.github.io/azure-verified-modules-copy/governance/avm-standard-github-labels.csv",
[Parameter(Mandatory = $false)]
[bool]$NoUserPrompts = $false
)
# Check if the GitHub CLI is installed $GitHubCliInstalled = Get-Command gh -ErrorAction SilentlyContinue
if ($null -eq $GitHubCliInstalled) {
throw"The GitHub CLI is not installed. Please install the GitHub CLI and try again." }
Write-Host "The GitHub CLI is installed..." -ForegroundColor Green
# Check if GitHub CLI is authenticated $GitHubCliAuthenticated = gh auth status
if ($LASTEXITCODE -ne0) {
Write-Host $GitHubCliAuthenticated -ForegroundColor Red
throw"Not authenticated to GitHub. Please authenticate to GitHub using the GitHub CLI, `gh auth login`, and try again." }
Write-Host "Authenticated to GitHub..." -ForegroundColor Green
# Check if GitHub repository name is valid $GitHubRepositoryNameValid = $RepositoryName -match"^[a-zA-Z0-9-]+/[a-zA-Z0-9-]+$"if ($false -eq $GitHubRepositoryNameValid) {
throw"The GitHub repository name $RepositoryName is not valid. Please check the repository name and try again. The format must be <OrgName>/<RepoName>" }
# List GitHub repository provided and check it exists $GitHubRepository = gh repo view $RepositoryName
if ($LASTEXITCODE -ne0) {
Write-Host $GitHubRepository -ForegroundColor Red
throw"The GitHub repository $RepositoryName does not exist. Please check the repository name and try again." }
Write-Host "The GitHub repository $RepositoryName exists..." -ForegroundColor Green
# PRE - Get the current GitHub repository labels and export to a CSV file in the current directory or where -OutputDirectory specifies if set to a valid directory path and the directory exists or can be created if it does not exist alreadyif ($RemoveExistingLabels -or $UpdateAndAddLabelsOnly) {
Write-Host "Getting the current GitHub repository (pre) labels for $RepositoryName..." -ForegroundColor Yellow
$GitHubRepositoryLabels = gh label list -R $RepositoryName -L $GitHubCliLimit --json name,description,color
if ($null -ne $GitHubRepositoryLabels -and $CreateCsvLabelExports -eq $true) {
$csvFileNamePathPre = "$OutputDirectory\$($RepositoryName.Replace('/', '_'))-Labels-Pre-$(Get-Date -Format FileDateTime).csv" Write-Host "Exporting the current GitHub repository (pre) labels for $RepositoryName to $csvFileNamePathPre" -ForegroundColor Yellow
$GitHubRepositoryLabels | ConvertFrom-Json | Export-Csv -Path $csvFileNamePathPre -NoTypeInformation
}
}
# Remove all pre-existing labels if -RemoveExistingLabels is set to $true and user confirms they want to remove all pre-existing labelsif ($null -ne $GitHubRepositoryLabels) {
$GitHubRepositoryLabelsJson = $GitHubRepositoryLabels | ConvertFrom-Json
if ($RemoveExistingLabels -eq $true -and $NoUserPrompts -eq $false -and $UpdateAndAddLabelsOnly -eq $false) {
$RemoveExistingLabelsConfirmation = Read-Host "Are you sure you want to remove all $($GitHubRepositoryLabelsJson.Count) pre-existing labels from $($RepositoryName)? (Y/N)"if ($RemoveExistingLabelsConfirmation -eq"Y") {
Write-Host "Removing all pre-existing labels from $RepositoryName..." -ForegroundColor Yellow
$GitHubRepositoryLabels | ConvertFrom-Json | ForEach-Object {
Write-Host "Removing label $($_.name) from $RepositoryName..." -ForegroundColor DarkRed
gh label delete -R $RepositoryName $_.name --yes
}
}
}
if ($RemoveExistingLabels -eq $true -and $NoUserPrompts -eq $true -and $UpdateAndAddLabelsOnly -eq $false) {
Write-Host "Removing all pre-existing labels from $RepositoryName..." -ForegroundColor Yellow
$GitHubRepositoryLabels | ConvertFrom-Json | ForEach-Object {
Write-Host "Removing label $($_.name) from $RepositoryName..." -ForegroundColor DarkRed
gh label delete -R $RepositoryName $_.name --yes
}
}
}
if ($null -eq $GitHubRepositoryLabels) {
Write-Host "No pre-existing labels to remove or not selected to be removed from $RepositoryName..." -ForegroundColor Magenta
}
# Check LabelsToApplyCsvUri is valid and contains a CSV content Write-Host "Checking $LabelsToApplyCsvUri is valid..." -ForegroundColor Yellow
$LabelsToApplyCsvUriValid = $LabelsToApplyCsvUri -match"^https?://"if ($false -eq $LabelsToApplyCsvUriValid) {
throw"The LabelsToApplyCsvUri $LabelsToApplyCsvUri is not valid. Please check the URI and try again. The format must be a valid URI." }
Write-Host "The LabelsToApplyCsvUri $LabelsToApplyCsvUri is valid..." -ForegroundColor Green
# Create AVM lables from the AVM labels CSV file stored on the web using the convertfrom-csv cmdlet $avmLabelsCsv = Invoke-WebRequest -Uri $LabelsToApplyCsvUri | ConvertFrom-Csv
# Check if the AVM labels CSV file contains the following columns: Name, Description, HEX $avmLabelsCsvColumns = $avmLabelsCsv | Get-Member -MemberType NoteProperty | Select-Object -ExpandProperty Name
$avmLabelsCsvColumnsValid = $avmLabelsCsvColumns -contains"Name"-and $avmLabelsCsvColumns -contains"Description"-and $avmLabelsCsvColumns -contains"HEX"if ($false -eq $avmLabelsCsvColumnsValid) {
throw"The labels CSV file does not contain the required columns: Name, Description, HEX. Please check the CSV file and try again. It contains the following columns: $avmLabelsCsvColumns" }
Write-Host "The labels CSV file contains the required columns: Name, Description, HEX" -ForegroundColor Green
# Create the AVM labels in the GitHub repository Write-Host "Creating/Updating the $($avmLabelsCsv.Count) AVM labels in $RepositoryName..." -ForegroundColor Yellow
$avmLabelsCsv | ForEach-Object {
if ($GitHubRepositoryLabelsJson.name -contains $_.name) {
Write-Host "The label $($_.name) already exists in $RepositoryName. Updating the label to ensure description and color are consitent..." -ForegroundColor Magenta
gh label create -R $RepositoryName "$($_.name)" -c $_.HEX -d $($_.Description) --force
}
else {
Write-Host "The label $($_.name) does not exist in $RepositoryName. Creating label $($_.name) in $RepositoryName..." -ForegroundColor Cyan
gh label create -R $RepositoryName "$($_.Name)" -c $_.HEX -d $($_.Description) --force
}
}
# POST - Get the current GitHub repository labels and export to a CSV file in the current directory or where -OutputDirectory specifies if set to a valid directory path and the directory exists or can be created if it does not exist alreadyif ($CreateCsvLabelExports -eq $true) {
Write-Host "Getting the current GitHub repository (post) labels for $RepositoryName..." -ForegroundColor Yellow
$GitHubRepositoryLabels = gh label list -R $RepositoryName -L $GitHubCliLimit --json name,description,color
if ($null -ne $GitHubRepositoryLabels) {
$csvFileNamePathPre = "$OutputDirectory\$($RepositoryName.Replace('/', '_'))-Labels-Post-$(Get-Date -Format FileDateTime).csv" Write-Host "Exporting the current GitHub repository (post) labels for $RepositoryName to $csvFileNamePathPre" -ForegroundColor Yellow
$GitHubRepositoryLabels | ConvertFrom-Json | Export-Csv -Path $csvFileNamePathPre -NoTypeInformation
}
}
# If -RemoveExistingLabels is set to $true and user confirms they want to remove all pre-existing labels check that only the avm labels exist in the repositoryif ($RemoveExistingLabels -eq $true -and ($RemoveExistingLabelsConfirmation -eq"Y"-or $NoUserPrompts -eq $true) -and $UpdateAndAddLabelsOnly -eq $false) {
Write-Host "Checking that only the AVM labels exist in $RepositoryName..." -ForegroundColor Yellow
$GitHubRepositoryLabels = gh label list -R $RepositoryName -L $GitHubCliLimit --json name,description,color
$GitHubRepositoryLabels | ConvertFrom-Json | ForEach-Object {
if ($avmLabelsCsv.Name -notcontains $_.name) {
throw"The label $($_.name) exists in $RepositoryName but is not in the CSV file." }
}
Write-Host "Only the CSV labels exist in $RepositoryName..." -ForegroundColor Green
}
Write-Host "The CSV labels have been created/updated in $RepositoryName..." -ForegroundColor Green
Module owners MUST set a branch protection policy on their GitHub Repositories for AVM modules against their default branch, typically main, to do the following:
Requires a Pull Request before merging
Require approval of the most recent reviewable push
Dismiss stale pull request approvals when new commits are pushed
Require linear history
Prevents force pushes
Not allow deletions
Require CODEOWNERS review
Do not allow bypassing the above settings
Above settings MUST also be enforced to administrators
Tip
If you use the template repository as mentioned in the contribution guide, the above will automatically be set.
Telemetry
The content below is listed based on the following tags
We will maintain a set of CSV files in the AVM Central Repo (Azure/Azure-Verified-Modules) with the required TelemetryId prefixes to enable checks to utilize this list to ensure the correct IDs are used. To see the formatted content of these CSV files with additional information, please visit the AVM Module Indexes page.
These will also be provided as a comment on the module proposal, once accepted, from the AVM core team.
Modules MUST provide the capability to collect deployment/usage telemetry as detailed in Telemetry further.
To highlight that AVM modules use telemetry, an information notice MUST be included in the footer of each module’s README.md file with the below content. (See more details on this requirement, here.)
Telemetry Information Notice
Note
The following information notice is automatically added at the bottom of the README.md file of the module when
Terraform: Executing the make docs command with the note and header ## Data Collection being placed in the module’s _footer.md beforehand
### Data Collection

The software may collect information about you and your use of the software and send it to Microsoft. Microsoft may use this information to provide services and improve our products and services. You may turn off the telemetry as described in the [repository](https://aka.ms/avm/telemetry). There are also some features in the software that may enable you and Microsoft to collect data from users of your applications. If you use these features, you must comply with applicable law, including providing appropriate notices to users of your applications together with a copy of Microsoft’s privacy statement. Our privacy statement is located at <https://go.microsoft.com/fwlink/?LinkID=824704>. You can learn more about data collection and use in the help documentation and our privacy statement. Your use of the software operates as your consent to these practices.
The ARM deployment name used for the telemetry MUST follow the pattern and MUST be no longer than 64 characters in length: 46d3xbcp.<res/ptn>.<(short) module name>.<version>.<uniqueness>
<res/ptn> == AVM Resource or Pattern Module
<(short) module name> == The AVM Module’s, possibly shortened, name including the resource provider and the resource type, without;
The prefixes: avm-res-
The prefixes: avm-ptn-
<version> == The AVM Module’s MAJOR.MINOR version (only) with . (periods) replaced with - (hyphens), to allow simpler splitting of the ARM deployment name
<uniqueness> == This section of the ARM deployment name is to be used to ensure uniqueness of the deployment name.
This is to cater for the following scenarios:
The module is deployed multiple times to the same:
Due to the 64-character length limit of Azure deployment names, the <(short) module name> segment has a length limit of 36 characters, so if the module name is longer than that, it MUST be truncated to 36 characters. If any of the semantic version’s segments are longer than 1 character, it further restricts the number of characters that can be used for naming the module.
An example deployment name for the AVM Virtual Machine Resource Module would be: 46d3xbcp.res.compute-virtualmachine.1-2-3.eum3
An example deployment name for a shortened module name would be: 46d3xbcp.res.desktopvirtualization-appgroup.1-2-3.eum3
Tip
Terraform: Terraform uses a telemetry provider, the configuration of which is the same for every module and is included in the template repo.
General: See the language specific contribution guides for detailed guidance and sample code to use in AVM modules to achieve this requirement.
To enable telemetry data collection for Terraform modules, the modtm telemetry provider MUST be used. This lightweight telemetry provider sends telemetry data to Azure Application Insights via a HTTP POST front end service.
The modtm telemetry provider is included in all Terraform modules and is enabled by default through the main.telemetry.tf file being automatically distributed from the template repo.
The modtm provider MUST be listed under the required_providers section in the module’s terraform.tf file using the following entry. This is also validated by the linter.
The telemetry enablement MUST be on/enabled by default, however this MUST be able to be disabled by a module consumer by setting the below parameter/variable value to false:
Bicep: enableTelemetry
Terraform: enable_telemetry
Note
Whenever a module references AVM modules that implement the telemetry parameter (e.g., a pattern module that uses AVM resource modules), the telemetry parameter value MUST be passed through to these modules. This is necessary to ensure a consumer can reliably enable & disable the telemetry feature for all used modules.
This general specification can be modified for some use-cases, that are language specific:
Bicep
For cross-references in resource modules, the spec BCPFR7 also applies.
Terraform
Currently, no further requirements apply.
Naming / Composition
The content below is listed based on the following tags
Modules MAY create/adopt public preview services and features at their discretion.
Preview API versions MAY be used when:
The resource/service/feature is GA but the only API version available for the GA resource/service/feature is a preview version
For example, Diagnostic Settings (Microsoft.Insights/diagnosticSettings) the latest version of the API available with GA features, like Category Groups etc., is 2021-05-01-preview
Otherwise the latest “non-preview” version of the API SHOULD be used
Preview services and features, SHOULD NOT be promoted and exposed, unless they are supported by the respective PG, and it’s documented publicly.
However, they MAY be exposed at the module owners discretion, but the following rules MUST be followed:
The description of each of the parameters/variables used for the preview service/feature MUST start with:
“THIS IS A <PARAMETER/VARIABLE> USED FOR A PREVIEW SERVICE/FEATURE, MICROSOFT MAY NOT PROVIDE SUPPORT FOR THIS, PLEASE CHECK THE PRODUCT DOCS FOR CLARIFICATION”
Modules SHOULD set defaults in input parameters/variables to align to high priority/impact/severity recommendations, where appropriate and applicable, in the following frameworks and resources:
They SHOULD NOT align to these recommendations when it requires an external dependency/resource to be deployed and configured and then associated to the resources in the module.
Alignment SHOULD prioritize best-practices and security over cost optimization, but MUST allow for these to be overridden by a module consumer easily, if desired.
ID: SFR5 - Category: Composition - Availability Zones
Modules that deploy zone-redundant resources MUST enable the spanning across as many zones as possible by default, typically all 3.
Modules that deploy zonal resources MUST provide the ability to specify a zone for the resources to be deployed/pinned to. However, they MUST NOT default to a particular zone by default, e.g. 1 in an effort to make the consumer aware of the zone they are selecting to suit their architecture requirements.
For both scenarios the modules MUST expose these configuration options via configurable parameters/variables.
ID: SFR6 - Category: Composition - Data Redundancy
Modules that deploy resources or patterns that support data redundancy SHOULD enable this to the highest possible value by default, e.g. RA-GZRS. When a resource or pattern doesn’t provide the ability to specify data redundancy as a simple property, e.g. GRS etc., then the modules MUST provide the ability to enable data redundancy for the resources or pattern via parameters/variables.
For example, a Storage Account module can simply set the sku.name property to Standard_RAGZRS. Whereas a SQL DB or Cosmos DB module will need to expose more properties, via parameters/variables, to allow the specification of the regions to replicate data to as per the consumers requirements.
Module owners MUST set the default resource name prefix for child, extension, and interface resources to the associated abbreviation for the specific resource as documented in the following CAF article Abbreviation examples for Azure resources, if specified and documented. This reduces the amount of input values a module consumer MUST provide by default when using the module.
For example, a Private Endpoint that is being deployed as part of a resource module, via the mandatory interfaces, MUST set the Private Endpoint’s default name to begin with the prefix of pep-.
Module owners MUST also provide the ability for these default names, including the prefixes, to be overridden via a parameter/variable if the consumer wishes to.
Furthermore, as per RMNFR2, Resource Modules MUST not have a default value specified for the name of the primary resource and therefore the name MUST be provided and specified by the module consumer.
The name provided MAY be used by the module owner to generate the rest of the default name for child, extension, and interface resources if they wish to. For example, for the Private Endpoint mentioned above, the full default name that can be overridden by the consumer, MAY be pep-<primary-resource-name>.
Tip
If the resource does not have a documented abbreviation in Abbreviation examples for Azure resources, then the module owner is free to use a sensible prefix instead.
Example: avm/ptn/compute/app-tier-vmss or avm/ptn/avd-lza/management-plane or avm/ptn/3-tier/web-app
Segments:
ptn defines this as a pattern module
<hyphenated grouping/category name> is a hierarchical grouping of pattern modules by category, with each word separated by dashes, such as:
project name, e.g., avd-lza,
primary resource provider, e.g., compute or network, or
architecture, e.g., 3-tier
<hyphenated pattern module name> is a term describing the module’s function, with each word separated by dashes, e.g., app-tier-vmss = Application Tier VMSS; management-plane = Azure Virtual Desktop Landing Zone Accelerator Management Plane
Terraform Pattern Module Naming
Naming convention:
avm-ptn-<pattern module name> (Module name for registry)
terraform-<provider>-avm-ptn-<pattern module name> (GitHub repository name to meet registry naming requirements)
Example: avm-ptn-apptiervmss or avm-ptn-avd-lza-managementplane
Segments:
<provider> is the logical abstraction of various APIs used by Terraform. In most cases, this is going to be azurerm or azuread for resource modules.
ptn defines this as a pattern module
<pattern module name> is a term describing the module’s function, e.g., apptiervmss = Application Tier VMSS; avd-lza-managementplane = Azure Virtual Desktop Landing Zone Accelerator Management Plane
ID: PMNFR2 - Category: Composition - Use Resource Modules to Build a Pattern Module
A Pattern Module SHOULD be built from AVM Resources Modules to establish a standardized code base and improve maintainability. If a valid reason exists, a pattern module MAY contain native resources (“vanilla” code) where it’s necessary. A Pattern Module MUST NOT contain references to non-AVM modules.
Valid reasons for not using a Resource Module for a resource required by a Pattern Module include but are not limited to:
When using a Resource Module would result in hitting scaling limitations and/or would reduce the capabilities of the Pattern Module due to the limitations of Azure Resource Manager.
Developing a Pattern Module under time constraint, without having all required Resource Modules readily available.
Note
In the latter case, the Pattern Module SHOULD be updated to use the Resource Module when the required Resource Module becomes available, to avoid accumulating technical debt. Ideally, all required Resource Modules SHOULD be developed first, and then leveraged by the Pattern Module.
Module owners MAY cross-references other modules to build either Resource or Pattern modules. However, they MUST be referenced only by a HashiCorp Terraform registry reference to a pinned version e.g.,
The module’s owners MUST use map(xxx) or set(xxx) as resource’s for_each collection, the map’s key or set’s element MUST be static literals.
Good example:
resource"azurerm_subnet""pair" {
for_each = var.subnet_map // `map(string)`, when user call this module, it could be: `{ "subnet0": "subnet0" }`, or `{ "subnet0": azurerm_subnet.subnet0.name }`
name = "${each.value}"-pairresource_group_name = azurerm_resource_group.example.namevirtual_network_name = azurerm_virtual_network.example.nameaddress_prefixes = ["10.0.1.0/24"]
}
Bad example:
resource"azurerm_subnet""pair" {
for_each = var.subnet_name_set // `set(string)`, when user use `toset([azurerm_subnet.subnet0.name])`, it would cause an error.
name = "${each.value}"-pairresource_group_name = azurerm_resource_group.example.namevirtual_network_name = azurerm_virtual_network.example.nameaddress_prefixes = ["10.0.1.0/24"]
}
There are 3 types of assignment statements in a resource or data block: argument, meta-argument and nested block. The argument assignment statement is a parameter followed by =:
Sometimes we need to ensure that the resources created are compliant to some rules at a minimum extent, for example a subnet has to be connected to at least one network_security_group. The user SHOULD pass in a security_group_id and ask us to make a connection to an existing security_group, or want us to create a new security group.
The disadvantage of this approach is if the user create a security group directly in the root module and use the id as a variable of the module, the expression which determines the value of count will contain an attribute from another resource, the value of this very attribute is “known after apply” at plan stage. Terraform core will not be able to get an exact plan of deployment during the “plan” stage.
For this kind of parameters, wrapping with object type is RECOMMENDED:
variable"security_group" {
type:object({
id = string })
default = null}
The advantage of doing so is encapsulating the value which is “known after apply” in an object, and the object itself can be easily found out if it’s null or not. Since the id of a resource cannot be null, this approach can avoid the situation we are facing in the first example, like the following:
variable used as feature switches SHOULD apply a positive statement, use xxx_enabled instead of xxx_disabled. Avoid double negatives like !xxx_disabled.
Please use xxx_enabled instead of xxx_disabled as name of a variable.
ID: TFNFR17 - Category: Code Style - Variables with Descriptions
The target audience of description is the module users.
For a newly created variable (Eg. variable for switching dynamic block on-off), it’s descriptionSHOULD precisely describe the input parameter’s purpose and the expected data type. descriptionSHOULD NOT contain any information for module developers, this kind of information can only exist in code comments.
For object type variable, description can be composed in HEREDOC format:
variable"kubernetes_cluster_key_management_service" {
type:object({
key_vault_key_id = stringkey_vault_network_access = optional(string)
})
default = nulldescription = <<-EOT - `key_vault_key_id` - (Required) Identifier of Azure Key Vault key. See [key identifier format](https://learn.microsoft.com/en-us/azure/key-vault/general/about-keys-secrets-certificates#vault-name-and-object-name) for more details. When Azure Key Vault key management service is enabled, this field is required and must be a valid key identifier. When `enabled` is `false`, leave the field empty.
- `key_vault_network_access` - (Optional) Network access of the key vault Network access of key vault. The possible values are `Public` and `Private`. `Public` means the key vault allows public access from all networks. `Private` means the key vault disables public access and enables private link. Defaults to `Public`.
EOT}
ID: TFNFR19 - Category: Code Style - Sensitive Data Variables
If variable’s type is object and contains one or more fields that would be assigned to a sensitive argument, then this whole variableSHOULD be declared as sensitive = true, otherwise you SHOULD extract sensitive field into separated variable block with sensitive = true.
Nullable SHOULD be set to false for collection values (e.g. sets, maps, lists) when using them in loops. However for scalar values like string and number, a null value MAY have a semantic meaning and as such these values are allowed.
Sometimes we will find names for some variable are not suitable anymore, or a change SHOULD be made to the data type. We want to ensure forward compatibility within a major version, so direct changes are strictly forbidden. The right way to do this is move this variable to an independent deprecated_variables.tf file, then redefine the new parameter in variable.tf and make sure it’s compatible everywhere else.
Deprecated variableMUST be annotated as DEPRECATED at the beginning of the description, at the same time the replacement’s name SHOULD be declared. E.g.,
variable"enable_network_security_group" {
type = stringdefault = nulldescription = "DEPRECATED, use `network_security_group_enabled` instead; Whether to generate a network security group and assign it to the subnet. Changing this forces a new resource to be created."}
A cleanup of deprecated_variables.tfSHOULD be performed during a major version release.
The terraform.tf file MUST only contain one terraform block.
The first line of the terraform block MUST define a required_version property for the Terraform CLI.
The required_version property MUST include a constraint on the minimum version of the Terraform CLI. Previous releases of the Terraform CLI can have unexpected behavior.
The required_version property MUST include a constraint on the maximum major version of the Terraform CLI. Major version releases of the Terraform CLI can introduce breaking changes and MUST be tested.
The required_version property constraint SHOULD use the ~> #.# or the >= #.#.#, < #.#.# format.
Note: You can read more about Terraform version constraints in the documentation.
ID: TFNFR26 - Category: Code Style - Providers in required_providers
The terraform block in terraform.tfMUST contain the required_providers block.
Each provider used directly in the module MUST be specified with the source and version properties. Providers in the required_providers block SHOULD be sorted in alphabetical order.
Do not add providers to the required_providers block that are not directly required by this module. If submodules are used then each submodule SHOULD have its own versions.tf file.
The source property MUST be in the format of namespace/name. If this is not explicitly specified, it can cause failure.
The version property MUST include a constraint on the minimum version of the provider. Older provider versions may not work as expected.
The version property MUST include a constraint on the maximum major version. A provider major version release may introduce breaking change, so updates to the major version constraint for a provider MUST be tested.
The version property constraint SHOULD use the ~> #.# or the >= #.#.#, < #.#.# format.
Note: You can read more about Terraform version constraints in the documentation.
By rules, in the module code providerMUST NOT be declared. The only exception is when the module indeed need different instances of the same kind of provider(Eg. manipulating resources across different locations or accounts), you MUST declare configuration_aliases in terraform.required_providers. See details in this document.
provider block declared in the module MUST only be used to differentiate instances used in resource and data. Declaration of fields other than alias in provider block is strictly forbidden. It could lead to module users unable to utilize count, for_each or depends_on. Configurations of the provider instance SHOULD be passed in by the module users.
Sometimes we notice that the name of certain output is not appropriate anymore, however, since we have to ensure forward compatibility in the same major version, its name MUST NOT be changed directly. It MUST be moved to an independent deprecated_outputs.tf file, then redefine a new output in output.tf and make sure it’s compatible everywhere else in the module.
A cleanup SHOULD be performed to deprecated_outputs.tf and other logics related to compatibility during a major version upgrade.
ID: TFNFR31 - Category: Code Style - locals.tf for Locals Only
In locals.tf, file we could declare multiple locals blocks, but only locals blocks are allowed.
You MAY declare locals blocks next to a resource block or data block for some advanced scenarios, like making a fake module to execute some light-weight tests aimed at the expressions.
From Terraform AzureRM 3.0, the default value of prevent_deletion_if_contains_resources in provider block is true. This will lead to an unstable test because the test subscription has some policies applied, and they will add some extra resources during the run, which can cause failures during destroy of resource groups.
Since we cannot guarantee our testing environment won’t be applied some Azure Policy Remediation Tasks in the future, for a robust testing environment, prevent_deletion_if_contains_resourcesSHOULD be explicitly set to false.
newres is a command-line tool that generates Terraform configuration files for a specified resource type. It automates the process of creating variables.tf and main.tf files, making it easier to get started with Terraform and reducing the time spent on manual configuration.
Module owners MAY use newres when they’re trying to add new resource block, attribute, or nested block. They MAY generate the whole block along with the corresponding variable blocks in an empty folder, then copy-paste the parts they need with essential refactoring.
Inputs / Outputs
The content below is listed based on the following tags
ID: SNFR22 - Category: Inputs - Parameters/Variables for Resource IDs
A module parameter/variable that requires a full Azure Resource ID as an input value, e.g. /subscriptions/{subscriptionId}/resourceGroups/{resourceGroupName}/providers/Microsoft.KeyVault/vaults/{keyVaultName}, MUST contain ResourceId/resource_id in its parameter/variable name to assist users in knowing what value to provide at a glance of the parameter/variable name.
Example for the property workspaceId for the Diagnostic Settings resource. In Bicep its parameter name should be workspaceResourceId and the variable name in Terraform should be workspace_resource_id.
workspaceId is not descriptive enough and is ambiguous as to which ID is required to be input.
Authors SHOULD NOT output entire resource objects as these may contain sensitive outputs and the schema can change with API or provider versions. Instead, authors SHOULD output the computed attributes of the resource as discreet outputs. This kind of pattern protects against provider schema changes and is known as an anti-corruption layer.
Remember, you SHOULD NOT output values that are already inputs (other than name).
E.g.,
# Resource output, computed attribute.
output"foo" {
description = "MyResource foo attribute"value = azurerm_resource_myresource.foo}# Resource output for resources that are deployed using `for_each`. Again only computed attributes.
output"childresource_foos" {
description = "MyResource children's foo attributes"value = {
forkey, valueinazurerm_resource_mychildresource:key => value.foo }
}# Output of a sensitive attribute
output"bar" {
description = "MyResource bar attribute"value = azurerm_resource_myresource.barsensitive = true}
ID: TFNFR14 - Category: Inputs - Not allowed variables
Since Terraform 0.13, count, for_each and depends_on are introduced for modules, module development is significantly simplified. Module’s owners MUST NOT add variables like enabled or module_depends_on to control the entire module’s operation. Boolean feature toggles are acceptable however.
Testing
The content below is listed based on the following tags
Modules MUST implement end-to-end (deployment) testing that create actual resources to validate that module deployments work. In Bicep tests are sourced from the directories in /tests/e2e. In Terraform, these are in /examples.
Each test MUST run and complete without user inputs successfully, for automation purposes.
Each test MUST also destroy/clean-up its resources and test dependencies following a run.
Tip
To see a directory and file structure for a module, see the language specific contribution guide.
It is likely that to complete E2E tests, a number of resources will be required as dependencies to enable the tests to pass successfully. Some examples:
When testing the Diagnostic Settings interface for a Resource Module, you will need an existing Log Analytics Workspace to be able to send the logs to as a destination.
When testing the Private Endpoints interface for a Resource Module, you will need an existing Virtual Network, Subnet and Private DNS Zone to be able to complete the Private Endpoint deployment and configuration.
Module owners MUST:
Create the required resources that their module depends upon in the test file/directory
They MUST either use:
Simple/native resource declarations/definitions in their respective IaC language, OR
Another already published AVM Module that MUST be pinned to a specific published version.
They MUST NOT use any local directory path references or local copies of AVM modules in their own modules test directory.
➕ Terraform & Bicep Log Analytics Workspace examples using simple/native declarations for use in E2E tests
Deployment tests are an important part of a module’s validation and a staple of AVM’s CI environment. However, there are situations where certain e2e-test-deployments cannot be performed against AVM’s test environment (e.g., if a special configuration/registration (such as certain AI models) is required). For these cases, the CI offers the possibility to ‘skip’ specific test cases by placing a file named .e2eignore in their test folder.
Note
A skipped test case is still added to the ‘Usage Examples’ section of the module’s readme and should be manually validated in regular intervals.
Details for use in E2E tests
You MUST add a note to the tests metadata description, which explains the excemption.
If you require that a test is skipped and add an “.e2eignore” file (e.g. \<module\>/tests/e2e/\<testname\>/.e2eignore) to a pull request, a member of the AVM Core Technical Bicep Team must approve set pull request. The content of the file is logged the module’s workflow runs and transparently communicates why the test case is skipped during the deployment validation stage. It iss hence important to specify the reason for skipping the deployment in this file.
Sample filecontent:
The test is skipped, as only one instance of this service can be deployed to a subscription.
Note
For resource modules, the ‘defaults’ and ‘waf-aligned’ tests can’t be skipped.
The deployment of a test can be skipped by adding a .e2eignore file into a test folder (e.g. /examples/<testname>).
Modules SHOULD implement unit testing to ensure logic and conditions within parameters/variables/locals are performing correctly. These tests MUST pass before a module version can be published.
Unit Tests test specific module functionality, without deploying resources. Used on more complex modules. In Terraform these live in tests/unit.
Modules MUST use static analysis, e.g., linting, security scanning (PSRule, tflint, etc.). These tests MUST pass before a module version can be published.
There may be differences between languages in linting rules standards, but the AVM core team will try to close these and bring them into alignment over time.
Modules MUST implement idempotency end-to-end (deployment) testing. E.g. deploying the module twice over the top of itself.
Modules SHOULD pass the idempotency test, as we are aware that there are some exceptions where they may fail as a false-positive or legitimate cases where a resource cannot be idempotent.
For example, Virtual Machine Image names must be unique on each resource creation/update.
Module owners MUST test that child and extension resources and those Bicep or Terreform interface resources that are supported by their modules, are validated in E2E tests as per SNFR2 to ensure they deploy and are configured correctly.
These MAY be tested in a separate E2E test and DO NOT have to be tested in each E2E test.
README documentation MUST be automatically/programmatically generated. MUST include the sections as defined in the language specific requirements BCPNFR2, TFNFR2.
Where descriptions for variables and outputs spans multiple lines. The description MAY provide variable input examples for each variable using the HEREDOC format and embedded markdown.
Example:
variable"my_complex_input" {
type = map(object({
param1 = stringparam2 = optional(number, null)
}))
description = <<DESCRIPTION A complex input variable that is a map of objects.
Each object has two attributes:
- `param1`: A required string parameter.
- `param2`: (Optional) An optional number parameter.
Example Input:
```terraform
my_complex_input = {
"object1" = {
param1 = "value1"
param2 = 2
}
"object2" = {
param1 = "value2"
}
}
```
DESCRIPTION }
You cannot specify the patch version for terraform modules in the public Bicep Registry, as this is automatically incremented by 1 each time a module is published. You can only set the Major and Minor versions.
Modules MUST use semantic versioning (aka semver) for their versions and releases in accordance with: Semantic Versioning 2.0.0
For example all modules should be released using a semantic version that matches this pattern: X.Y.Z
X == Major Version
Y == Minor Version
Z == Patch Version
Module versioning before first Major version release 1.0.0
Initially modules MUST be released as version 0.1.0 and incremented via Minor and Patch versions only until the AVM Core Team are confident the AVM specifications are mature enough and appropriate CI test coverage is in place, plus the module owner is happy the module has been “road tested” and is now stable enough for its first Major release of version 1.0.0.
Note
Releasing as version 0.1.0 initially and only incrementing Minor and Patch versions allows the module owner to make breaking changes more easily and frequently as it’s still not an official Major/Stable release. 👍
Until first Major version 1.0.0 is released, given a version number X.Y.Z:
X Major version MUST NOT be bumped.
Y Minor version MUST be bumped when introducing breaking changes (which would normally bump Major after 1.0.0 release) or feature updates (same as it will be after 1.0.0 release).
Z Patch version MUST be bumped when introducing non-breaking, backward compatible bug fixes (same as it will be after 1.0.0 release).
A module SHOULD avoid breaking changes, e.g., deprecating inputs vs. removing. If you need to implement changes that cause a breaking change, the major version should be increased.
Info
Modules that have not been released as 1.0.0 may introduce breaking changes, as explained in the previous ID SNFR17. That means that you have to introduce non-breaking and breaking changes with a minor version jump, as long as the module has not reached version 1.0.0.
There are, however, scenarios where you want to include breaking changes into a commit and not create a new major version. If you want to introduce breaking changes as part of a minor update, you can do so. In this case, it is essential to keep the change backward compatible, so that the existing code will continue to work. At a later point, another update can increase the major version and remove the code introduced for the backward compatibility.
Tip
See the language specific examples to find out how you can deal with deprecations in AVM modules.
ID: SNFR21 - Category: Publishing - Cross Language Collaboration
When the module owners of the same Resource or Pattern AVM module are not the same individual or team for all languages, each languages team SHOULD collaborate with their sibling language team for the same module to ensure consistency where possible.
Terraform Resource Module Specifications
Contribution / Support
The content below is listed based on the following tags
A module MUST have an owner that is defined and managed by a GitHub Team in the Azure GitHub organization.
Today this is only Microsoft FTEs, but everyone is welcome to contribute. The module just MUST be owned by a Microsoft FTE (today) so we can enforce and provide the long-term support required by this initiative.
Note
The names for the GitHub teams for each approved module are already defined in the respective Module Indexes. These teams MUST be created (and used) for each module.
ID: SNFR20 - Category: Contribution/Support - GitHub Teams Only
All GitHub repositories that AVM module are published from and hosted within MUST only assign GitHub repository permissions to GitHub teams only.
Each module MUST have separate GitHub teams assigned for module owners AND module contributors respectively. These GitHub teams MUST be created in the Azure organization in GitHub.
There MUST NOT be any GitHub repository permissions assigned to individual users.
Note
The names for the GitHub teams for each approved module are already defined in the respective Module Indexes. These teams MUST be created (and used) for each module.
The @Azure prefix in the last column of the tables linked above represents the “Azure” GitHub organization all AVM-related repositories exist in. DO NOT include this segment in the team’s name!
Important
Non-FTE / external contributors (subject matter experts that aren’t Microsoft employees) can’t be members of the teams described in this chapter, hence, they won’t gain any extra permissions on AVM repositories, therefore, they need to work in forks.
Naming Convention
The naming convention for the GitHub teams MUST follow the below pattern:
<hyphenated module name>-module-owners-<bicep/tf> - to be assigned as the GitHub repository’s Module Owners team
<hyphenated module name>-module-contributors-<bicep/tf> - to be assigned as the GitHub repository’s Module Contributors team
Note
The naming convention for terraform modules is slightly different than the naming convention for their respective GitHub teams.
Segments:
<hyphenated module name> == the AVM Module’s name, with each segment separated by dashes, i.e., avm-res-<resource provider>-<ARM resource type>
All officially documented module owner(s) MUST be added to the -module-owners- team. The -module-owners- team MUST NOT have any other members.
Any additional module contributors whom the module owner(s) agreed to work with MUST be added to the -module-contributors- team.
Unless explicitly requested and agreed, members of the AVM core team or any PG teams MUST NOT be added to the -module-owners- or -module-contributors- teams as permissions for them are granted through the teams described in SNFR9.
Grant Permissions - Bicep
Team memberships
Note
In case of terraform modules, permissions to the BRM repository (the repo of the Bicep Registry) are granted via assigning the -module-owners- and -module-contributors- teams to parent teams that already have the required level access configured. While it is the module owner’s responsibility to initiate the addition of their teams to the respective parents, only the AVM core team can approve this parent-child relationship.
Module owners MUST create their -module-owners- and -module-contributors- teams and as part of the provisioning process, they MUST request the addition of these teams to their respective parent teams (see the table below for details).
GitHub Team Name
Description
Permissions
Permissions granted through
Where to work?
<hyphenated module name>-module-owners-bicep
AVM Bicep Module Owners - <module name>
Write
Assignment to the avm-technical-reviewers-bicep parent team.
Examples - GitHub teams required for the Bicep resource module of Azure Virtual Network (avm/res/network/virtual-network):
avm-res-network-virtualnetwork-module-owners-bicep –> assign to the avm-technical-reviewers-bicep parent team.
avm-res-network-virtualnetwork-module-contributors-bicep –> assign to the avm-module-contributors-bicep parent team.
Tip
Direct link to create a new GitHub team and assign it to its parent: Create new team
Fill in the values as follows:
Team name: Following the naming convention described above, use the value defined in the module indexes.
Description: Follow the guidance above (see the Description column in the table above).
Parent team: Follow the guidance above (see the Permissions granted through column in the table above).
Team visibility: Visible
Team notifications: Enabled
CODEOWNERS file
As part of the “initial Pull Request” (that publishes the first version of the module), module owners MUST add an entry to the CODEOWNERS file in the BRM repository (here).
Note
Through this approach, the AVM core team will grant review permission to module owners as part of the standard PR review process.
Every CODEOWNERS entry (line) MUST include the following segments separated by a single whitespace character:
Path of the module, relative to the repo’s root, e.g.: /avm/res/network/virtual-network/
The -module-owners-team, with the @Azure/ prefix, e.g., @Azure/avm-res-network-virtualnetwork-module-owners-bicep
The GitHub team of the AVM Bicep reviewers, with the @Azure/ prefix, i.e., @Azure/avm-module-reviewers-bicep
Example - CODEOWNERS entry for the Bicep resource module of Azure Virtual Network (avm/res/network/virtual-network):
Module owners MUST assign the -module-owners-and -module-contributors- teams the necessary permissions on their Terraform module repository per the guidance below.
GitHub Team Name
Description
Permissions
Permissions granted through
Where to work?
<module name>-module-owners-tf
AVM Terraform Module Owners - <module name>
Admin
Direct assignment to repo
Module owner can decide whether they want to work in a branch local to the repo or in a fork.
Only the latest released version of a module MUST be supported.
For example, if an AVM Resource Module is used in an AVM Pattern Module that was working but now is not. The first step by the AVM Pattern Module owner should be to upgrade to the latest version of the AVM Resource Module test and then if not fixed, troubleshoot and fix forward from the that latest version of the AVM Resource Module onwards.
This avoids AVM Module owners from having to maintain multiple major release versions.
```shell
# Linux / MacOs# For Windows replace $PWD with your the local path or your repository#docker run -it -v $PWD:/repo -w /repo mcr.microsoft.com/powershell pwsh -Command '
#Invoke-WebRequest -Uri "https://zojovano.github.io/azure-verified-modules-copy/scripts/Set-AvmGitHubLabels.ps1" -OutFile "Set-AvmGitHubLabels.ps1"
$gh_version = "2.44.1"
Invoke-WebRequest -Uri "https://github.com/cli/cli/releases/download/v2.44.1/gh_2.44.1_linux_amd64.tar.gz" -OutFile "gh_$($gh_version)_linux_amd64.tar.gz"
apt-get update && apt-get install -y git
tar -xzf "gh_$($gh_version)_linux_amd64.tar.gz"
ls -lsa
mv "gh_$($gh_version)_linux_amd64/bin/gh" /usr/local/bin/
rm "gh_$($gh_version)_linux_amd64.tar.gz" && rm -rf "gh_$($gh_version)_linux_amd64"
gh --version
ls -lsa
gh auth login
$OrgProject = "Azure/terraform-azurerm-avm-res-kusto-cluster"
gh auth status
./Set-AvmGitHubLabels.ps1 -RepositoryName $OrgProject -CreateCsvLabelExports $false -NoUserPrompts $true
'```
By default this script will only update and append labels on the repository specified. However, this can be changed by setting the parameter -UpdateAndAddLabelsOnly to $false, which will remove all the labels from the repository first and then apply the AVM labels from the CSV only.
Make sure you elevate your privilege to admin level or the labels will not be applied to your repository. Go to repos.opensource.microsoft.com/orgs/Azure/repos/ to request admin access before running the script.
Full Script:
These Set-AvmGitHubLabels.ps1 can be downloaded from here.
[Diagnostics.CodeAnalysis.SuppressMessageAttribute("PSAvoidUsingWriteHost", "", Justification = "Coloured output required in this script")]
<#
.SYNOPSIS This script can be used to create the Azure Verified Modules (AVM) standard GitHub labels to a GitHub repository.
.DESCRIPTION This script can be used to create the Azure Verified Modules (AVM) standard GitHub labels to a GitHub repository.
By default, the script will remove all pre-existing labels and apply the AVM labels. However, this can be changed by using the -RemoveExistingLabels parameter and setting it to $false. The tool will also output the labels that exist in the repository before and after the script has run to a CSV file in the current directory, or a directory specified by the -OutputDirectory parameter.
The AVM labels to be created are documented here: TBC
.NOTES Please ensure you have specified the GitHub repositry correctly. The script will prompt you to confirm the repository name before proceeding.
.COMPONENT You must have the GitHub CLI installed and be authenticated to a GitHub account with access to the repository you are applying the labels to before running this script.
.LINK TBC
.Parameter RepositoryName
The name of the GitHub repository to apply the labels to.
.Parameter RemoveExistingLabels
If set to $true, the default value, the script will remove all pre-existing labels from the repository specified in -RepositoryName before applying the AVM labels. If set to $false, the script will not remove any pre-existing labels.
.Parameter UpdateAndAddLabelsOnly
If set to $true, the default value, the script will only update and add labels to the repository specified in -RepositoryName. If set to $false, the script will remove all pre-existing labels from the repository specified in -RepositoryName before applying the AVM labels.
.Parameter OutputDirectory
The directory to output the pre-existing and post-existing labels to in a CSV file. The default value is the current directory.
.Parameter CreateCsvLabelExports
If set to $true, the default value, the script will output the pre-existing and post-existing labels to a CSV file in the current directory, or a directory specified by the -OutputDirectory parameter. If set to $false, the script will not output the pre-existing and post-existing labels to a CSV file.
.Parameter GitHubCliLimit
The maximum number of labels to return from the GitHub CLI. The default value is 999.
.Parameter LabelsToApplyCsvUri
The URI to the CSV file containing the labels to apply to the GitHub repository. The default value is https://raw.githubusercontent.com/jtracey93/label-source/main/avm-github-labels.csv.
.Parameter NoUserPrompts
If set to $true, the default value, the script will not prompt the user to confirm they want to remove all pre-existing labels from the repository specified in -RepositoryName before applying the AVM labels. If set to $false, the script will prompt the user to confirm they want to remove all pre-existing labels from the repository specified in -RepositoryName before applying the AVM labels.
This is useful for running the script in automation workflows
.EXAMPLE Create the AVM labels in the repository Org/MyGitHubRepo and remove all pre-existing labels.
Set-AvmGitHubLabels.ps1 -RepositoryName "Org/MyGitHubRepo"
.EXAMPLE Create the AVM labels in the repository Org/MyGitHubRepo and do not remove any pre-existing labels, just overwrite any labels that have the same name.
Set-AvmGitHubLabels.ps1 -RepositoryName "Org/MyGitHubRepo" -RemoveExistingLabels $false
.EXAMPLE Create the AVM labels in the repository Org/MyGitHubRepo and output the pre-existing and post-existing labels to the directory C:\GitHubLabels.
Set-AvmGitHubLabels.ps1 -RepositoryName "Org/MyGitHubRepo" -OutputDirectory "C:\GitHubLabels"
.EXAMPLE Create the AVM labels in the repository Org/MyGitHubRepo and output the pre-existing and post-existing labels to the directory C:\GitHubLabels and do not remove any pre-existing labels, just overwrite any labels that have the same name.
Set-AvmGitHubLabels.ps1 -RepositoryName "Org/MyGitHubRepo" -OutputDirectory "C:\GitHubLabels" -RemoveExistingLabels $false
.EXAMPLE Create the AVM labels in the repository Org/MyGitHubRepo and do not create the pre-existing and post-existing labels CSV files and do not remove any pre-existing labels, just overwrite any labels that have the same name.
Set-AvmGitHubLabels.ps1 -RepositoryName "Org/MyGitHubRepo" -RemoveExistingLabels $false -CreateCsvLabelExports $false
.EXAMPLE Create the AVM labels in the repository Org/MyGitHubRepo and do not create the pre-existing and post-existing labels CSV files and do not remove any pre-existing labels, just overwrite any labels that have the same name. Finally, use a custom CSV file hosted on the internet to create the labels from.
Set-AvmGitHubLabels.ps1 -RepositoryName "Org/MyGitHubRepo" -OutputDirectory "C:\GitHubLabels" -RemoveExistingLabels $false -CreateCsvLabelExports $false -LabelsToApplyCsvUri "https://example.com/csv/avm-github-labels.csv"
#>#Requires-PSEdition Core [CmdletBinding()]
param (
[Parameter(Mandatory = $true)]
[string]$RepositoryName,
[Parameter(Mandatory = $false)]
[bool]$RemoveExistingLabels = $true,
[Parameter(Mandatory = $false)]
[bool]$UpdateAndAddLabelsOnly = $true,
[Parameter(Mandatory = $false)]
[bool]$CreateCsvLabelExports = $true,
[Parameter(Mandatory = $false)]
[string]$OutputDirectory = (Get-Location),
[Parameter(Mandatory = $false)]
[int]$GitHubCliLimit = 999,
[Parameter(Mandatory = $false)]
[string]$LabelsToApplyCsvUri = "https://zojovano.github.io/azure-verified-modules-copy/governance/avm-standard-github-labels.csv",
[Parameter(Mandatory = $false)]
[bool]$NoUserPrompts = $false
)
# Check if the GitHub CLI is installed $GitHubCliInstalled = Get-Command gh -ErrorAction SilentlyContinue
if ($null -eq $GitHubCliInstalled) {
throw"The GitHub CLI is not installed. Please install the GitHub CLI and try again." }
Write-Host "The GitHub CLI is installed..." -ForegroundColor Green
# Check if GitHub CLI is authenticated $GitHubCliAuthenticated = gh auth status
if ($LASTEXITCODE -ne0) {
Write-Host $GitHubCliAuthenticated -ForegroundColor Red
throw"Not authenticated to GitHub. Please authenticate to GitHub using the GitHub CLI, `gh auth login`, and try again." }
Write-Host "Authenticated to GitHub..." -ForegroundColor Green
# Check if GitHub repository name is valid $GitHubRepositoryNameValid = $RepositoryName -match"^[a-zA-Z0-9-]+/[a-zA-Z0-9-]+$"if ($false -eq $GitHubRepositoryNameValid) {
throw"The GitHub repository name $RepositoryName is not valid. Please check the repository name and try again. The format must be <OrgName>/<RepoName>" }
# List GitHub repository provided and check it exists $GitHubRepository = gh repo view $RepositoryName
if ($LASTEXITCODE -ne0) {
Write-Host $GitHubRepository -ForegroundColor Red
throw"The GitHub repository $RepositoryName does not exist. Please check the repository name and try again." }
Write-Host "The GitHub repository $RepositoryName exists..." -ForegroundColor Green
# PRE - Get the current GitHub repository labels and export to a CSV file in the current directory or where -OutputDirectory specifies if set to a valid directory path and the directory exists or can be created if it does not exist alreadyif ($RemoveExistingLabels -or $UpdateAndAddLabelsOnly) {
Write-Host "Getting the current GitHub repository (pre) labels for $RepositoryName..." -ForegroundColor Yellow
$GitHubRepositoryLabels = gh label list -R $RepositoryName -L $GitHubCliLimit --json name,description,color
if ($null -ne $GitHubRepositoryLabels -and $CreateCsvLabelExports -eq $true) {
$csvFileNamePathPre = "$OutputDirectory\$($RepositoryName.Replace('/', '_'))-Labels-Pre-$(Get-Date -Format FileDateTime).csv" Write-Host "Exporting the current GitHub repository (pre) labels for $RepositoryName to $csvFileNamePathPre" -ForegroundColor Yellow
$GitHubRepositoryLabels | ConvertFrom-Json | Export-Csv -Path $csvFileNamePathPre -NoTypeInformation
}
}
# Remove all pre-existing labels if -RemoveExistingLabels is set to $true and user confirms they want to remove all pre-existing labelsif ($null -ne $GitHubRepositoryLabels) {
$GitHubRepositoryLabelsJson = $GitHubRepositoryLabels | ConvertFrom-Json
if ($RemoveExistingLabels -eq $true -and $NoUserPrompts -eq $false -and $UpdateAndAddLabelsOnly -eq $false) {
$RemoveExistingLabelsConfirmation = Read-Host "Are you sure you want to remove all $($GitHubRepositoryLabelsJson.Count) pre-existing labels from $($RepositoryName)? (Y/N)"if ($RemoveExistingLabelsConfirmation -eq"Y") {
Write-Host "Removing all pre-existing labels from $RepositoryName..." -ForegroundColor Yellow
$GitHubRepositoryLabels | ConvertFrom-Json | ForEach-Object {
Write-Host "Removing label $($_.name) from $RepositoryName..." -ForegroundColor DarkRed
gh label delete -R $RepositoryName $_.name --yes
}
}
}
if ($RemoveExistingLabels -eq $true -and $NoUserPrompts -eq $true -and $UpdateAndAddLabelsOnly -eq $false) {
Write-Host "Removing all pre-existing labels from $RepositoryName..." -ForegroundColor Yellow
$GitHubRepositoryLabels | ConvertFrom-Json | ForEach-Object {
Write-Host "Removing label $($_.name) from $RepositoryName..." -ForegroundColor DarkRed
gh label delete -R $RepositoryName $_.name --yes
}
}
}
if ($null -eq $GitHubRepositoryLabels) {
Write-Host "No pre-existing labels to remove or not selected to be removed from $RepositoryName..." -ForegroundColor Magenta
}
# Check LabelsToApplyCsvUri is valid and contains a CSV content Write-Host "Checking $LabelsToApplyCsvUri is valid..." -ForegroundColor Yellow
$LabelsToApplyCsvUriValid = $LabelsToApplyCsvUri -match"^https?://"if ($false -eq $LabelsToApplyCsvUriValid) {
throw"The LabelsToApplyCsvUri $LabelsToApplyCsvUri is not valid. Please check the URI and try again. The format must be a valid URI." }
Write-Host "The LabelsToApplyCsvUri $LabelsToApplyCsvUri is valid..." -ForegroundColor Green
# Create AVM lables from the AVM labels CSV file stored on the web using the convertfrom-csv cmdlet $avmLabelsCsv = Invoke-WebRequest -Uri $LabelsToApplyCsvUri | ConvertFrom-Csv
# Check if the AVM labels CSV file contains the following columns: Name, Description, HEX $avmLabelsCsvColumns = $avmLabelsCsv | Get-Member -MemberType NoteProperty | Select-Object -ExpandProperty Name
$avmLabelsCsvColumnsValid = $avmLabelsCsvColumns -contains"Name"-and $avmLabelsCsvColumns -contains"Description"-and $avmLabelsCsvColumns -contains"HEX"if ($false -eq $avmLabelsCsvColumnsValid) {
throw"The labels CSV file does not contain the required columns: Name, Description, HEX. Please check the CSV file and try again. It contains the following columns: $avmLabelsCsvColumns" }
Write-Host "The labels CSV file contains the required columns: Name, Description, HEX" -ForegroundColor Green
# Create the AVM labels in the GitHub repository Write-Host "Creating/Updating the $($avmLabelsCsv.Count) AVM labels in $RepositoryName..." -ForegroundColor Yellow
$avmLabelsCsv | ForEach-Object {
if ($GitHubRepositoryLabelsJson.name -contains $_.name) {
Write-Host "The label $($_.name) already exists in $RepositoryName. Updating the label to ensure description and color are consitent..." -ForegroundColor Magenta
gh label create -R $RepositoryName "$($_.name)" -c $_.HEX -d $($_.Description) --force
}
else {
Write-Host "The label $($_.name) does not exist in $RepositoryName. Creating label $($_.name) in $RepositoryName..." -ForegroundColor Cyan
gh label create -R $RepositoryName "$($_.Name)" -c $_.HEX -d $($_.Description) --force
}
}
# POST - Get the current GitHub repository labels and export to a CSV file in the current directory or where -OutputDirectory specifies if set to a valid directory path and the directory exists or can be created if it does not exist alreadyif ($CreateCsvLabelExports -eq $true) {
Write-Host "Getting the current GitHub repository (post) labels for $RepositoryName..." -ForegroundColor Yellow
$GitHubRepositoryLabels = gh label list -R $RepositoryName -L $GitHubCliLimit --json name,description,color
if ($null -ne $GitHubRepositoryLabels) {
$csvFileNamePathPre = "$OutputDirectory\$($RepositoryName.Replace('/', '_'))-Labels-Post-$(Get-Date -Format FileDateTime).csv" Write-Host "Exporting the current GitHub repository (post) labels for $RepositoryName to $csvFileNamePathPre" -ForegroundColor Yellow
$GitHubRepositoryLabels | ConvertFrom-Json | Export-Csv -Path $csvFileNamePathPre -NoTypeInformation
}
}
# If -RemoveExistingLabels is set to $true and user confirms they want to remove all pre-existing labels check that only the avm labels exist in the repositoryif ($RemoveExistingLabels -eq $true -and ($RemoveExistingLabelsConfirmation -eq"Y"-or $NoUserPrompts -eq $true) -and $UpdateAndAddLabelsOnly -eq $false) {
Write-Host "Checking that only the AVM labels exist in $RepositoryName..." -ForegroundColor Yellow
$GitHubRepositoryLabels = gh label list -R $RepositoryName -L $GitHubCliLimit --json name,description,color
$GitHubRepositoryLabels | ConvertFrom-Json | ForEach-Object {
if ($avmLabelsCsv.Name -notcontains $_.name) {
throw"The label $($_.name) exists in $RepositoryName but is not in the CSV file." }
}
Write-Host "Only the CSV labels exist in $RepositoryName..." -ForegroundColor Green
}
Write-Host "The CSV labels have been created/updated in $RepositoryName..." -ForegroundColor Green
Module owners MUST set a branch protection policy on their GitHub Repositories for AVM modules against their default branch, typically main, to do the following:
Requires a Pull Request before merging
Require approval of the most recent reviewable push
Dismiss stale pull request approvals when new commits are pushed
Require linear history
Prevents force pushes
Not allow deletions
Require CODEOWNERS review
Do not allow bypassing the above settings
Above settings MUST also be enforced to administrators
Tip
If you use the template repository as mentioned in the contribution guide, the above will automatically be set.
Telemetry
The content below is listed based on the following tags
We will maintain a set of CSV files in the AVM Central Repo (Azure/Azure-Verified-Modules) with the required TelemetryId prefixes to enable checks to utilize this list to ensure the correct IDs are used. To see the formatted content of these CSV files with additional information, please visit the AVM Module Indexes page.
These will also be provided as a comment on the module proposal, once accepted, from the AVM core team.
Modules MUST provide the capability to collect deployment/usage telemetry as detailed in Telemetry further.
To highlight that AVM modules use telemetry, an information notice MUST be included in the footer of each module’s README.md file with the below content. (See more details on this requirement, here.)
Telemetry Information Notice
Note
The following information notice is automatically added at the bottom of the README.md file of the module when
Terraform: Executing the make docs command with the note and header ## Data Collection being placed in the module’s _footer.md beforehand
### Data Collection

The software may collect information about you and your use of the software and send it to Microsoft. Microsoft may use this information to provide services and improve our products and services. You may turn off the telemetry as described in the [repository](https://aka.ms/avm/telemetry). There are also some features in the software that may enable you and Microsoft to collect data from users of your applications. If you use these features, you must comply with applicable law, including providing appropriate notices to users of your applications together with a copy of Microsoft’s privacy statement. Our privacy statement is located at <https://go.microsoft.com/fwlink/?LinkID=824704>. You can learn more about data collection and use in the help documentation and our privacy statement. Your use of the software operates as your consent to these practices.
The ARM deployment name used for the telemetry MUST follow the pattern and MUST be no longer than 64 characters in length: 46d3xbcp.<res/ptn>.<(short) module name>.<version>.<uniqueness>
<res/ptn> == AVM Resource or Pattern Module
<(short) module name> == The AVM Module’s, possibly shortened, name including the resource provider and the resource type, without;
The prefixes: avm-res-
The prefixes: avm-ptn-
<version> == The AVM Module’s MAJOR.MINOR version (only) with . (periods) replaced with - (hyphens), to allow simpler splitting of the ARM deployment name
<uniqueness> == This section of the ARM deployment name is to be used to ensure uniqueness of the deployment name.
This is to cater for the following scenarios:
The module is deployed multiple times to the same:
Due to the 64-character length limit of Azure deployment names, the <(short) module name> segment has a length limit of 36 characters, so if the module name is longer than that, it MUST be truncated to 36 characters. If any of the semantic version’s segments are longer than 1 character, it further restricts the number of characters that can be used for naming the module.
An example deployment name for the AVM Virtual Machine Resource Module would be: 46d3xbcp.res.compute-virtualmachine.1-2-3.eum3
An example deployment name for a shortened module name would be: 46d3xbcp.res.desktopvirtualization-appgroup.1-2-3.eum3
Tip
Terraform: Terraform uses a telemetry provider, the configuration of which is the same for every module and is included in the template repo.
General: See the language specific contribution guides for detailed guidance and sample code to use in AVM modules to achieve this requirement.
To enable telemetry data collection for Terraform modules, the modtm telemetry provider MUST be used. This lightweight telemetry provider sends telemetry data to Azure Application Insights via a HTTP POST front end service.
The modtm telemetry provider is included in all Terraform modules and is enabled by default through the main.telemetry.tf file being automatically distributed from the template repo.
The modtm provider MUST be listed under the required_providers section in the module’s terraform.tf file using the following entry. This is also validated by the linter.
The telemetry enablement MUST be on/enabled by default, however this MUST be able to be disabled by a module consumer by setting the below parameter/variable value to false:
Bicep: enableTelemetry
Terraform: enable_telemetry
Note
Whenever a module references AVM modules that implement the telemetry parameter (e.g., a pattern module that uses AVM resource modules), the telemetry parameter value MUST be passed through to these modules. This is necessary to ensure a consumer can reliably enable & disable the telemetry feature for all used modules.
This general specification can be modified for some use-cases, that are language specific:
Bicep
For cross-references in resource modules, the spec BCPFR7 also applies.
Terraform
Currently, no further requirements apply.
Naming / Composition
The content below is listed based on the following tags
Modules MAY create/adopt public preview services and features at their discretion.
Preview API versions MAY be used when:
The resource/service/feature is GA but the only API version available for the GA resource/service/feature is a preview version
For example, Diagnostic Settings (Microsoft.Insights/diagnosticSettings) the latest version of the API available with GA features, like Category Groups etc., is 2021-05-01-preview
Otherwise the latest “non-preview” version of the API SHOULD be used
Preview services and features, SHOULD NOT be promoted and exposed, unless they are supported by the respective PG, and it’s documented publicly.
However, they MAY be exposed at the module owners discretion, but the following rules MUST be followed:
The description of each of the parameters/variables used for the preview service/feature MUST start with:
“THIS IS A <PARAMETER/VARIABLE> USED FOR A PREVIEW SERVICE/FEATURE, MICROSOFT MAY NOT PROVIDE SUPPORT FOR THIS, PLEASE CHECK THE PRODUCT DOCS FOR CLARIFICATION”
Modules SHOULD set defaults in input parameters/variables to align to high priority/impact/severity recommendations, where appropriate and applicable, in the following frameworks and resources:
They SHOULD NOT align to these recommendations when it requires an external dependency/resource to be deployed and configured and then associated to the resources in the module.
Alignment SHOULD prioritize best-practices and security over cost optimization, but MUST allow for these to be overridden by a module consumer easily, if desired.
ID: SFR5 - Category: Composition - Availability Zones
Modules that deploy zone-redundant resources MUST enable the spanning across as many zones as possible by default, typically all 3.
Modules that deploy zonal resources MUST provide the ability to specify a zone for the resources to be deployed/pinned to. However, they MUST NOT default to a particular zone by default, e.g. 1 in an effort to make the consumer aware of the zone they are selecting to suit their architecture requirements.
For both scenarios the modules MUST expose these configuration options via configurable parameters/variables.
ID: SFR6 - Category: Composition - Data Redundancy
Modules that deploy resources or patterns that support data redundancy SHOULD enable this to the highest possible value by default, e.g. RA-GZRS. When a resource or pattern doesn’t provide the ability to specify data redundancy as a simple property, e.g. GRS etc., then the modules MUST provide the ability to enable data redundancy for the resources or pattern via parameters/variables.
For example, a Storage Account module can simply set the sku.name property to Standard_RAGZRS. Whereas a SQL DB or Cosmos DB module will need to expose more properties, via parameters/variables, to allow the specification of the regions to replicate data to as per the consumers requirements.
Module owners MUST set the default resource name prefix for child, extension, and interface resources to the associated abbreviation for the specific resource as documented in the following CAF article Abbreviation examples for Azure resources, if specified and documented. This reduces the amount of input values a module consumer MUST provide by default when using the module.
For example, a Private Endpoint that is being deployed as part of a resource module, via the mandatory interfaces, MUST set the Private Endpoint’s default name to begin with the prefix of pep-.
Module owners MUST also provide the ability for these default names, including the prefixes, to be overridden via a parameter/variable if the consumer wishes to.
Furthermore, as per RMNFR2, Resource Modules MUST not have a default value specified for the name of the primary resource and therefore the name MUST be provided and specified by the module consumer.
The name provided MAY be used by the module owner to generate the rest of the default name for child, extension, and interface resources if they wish to. For example, for the Private Endpoint mentioned above, the full default name that can be overridden by the consumer, MAY be pep-<primary-resource-name>.
Tip
If the resource does not have a documented abbreviation in Abbreviation examples for Azure resources, then the module owner is free to use a sensible prefix instead.
Resource modules support the following optional features/extension resources, as specified, if supported by the primary resource. The top-level variable/parameter names MUST be:
Optional Features/Extension Resources
Bicep Parameter Name
Terraform Variable Name
MUST/SHOULD
Diagnostic Settings
diagnosticSettings
diagnostic_settings
MUST
Role Assignments
roleAssignments
role_assignments
MUST
Resource Locks
lock
lock
MUST
Tags
tags
tags
MUST
Managed Identities (System / User Assigned)
managedIdentities
managed_identities
MUST
Private Endpoints
privateEndpoints
private_endpoints
MUST
Customer Managed Keys
customerManagedKey
customer_managed_key
MUST
Azure Monitor Alerts
alerts
alerts
SHOULD
Resource modules MUST NOT deploy required/dependent resources for the optional features/extension resources specified above. For example, for Diagnostic Settings the resource module MUST NOT deploy the Log Analytics Workspace, this is expected to be already in existence from the perspective of the resource module deployed via another method/module etc.
Note
Please note that the implementation of Customer Managed Keys from an ARM API perspective is different across various RPs that implement Customer Managed Keys in their service. For that reason you may see differences between modules on how Customer Managed Keys are handled and implemented, but functionality will be as expected.
Module owners MAY choose to utilize cross repo dependencies for these “add-on” resources, or MAY chose to implement the code directly in their own repo/module. So long as the implementation and outputs are as per the specifications requirements, then this is acceptable.
Tip
Make sure to checkout the language specific specifications for more info on this:
Resource modules MUST implement a common interface, e.g. the input’s data structures and properties within them (objects/arrays/dictionaries/maps), for the optional features/extension resources:
When a given version of an Azure resource used in a resource module reaches its end-of-life (EOL) and is no longer supported by Microsoft, the module owner SHOULD ensure that:
The module is aligned with these changes and only includes supported versions of the resource. This is typically achieved through the allowed values in the parameter that specifies the resource SKU or type.
The following notice is shown under the Notes section of the module’s readme.md. (If any related public announcement is available, it can also be linked to from the Notes section.):
“Certain versions of this Azure resource reached their end of life. The latest version of this module only includes supported versions of the resource. All unsupported versions have been removed from the related parameters.”
AND the related parameter’s description:
“Certain versions of this Azure resource reached their end of life. The latest version of this module only includes supported versions of the resource. All unsupported versions have been removed from this parameter.”
We will maintain a set of CSV files in the AVM Central Repo (Azure/Azure-Verified-Modules) with the correct singular names for all resource types to enable checks to utilize this list to ensure repos are named correctly. To see the formatted content of these CSV files with additional information, please visit the AVM Module Indexes page.
This will be updated quarterly, or ad-hoc as new RPs/ Resources are created and highlighted via a check failure.
Resource modules MUST follow the below naming conventions (all lower case):
Bicep Resource Module Naming
Naming convention (module name for registry): avm/res/<hyphenated resource provider name>/<hyphenated ARM resource type>
Example: avm/res/compute/virtual-machine or avm/res/managed-identity/user-assigned-identity
Segments:
res defines this is a resource module
<hyphenated resource provider name> is the resource provider’s name after the Microsoft part, with each word starting with a capital letter separated by dashes, e.g., Microsoft.Compute = compute, Microsoft.ManagedIdentity = managed-identity.
<hyphenated ARM resource type> is the singular version of the word after the resource provider, with each word starting with a capital letter separated by dashes, e.g., Microsoft.Compute/virtualMachines = virtual-machine, BUTMicrosoft.Network/trafficmanagerprofiles = trafficmanagerprofile - since trafficmanagerprofiles is all lower case as per the ARM API definition.
Bicep Child Module Naming
Naming convention (module name for registry):avm/res/<hyphenated resource provider name>/<hyphenated ARM resource type>/<hyphenated child resource type/<hyphenated grandchild resource type>/<etc.>
Example: avm/res/network/virtual-network/subnet or avm/res/storage/storage-account/blob-service/container
Segments:
res defines this is a resource module
<hyphenated resource provider name> is the resource provider’s name after the Microsoft part, with each word starting with a capital letter separated by dashes, e.g., Microsoft.Network = network.
<hyphenated ARM resource type> is the singular version of the word after the resource provider, with each word starting with a capital letter separated by dashes, e.g., Microsoft.Network/virtualNetworks = virtual-network.
<hyphenated child resource type (to be repeated for grandchildren, etc.)> is the singular version of the word after the resource provider, with each word starting with a capital letter separated by dashes, e.g., Microsoft.Network/virtualNetworks/subnets = subnet or Microsoft.Storage/storageAccounts/blobServices/containers = blob-service/container.
Terraform Resource Module Naming
Naming convention:
avm-res-<resource provider>-<ARM resource type> (module name for registry)
terraform-<provider>-avm-res-<resource provider>-<ARM resource type> (GitHub repository name to meet registry naming requirements)
Example: avm-res-compute-virtualmachine or avm-res-managedidentity-userassignedidentity
Segments:
<provider> is the logical abstraction of various APIs used by Terraform. In most cases, this is going to be azurerm or azuread for resource modules.
res defines this is a resource module
<resource provider> is the resource provider’s name after the Microsoft part, e.g., Microsoft.Compute = compute.
<ARM resource type> is the singular version of the word after the resource provider, e.g., Microsoft.Compute/virtualMachines = virtualmachine
ID: RMNFR3 - Category: Composition - RP Collaboration
Module owners (Microsoft FTEs) SHOULD reach out to the respective Resource Provider teams to build a partnership and collaboration on the modules creation, existence and long term maintenance.
Module owners MAY cross-references other modules to build either Resource or Pattern modules. However, they MUST be referenced only by a HashiCorp Terraform registry reference to a pinned version e.g.,
The module’s owners MUST use map(xxx) or set(xxx) as resource’s for_each collection, the map’s key or set’s element MUST be static literals.
Good example:
resource"azurerm_subnet""pair" {
for_each = var.subnet_map // `map(string)`, when user call this module, it could be: `{ "subnet0": "subnet0" }`, or `{ "subnet0": azurerm_subnet.subnet0.name }`
name = "${each.value}"-pairresource_group_name = azurerm_resource_group.example.namevirtual_network_name = azurerm_virtual_network.example.nameaddress_prefixes = ["10.0.1.0/24"]
}
Bad example:
resource"azurerm_subnet""pair" {
for_each = var.subnet_name_set // `set(string)`, when user use `toset([azurerm_subnet.subnet0.name])`, it would cause an error.
name = "${each.value}"-pairresource_group_name = azurerm_resource_group.example.namevirtual_network_name = azurerm_virtual_network.example.nameaddress_prefixes = ["10.0.1.0/24"]
}
There are 3 types of assignment statements in a resource or data block: argument, meta-argument and nested block. The argument assignment statement is a parameter followed by =:
Sometimes we need to ensure that the resources created are compliant to some rules at a minimum extent, for example a subnet has to be connected to at least one network_security_group. The user SHOULD pass in a security_group_id and ask us to make a connection to an existing security_group, or want us to create a new security group.
The disadvantage of this approach is if the user create a security group directly in the root module and use the id as a variable of the module, the expression which determines the value of count will contain an attribute from another resource, the value of this very attribute is “known after apply” at plan stage. Terraform core will not be able to get an exact plan of deployment during the “plan” stage.
For this kind of parameters, wrapping with object type is RECOMMENDED:
variable"security_group" {
type:object({
id = string })
default = null}
The advantage of doing so is encapsulating the value which is “known after apply” in an object, and the object itself can be easily found out if it’s null or not. Since the id of a resource cannot be null, this approach can avoid the situation we are facing in the first example, like the following:
variable used as feature switches SHOULD apply a positive statement, use xxx_enabled instead of xxx_disabled. Avoid double negatives like !xxx_disabled.
Please use xxx_enabled instead of xxx_disabled as name of a variable.
ID: TFNFR17 - Category: Code Style - Variables with Descriptions
The target audience of description is the module users.
For a newly created variable (Eg. variable for switching dynamic block on-off), it’s descriptionSHOULD precisely describe the input parameter’s purpose and the expected data type. descriptionSHOULD NOT contain any information for module developers, this kind of information can only exist in code comments.
For object type variable, description can be composed in HEREDOC format:
variable"kubernetes_cluster_key_management_service" {
type:object({
key_vault_key_id = stringkey_vault_network_access = optional(string)
})
default = nulldescription = <<-EOT - `key_vault_key_id` - (Required) Identifier of Azure Key Vault key. See [key identifier format](https://learn.microsoft.com/en-us/azure/key-vault/general/about-keys-secrets-certificates#vault-name-and-object-name) for more details. When Azure Key Vault key management service is enabled, this field is required and must be a valid key identifier. When `enabled` is `false`, leave the field empty.
- `key_vault_network_access` - (Optional) Network access of the key vault Network access of key vault. The possible values are `Public` and `Private`. `Public` means the key vault allows public access from all networks. `Private` means the key vault disables public access and enables private link. Defaults to `Public`.
EOT}
ID: TFNFR19 - Category: Code Style - Sensitive Data Variables
If variable’s type is object and contains one or more fields that would be assigned to a sensitive argument, then this whole variableSHOULD be declared as sensitive = true, otherwise you SHOULD extract sensitive field into separated variable block with sensitive = true.
Nullable SHOULD be set to false for collection values (e.g. sets, maps, lists) when using them in loops. However for scalar values like string and number, a null value MAY have a semantic meaning and as such these values are allowed.
Sometimes we will find names for some variable are not suitable anymore, or a change SHOULD be made to the data type. We want to ensure forward compatibility within a major version, so direct changes are strictly forbidden. The right way to do this is move this variable to an independent deprecated_variables.tf file, then redefine the new parameter in variable.tf and make sure it’s compatible everywhere else.
Deprecated variableMUST be annotated as DEPRECATED at the beginning of the description, at the same time the replacement’s name SHOULD be declared. E.g.,
variable"enable_network_security_group" {
type = stringdefault = nulldescription = "DEPRECATED, use `network_security_group_enabled` instead; Whether to generate a network security group and assign it to the subnet. Changing this forces a new resource to be created."}
A cleanup of deprecated_variables.tfSHOULD be performed during a major version release.
The terraform.tf file MUST only contain one terraform block.
The first line of the terraform block MUST define a required_version property for the Terraform CLI.
The required_version property MUST include a constraint on the minimum version of the Terraform CLI. Previous releases of the Terraform CLI can have unexpected behavior.
The required_version property MUST include a constraint on the maximum major version of the Terraform CLI. Major version releases of the Terraform CLI can introduce breaking changes and MUST be tested.
The required_version property constraint SHOULD use the ~> #.# or the >= #.#.#, < #.#.# format.
Note: You can read more about Terraform version constraints in the documentation.
ID: TFNFR26 - Category: Code Style - Providers in required_providers
The terraform block in terraform.tfMUST contain the required_providers block.
Each provider used directly in the module MUST be specified with the source and version properties. Providers in the required_providers block SHOULD be sorted in alphabetical order.
Do not add providers to the required_providers block that are not directly required by this module. If submodules are used then each submodule SHOULD have its own versions.tf file.
The source property MUST be in the format of namespace/name. If this is not explicitly specified, it can cause failure.
The version property MUST include a constraint on the minimum version of the provider. Older provider versions may not work as expected.
The version property MUST include a constraint on the maximum major version. A provider major version release may introduce breaking change, so updates to the major version constraint for a provider MUST be tested.
The version property constraint SHOULD use the ~> #.# or the >= #.#.#, < #.#.# format.
Note: You can read more about Terraform version constraints in the documentation.
By rules, in the module code providerMUST NOT be declared. The only exception is when the module indeed need different instances of the same kind of provider(Eg. manipulating resources across different locations or accounts), you MUST declare configuration_aliases in terraform.required_providers. See details in this document.
provider block declared in the module MUST only be used to differentiate instances used in resource and data. Declaration of fields other than alias in provider block is strictly forbidden. It could lead to module users unable to utilize count, for_each or depends_on. Configurations of the provider instance SHOULD be passed in by the module users.
Sometimes we notice that the name of certain output is not appropriate anymore, however, since we have to ensure forward compatibility in the same major version, its name MUST NOT be changed directly. It MUST be moved to an independent deprecated_outputs.tf file, then redefine a new output in output.tf and make sure it’s compatible everywhere else in the module.
A cleanup SHOULD be performed to deprecated_outputs.tf and other logics related to compatibility during a major version upgrade.
ID: TFNFR31 - Category: Code Style - locals.tf for Locals Only
In locals.tf, file we could declare multiple locals blocks, but only locals blocks are allowed.
You MAY declare locals blocks next to a resource block or data block for some advanced scenarios, like making a fake module to execute some light-weight tests aimed at the expressions.
From Terraform AzureRM 3.0, the default value of prevent_deletion_if_contains_resources in provider block is true. This will lead to an unstable test because the test subscription has some policies applied, and they will add some extra resources during the run, which can cause failures during destroy of resource groups.
Since we cannot guarantee our testing environment won’t be applied some Azure Policy Remediation Tasks in the future, for a robust testing environment, prevent_deletion_if_contains_resourcesSHOULD be explicitly set to false.
newres is a command-line tool that generates Terraform configuration files for a specified resource type. It automates the process of creating variables.tf and main.tf files, making it easier to get started with Terraform and reducing the time spent on manual configuration.
Module owners MAY use newres when they’re trying to add new resource block, attribute, or nested block. They MAY generate the whole block along with the corresponding variable blocks in an empty folder, then copy-paste the parts they need with essential refactoring.
Inputs / Outputs
The content below is listed based on the following tags
ID: SNFR22 - Category: Inputs - Parameters/Variables for Resource IDs
A module parameter/variable that requires a full Azure Resource ID as an input value, e.g. /subscriptions/{subscriptionId}/resourceGroups/{resourceGroupName}/providers/Microsoft.KeyVault/vaults/{keyVaultName}, MUST contain ResourceId/resource_id in its parameter/variable name to assist users in knowing what value to provide at a glance of the parameter/variable name.
Example for the property workspaceId for the Diagnostic Settings resource. In Bicep its parameter name should be workspaceResourceId and the variable name in Terraform should be workspace_resource_id.
workspaceId is not descriptive enough and is ambiguous as to which ID is required to be input.
Parameters/variables that pertain to the primary resource MUST NOT use the resource type in the name.
e.g., use sku, vs. virtualMachineSku/virtualmachine_sku
Another example for where RPs contain some of their name within a property, leave the property unchanged. E.g. Key Vault has a property called keySize, it is fine to leave as this and not remove the key part from the property/parameter name.
A resource module MUST use the following standard inputs:
name (no default)
location (if supported by the resource and not a global resource, then use Resource Group location, if resource supports Resource Groups, otherwise no default)
Authors SHOULD NOT output entire resource objects as these may contain sensitive outputs and the schema can change with API or provider versions. Instead, authors SHOULD output the computed attributes of the resource as discreet outputs. This kind of pattern protects against provider schema changes and is known as an anti-corruption layer.
Remember, you SHOULD NOT output values that are already inputs (other than name).
E.g.,
# Resource output, computed attribute.
output"foo" {
description = "MyResource foo attribute"value = azurerm_resource_myresource.foo}# Resource output for resources that are deployed using `for_each`. Again only computed attributes.
output"childresource_foos" {
description = "MyResource children's foo attributes"value = {
forkey, valueinazurerm_resource_mychildresource:key => value.foo }
}# Output of a sensitive attribute
output"bar" {
description = "MyResource bar attribute"value = azurerm_resource_myresource.barsensitive = true}
ID: TFNFR14 - Category: Inputs - Not allowed variables
Since Terraform 0.13, count, for_each and depends_on are introduced for modules, module development is significantly simplified. Module’s owners MUST NOT add variables like enabled or module_depends_on to control the entire module’s operation. Boolean feature toggles are acceptable however.
Testing
The content below is listed based on the following tags
Modules MUST implement end-to-end (deployment) testing that create actual resources to validate that module deployments work. In Bicep tests are sourced from the directories in /tests/e2e. In Terraform, these are in /examples.
Each test MUST run and complete without user inputs successfully, for automation purposes.
Each test MUST also destroy/clean-up its resources and test dependencies following a run.
Tip
To see a directory and file structure for a module, see the language specific contribution guide.
It is likely that to complete E2E tests, a number of resources will be required as dependencies to enable the tests to pass successfully. Some examples:
When testing the Diagnostic Settings interface for a Resource Module, you will need an existing Log Analytics Workspace to be able to send the logs to as a destination.
When testing the Private Endpoints interface for a Resource Module, you will need an existing Virtual Network, Subnet and Private DNS Zone to be able to complete the Private Endpoint deployment and configuration.
Module owners MUST:
Create the required resources that their module depends upon in the test file/directory
They MUST either use:
Simple/native resource declarations/definitions in their respective IaC language, OR
Another already published AVM Module that MUST be pinned to a specific published version.
They MUST NOT use any local directory path references or local copies of AVM modules in their own modules test directory.
➕ Terraform & Bicep Log Analytics Workspace examples using simple/native declarations for use in E2E tests
Deployment tests are an important part of a module’s validation and a staple of AVM’s CI environment. However, there are situations where certain e2e-test-deployments cannot be performed against AVM’s test environment (e.g., if a special configuration/registration (such as certain AI models) is required). For these cases, the CI offers the possibility to ‘skip’ specific test cases by placing a file named .e2eignore in their test folder.
Note
A skipped test case is still added to the ‘Usage Examples’ section of the module’s readme and should be manually validated in regular intervals.
Details for use in E2E tests
You MUST add a note to the tests metadata description, which explains the excemption.
If you require that a test is skipped and add an “.e2eignore” file (e.g. \<module\>/tests/e2e/\<testname\>/.e2eignore) to a pull request, a member of the AVM Core Technical Bicep Team must approve set pull request. The content of the file is logged the module’s workflow runs and transparently communicates why the test case is skipped during the deployment validation stage. It iss hence important to specify the reason for skipping the deployment in this file.
Sample filecontent:
The test is skipped, as only one instance of this service can be deployed to a subscription.
Note
For resource modules, the ‘defaults’ and ‘waf-aligned’ tests can’t be skipped.
The deployment of a test can be skipped by adding a .e2eignore file into a test folder (e.g. /examples/<testname>).
Modules SHOULD implement unit testing to ensure logic and conditions within parameters/variables/locals are performing correctly. These tests MUST pass before a module version can be published.
Unit Tests test specific module functionality, without deploying resources. Used on more complex modules. In Terraform these live in tests/unit.
Modules MUST use static analysis, e.g., linting, security scanning (PSRule, tflint, etc.). These tests MUST pass before a module version can be published.
There may be differences between languages in linting rules standards, but the AVM core team will try to close these and bring them into alignment over time.
Modules MUST implement idempotency end-to-end (deployment) testing. E.g. deploying the module twice over the top of itself.
Modules SHOULD pass the idempotency test, as we are aware that there are some exceptions where they may fail as a false-positive or legitimate cases where a resource cannot be idempotent.
For example, Virtual Machine Image names must be unique on each resource creation/update.
Module owners MUST test that child and extension resources and those Bicep or Terreform interface resources that are supported by their modules, are validated in E2E tests as per SNFR2 to ensure they deploy and are configured correctly.
These MAY be tested in a separate E2E test and DO NOT have to be tested in each E2E test.
README documentation MUST be automatically/programmatically generated. MUST include the sections as defined in the language specific requirements BCPNFR2, TFNFR2.
Where descriptions for variables and outputs spans multiple lines. The description MAY provide variable input examples for each variable using the HEREDOC format and embedded markdown.
Example:
variable"my_complex_input" {
type = map(object({
param1 = stringparam2 = optional(number, null)
}))
description = <<DESCRIPTION A complex input variable that is a map of objects.
Each object has two attributes:
- `param1`: A required string parameter.
- `param2`: (Optional) An optional number parameter.
Example Input:
```terraform
my_complex_input = {
"object1" = {
param1 = "value1"
param2 = 2
}
"object2" = {
param1 = "value2"
}
}
```
DESCRIPTION }
You cannot specify the patch version for terraform modules in the public Bicep Registry, as this is automatically incremented by 1 each time a module is published. You can only set the Major and Minor versions.
Modules MUST use semantic versioning (aka semver) for their versions and releases in accordance with: Semantic Versioning 2.0.0
For example all modules should be released using a semantic version that matches this pattern: X.Y.Z
X == Major Version
Y == Minor Version
Z == Patch Version
Module versioning before first Major version release 1.0.0
Initially modules MUST be released as version 0.1.0 and incremented via Minor and Patch versions only until the AVM Core Team are confident the AVM specifications are mature enough and appropriate CI test coverage is in place, plus the module owner is happy the module has been “road tested” and is now stable enough for its first Major release of version 1.0.0.
Note
Releasing as version 0.1.0 initially and only incrementing Minor and Patch versions allows the module owner to make breaking changes more easily and frequently as it’s still not an official Major/Stable release. 👍
Until first Major version 1.0.0 is released, given a version number X.Y.Z:
X Major version MUST NOT be bumped.
Y Minor version MUST be bumped when introducing breaking changes (which would normally bump Major after 1.0.0 release) or feature updates (same as it will be after 1.0.0 release).
Z Patch version MUST be bumped when introducing non-breaking, backward compatible bug fixes (same as it will be after 1.0.0 release).
A module SHOULD avoid breaking changes, e.g., deprecating inputs vs. removing. If you need to implement changes that cause a breaking change, the major version should be increased.
Info
Modules that have not been released as 1.0.0 may introduce breaking changes, as explained in the previous ID SNFR17. That means that you have to introduce non-breaking and breaking changes with a minor version jump, as long as the module has not reached version 1.0.0.
There are, however, scenarios where you want to include breaking changes into a commit and not create a new major version. If you want to introduce breaking changes as part of a minor update, you can do so. In this case, it is essential to keep the change backward compatible, so that the existing code will continue to work. At a later point, another update can increase the major version and remove the code introduced for the backward compatibility.
Tip
See the language specific examples to find out how you can deal with deprecations in AVM modules.
ID: SNFR21 - Category: Publishing - Cross Language Collaboration
When the module owners of the same Resource or Pattern AVM module are not the same individual or team for all languages, each languages team SHOULD collaborate with their sibling language team for the same module to ensure consistency where possible.
You cannot specify the patch version for terraform modules in the public Bicep Registry, as this is automatically incremented by 1 each time a module is published. You can only set the Major and Minor versions.
Modules MUST use semantic versioning (aka semver) for their versions and releases in accordance with: Semantic Versioning 2.0.0
For example all modules should be released using a semantic version that matches this pattern: X.Y.Z
X == Major Version
Y == Minor Version
Z == Patch Version
Module versioning before first Major version release 1.0.0
Initially modules MUST be released as version 0.1.0 and incremented via Minor and Patch versions only until the AVM Core Team are confident the AVM specifications are mature enough and appropriate CI test coverage is in place, plus the module owner is happy the module has been “road tested” and is now stable enough for its first Major release of version 1.0.0.
Note
Releasing as version 0.1.0 initially and only incrementing Minor and Patch versions allows the module owner to make breaking changes more easily and frequently as it’s still not an official Major/Stable release. 👍
Until first Major version 1.0.0 is released, given a version number X.Y.Z:
X Major version MUST NOT be bumped.
Y Minor version MUST be bumped when introducing breaking changes (which would normally bump Major after 1.0.0 release) or feature updates (same as it will be after 1.0.0 release).
Z Patch version MUST be bumped when introducing non-breaking, backward compatible bug fixes (same as it will be after 1.0.0 release).
Module Classifications
Module Classification Definitions
AVM defines two module classifications, Resource Modules and Pattern Modules, that can be created, published, and consumed, these are defined further in the table below:
Module Class
Definition
Who is it for?
Resource Module
Deploys a primary resource with WAF high priority/impact best practice configurations set by default, e.g., availability zones, firewall, enforced Entra ID authentication and other shared interfaces, e.g., RBAC, Locks, Private Endpoints etc. (if supported). See What does AVM mean by “WAF Aligned”?
They MAY include related resources, e.g. VM contains disk & NIC. Focus should be on customer experience. A customer would expect that a VM module would include all required resources to provision a VM.
Furthermore, Resource Modules MUST NOT deploy external dependencies for the primary resource. E.g. a VM needs a vNet and Subnet to be deployed into, but the vNet will not be created by the VM Resource Module.
Finally, a resource can be anything such as Microsoft Defender for Cloud Pricing Plans, these are still resources in ARM and can therefore be created as a Resource Module.
People who want to craft bespoke architectures that default to WAF best practices, where appropriate, for each resource.
People who want to create pattern modules.
Pattern Module
Deploys multiple resources, usually using Resource Modules. They can be any size but should help accelerate a common task/deployment/architecture.
Good candidates for pattern modules are those architectures that exist in Azure Architecture Center, or other official documentation.
Note: Pattern modules can contain other pattern modules, however, pattern modules MUST NOT contain references to non-AVM modules.
People who want to easily deploy patterns (architectures) using WAF best practices.
Utility Module (draft, see below)
Implements a function or routine that can be flexibly reused in resource or pattern modules - e.g., a function that retrieves the endpoint of an API or portal of a given environment.
It MUST NOT deploy any Azure resources other than deployment scripts.
People who want to leverage commonly used functions/routines/helpers in their module, instead of re-implementing them locally.
PREVIEW
The concept of Utility Modules will be introduced gradually, through some initial examples. The definition above is subject to change as additional details are worked out.
The required automated tests and other workflow elements will be derived from the Pattern Modules’ automation/CI environment as the concept matures.
Utility modules will follow the below naming convention:
Bicep: avm/utl/<hyphenated grouping/category name>/<hyphenated utility module name>. Modules will be kept under the avm/utl folder in the BRM repository.
Terraform: avm-utl-<utility-module-name>. Repositories will be named after the utility module (e.g., terraform-azurerm-avm-utl-<my utility module>).
All related documentation (functional and non-functional requirements, etc.) will also be published along the way.
Module Lifecycle
This section outlines the different stages of a module’s lifecycle:
flowchart LR
    Proposed["1 - Proposed ⚪"] --> |Acceptance criteria met ✅| Available["2 - Available 🟢"]
      click Proposed "/azure-verified-modules-copy/specs/shared/module-lifecycle/#1-proposed-modules"
      click Available "/azure-verified-modules-copy/specs/shared/module-lifecycle/#2-available-modules"
    Proposed --> |Acceptance criteria not met ❌| Rejected[Rejected]
    Available --> |Module temporarily not maintained| Orphaned["3 - Orphaned 🟡"]
    Orphaned --> |End of life| Deprecated["4 - Deprecated 🔴"]
      click Orphaned "/azure-verified-modules-copy/specs/shared/module-lifecycle/#3-orphaned-modules"
    Orphaned --> |New owner identified| Available
    Available --> |End of life| Deprecated
      click Deprecated "/azure-verified-modules-copy/specs/shared/module-lifecycle/#4-deprecated-modules"
    style Proposed fill:#ADD8E6,stroke:#333,stroke-width:1px
    style Orphaned fill:#F4A460,stroke:#333,stroke-width:1px
    style Available fill:#8DE971,stroke:#333,stroke-width:4px
    style Deprecated fill:#000000,stroke:#333,stroke-width:1px,color:#fff
    style Rejected fill:#A2A2A2,stroke:#333,stroke-width:1px
Important
If a module proposal is rejected, the issue is closed and the module’s lifecycle ends.
1. Proposed Modules
A module can be proposed through the module proposal process. The module proposal process is outlined in the Process Overview section.
To propose/request a new AVM resource, pattern or utility module, submit a module proposal issue in the AVM repository.
The proposal should include the following information:
module name
language (Bicep, Terraform, etc.)
module class (resource, pattern, utility)
module description
module owner(s) - if known
The AVM core team will review the proposal, and administrate the module.
Info
To propose a new module, submit a module proposal issue in the AVM repository.
2. Available modules
Once a module has been fully developed, tested and published in the main branch of the repository and the corresponding public registry (Bicep or Terraform), it is then considered to be “available” and can be used by the community. The module is maintained by the module owner(s). Feature or bug fix requests and related pull requests can be submitted by anyone to the module owner(s) for review.
3. Orphaned Modules
It is critical to the consumers experience that modules continue to be maintained. In the case where a module owner cannot continue in their role or do not respond to issues as per the defined timescale in the Module Support page , the following process will apply:
The module owner is responsible for finding a replacement owner and providing a handover.
If no replacement can be found or the module owner leaves Microsoft without giving warning to the AVM core team, the AVM core team will provide essential maintenance (critical bug and security fixes), as per the Module Support page
The AVM core team will continue to try and re-assign the module ownership.
While a module is in an orphaned state, only security and bug fixes MUST be made, no new feature development will be worked on until a new owner is found that can then lead this effort for the module.
An issue will be created on the central AVM repo (zojovano/azure-verified-modules-copy) to track the finding of a new owner for a module.
When a module becomes orphaned, the AVM core team will communicate this through an information notice to be placed as follows.
In case of a Bicep module, the information notice will be placed in an ORPHANED.md file and in the header of the module’s README.md - both residing in the module’s root.
In case of a Terraform module, the information notice will be placed in the header of the README.md file, in the module’s root.
The information notice will include the following statement:
⚠️THIS MODULE IS CURRENTLY ORPHANED.⚠️

- Only security and bug fixes are being handled by the AVM core team at present.
- If interested in becoming the module owner of this orphaned module (must be Microsoft FTE), please look for the related "orphaned module" GitHub issue [here](https://aka.ms/AVM/OrphanedModules)!
Also, the AVM core team will amend the issue automation to auto reply stating that the repo is orphaned and only security/bug fixes are being handled until a new module owner is found.
4. Deprecated Modules
Once a module reaches the end of its lifecycle (e.g., it’s permanently replaced by another module; permanent retirement due to obsolete technology/solution), it needs to be deprecated. A deprecated module will no longer be maintained, and no new features or bug fixes will be implemented for it. The module will indefinitely stay available in the public registry and source code repository for use, but certain measures will take place, such as:
The module will show as deprecated in the AVM module index.
The module will no longer be shown through VS Code IntelliSense.
The module’s source code will be kept in its repository but it will show a deprecated status through a DEPRECATED.md file (Bicep only) and a disclaimer in the module’s README.md file.
It will be a clearly indicated on the module’s repo that new issues can no longer be submitted for the module:
Bicep: The module will be taken off the list of available modules in related issue templates.
Terraform: The module’s repo will be archived.
It is recommended to migrate to a replacement/alternative version of the module, if available.
Important
When a module becomes deprecated, the AVM core team will communicate this through an information notice to be placed as follows.
In case of a Bicep module, the information notice will be placed in a DEPRECATED.md file and in the header of the module’s README.md - both residing in the module’s root.
In case of a Terraform module, the information notice will be placed in the header of the README.md file, in the module’s root.
The information notice MUST include the following statement:
⚠️THIS MODULE IS DEPRECATED.⚠️

- It will no longer receive any updates.
- The module can still be used as is (references to any existing versions will keep working), but it is not recommended for new deployments.
- It is recommended to migrate to a replacement/alternative version of the module, if available.
➕ Retrieve the available versions of a deprecated module
To find all previous versions of a Bicep module, the following steps need to be performed (assuming the avm/ptn/finops-toolkit/finops-hub module has been deprecated):
To find out the all the versions the module has ever been published under, perform one of these steps:
navigate to Bicep Public Registry’s JSON index and look for the module’s name,
OR clone the Bicep Public Registry repository and run the following command in the root of the repository: git tag -l 'avm/ptn/finops-toolkit/finops-hub/*'. This will list all the tags that match the module’s name.
Identify the available versions of the module, e.g., 0.1.0, 0.1.1, etc.
Example: avm/ptn/compute/app-tier-vmss or avm/ptn/avd-lza/management-plane or avm/ptn/3-tier/web-app
Segments:
ptn defines this as a pattern module
<hyphenated grouping/category name> is a hierarchical grouping of pattern modules by category, with each word separated by dashes, such as:
project name, e.g., avd-lza,
primary resource provider, e.g., compute or network, or
architecture, e.g., 3-tier
<hyphenated pattern module name> is a term describing the module’s function, with each word separated by dashes, e.g., app-tier-vmss = Application Tier VMSS; management-plane = Azure Virtual Desktop Landing Zone Accelerator Management Plane
Terraform Pattern Module Naming
Naming convention:
avm-ptn-<pattern module name> (Module name for registry)
terraform-<provider>-avm-ptn-<pattern module name> (GitHub repository name to meet registry naming requirements)
Example: avm-ptn-apptiervmss or avm-ptn-avd-lza-managementplane
Segments:
<provider> is the logical abstraction of various APIs used by Terraform. In most cases, this is going to be azurerm or azuread for resource modules.
ptn defines this as a pattern module
<pattern module name> is a term describing the module’s function, e.g., apptiervmss = Application Tier VMSS; avd-lza-managementplane = Azure Virtual Desktop Landing Zone Accelerator Management Plane
PMNFR2 - Use Resource Modules to Build a Pattern Module
ID: PMNFR2 - Category: Composition - Use Resource Modules to Build a Pattern Module
A Pattern Module SHOULD be built from AVM Resources Modules to establish a standardized code base and improve maintainability. If a valid reason exists, a pattern module MAY contain native resources (“vanilla” code) where it’s necessary. A Pattern Module MUST NOT contain references to non-AVM modules.
Valid reasons for not using a Resource Module for a resource required by a Pattern Module include but are not limited to:
When using a Resource Module would result in hitting scaling limitations and/or would reduce the capabilities of the Pattern Module due to the limitations of Azure Resource Manager.
Developing a Pattern Module under time constraint, without having all required Resource Modules readily available.
Note
In the latter case, the Pattern Module SHOULD be updated to use the Resource Module when the required Resource Module becomes available, to avoid accumulating technical debt. Ideally, all required Resource Modules SHOULD be developed first, and then leveraged by the Pattern Module.
Resource modules support the following optional features/extension resources, as specified, if supported by the primary resource. The top-level variable/parameter names MUST be:
Optional Features/Extension Resources
Bicep Parameter Name
Terraform Variable Name
MUST/SHOULD
Diagnostic Settings
diagnosticSettings
diagnostic_settings
MUST
Role Assignments
roleAssignments
role_assignments
MUST
Resource Locks
lock
lock
MUST
Tags
tags
tags
MUST
Managed Identities (System / User Assigned)
managedIdentities
managed_identities
MUST
Private Endpoints
privateEndpoints
private_endpoints
MUST
Customer Managed Keys
customerManagedKey
customer_managed_key
MUST
Azure Monitor Alerts
alerts
alerts
SHOULD
Resource modules MUST NOT deploy required/dependent resources for the optional features/extension resources specified above. For example, for Diagnostic Settings the resource module MUST NOT deploy the Log Analytics Workspace, this is expected to be already in existence from the perspective of the resource module deployed via another method/module etc.
Note
Please note that the implementation of Customer Managed Keys from an ARM API perspective is different across various RPs that implement Customer Managed Keys in their service. For that reason you may see differences between modules on how Customer Managed Keys are handled and implemented, but functionality will be as expected.
Module owners MAY choose to utilize cross repo dependencies for these “add-on” resources, or MAY chose to implement the code directly in their own repo/module. So long as the implementation and outputs are as per the specifications requirements, then this is acceptable.
Tip
Make sure to checkout the language specific specifications for more info on this:
Resource modules MUST implement a common interface, e.g. the input’s data structures and properties within them (objects/arrays/dictionaries/maps), for the optional features/extension resources:
Parameters/variables that pertain to the primary resource MUST NOT use the resource type in the name.
e.g., use sku, vs. virtualMachineSku/virtualmachine_sku
Another example for where RPs contain some of their name within a property, leave the property unchanged. E.g. Key Vault has a property called keySize, it is fine to leave as this and not remove the key part from the property/parameter name.
When a given version of an Azure resource used in a resource module reaches its end-of-life (EOL) and is no longer supported by Microsoft, the module owner SHOULD ensure that:
The module is aligned with these changes and only includes supported versions of the resource. This is typically achieved through the allowed values in the parameter that specifies the resource SKU or type.
The following notice is shown under the Notes section of the module’s readme.md. (If any related public announcement is available, it can also be linked to from the Notes section.):
“Certain versions of this Azure resource reached their end of life. The latest version of this module only includes supported versions of the resource. All unsupported versions have been removed from the related parameters.”
AND the related parameter’s description:
“Certain versions of this Azure resource reached their end of life. The latest version of this module only includes supported versions of the resource. All unsupported versions have been removed from this parameter.”
We will maintain a set of CSV files in the AVM Central Repo (Azure/Azure-Verified-Modules) with the correct singular names for all resource types to enable checks to utilize this list to ensure repos are named correctly. To see the formatted content of these CSV files with additional information, please visit the AVM Module Indexes page.
This will be updated quarterly, or ad-hoc as new RPs/ Resources are created and highlighted via a check failure.
Resource modules MUST follow the below naming conventions (all lower case):
Bicep Resource Module Naming
Naming convention (module name for registry): avm/res/<hyphenated resource provider name>/<hyphenated ARM resource type>
Example: avm/res/compute/virtual-machine or avm/res/managed-identity/user-assigned-identity
Segments:
res defines this is a resource module
<hyphenated resource provider name> is the resource provider’s name after the Microsoft part, with each word starting with a capital letter separated by dashes, e.g., Microsoft.Compute = compute, Microsoft.ManagedIdentity = managed-identity.
<hyphenated ARM resource type> is the singular version of the word after the resource provider, with each word starting with a capital letter separated by dashes, e.g., Microsoft.Compute/virtualMachines = virtual-machine, BUTMicrosoft.Network/trafficmanagerprofiles = trafficmanagerprofile - since trafficmanagerprofiles is all lower case as per the ARM API definition.
Bicep Child Module Naming
Naming convention (module name for registry):avm/res/<hyphenated resource provider name>/<hyphenated ARM resource type>/<hyphenated child resource type/<hyphenated grandchild resource type>/<etc.>
Example: avm/res/network/virtual-network/subnet or avm/res/storage/storage-account/blob-service/container
Segments:
res defines this is a resource module
<hyphenated resource provider name> is the resource provider’s name after the Microsoft part, with each word starting with a capital letter separated by dashes, e.g., Microsoft.Network = network.
<hyphenated ARM resource type> is the singular version of the word after the resource provider, with each word starting with a capital letter separated by dashes, e.g., Microsoft.Network/virtualNetworks = virtual-network.
<hyphenated child resource type (to be repeated for grandchildren, etc.)> is the singular version of the word after the resource provider, with each word starting with a capital letter separated by dashes, e.g., Microsoft.Network/virtualNetworks/subnets = subnet or Microsoft.Storage/storageAccounts/blobServices/containers = blob-service/container.
Terraform Resource Module Naming
Naming convention:
avm-res-<resource provider>-<ARM resource type> (module name for registry)
terraform-<provider>-avm-res-<resource provider>-<ARM resource type> (GitHub repository name to meet registry naming requirements)
Example: avm-res-compute-virtualmachine or avm-res-managedidentity-userassignedidentity
Segments:
<provider> is the logical abstraction of various APIs used by Terraform. In most cases, this is going to be azurerm or azuread for resource modules.
res defines this is a resource module
<resource provider> is the resource provider’s name after the Microsoft part, e.g., Microsoft.Compute = compute.
<ARM resource type> is the singular version of the word after the resource provider, e.g., Microsoft.Compute/virtualMachines = virtualmachine
A resource module MUST use the following standard inputs:
name (no default)
location (if supported by the resource and not a global resource, then use Resource Group location, if resource supports Resource Groups, otherwise no default)
ID: RMNFR3 - Category: Composition - RP Collaboration
Module owners (Microsoft FTEs) SHOULD reach out to the respective Resource Provider teams to build a partnership and collaboration on the modules creation, existence and long term maintenance.
Modules MAY create/adopt public preview services and features at their discretion.
Preview API versions MAY be used when:
The resource/service/feature is GA but the only API version available for the GA resource/service/feature is a preview version
For example, Diagnostic Settings (Microsoft.Insights/diagnosticSettings) the latest version of the API available with GA features, like Category Groups etc., is 2021-05-01-preview
Otherwise the latest “non-preview” version of the API SHOULD be used
Preview services and features, SHOULD NOT be promoted and exposed, unless they are supported by the respective PG, and it’s documented publicly.
However, they MAY be exposed at the module owners discretion, but the following rules MUST be followed:
The description of each of the parameters/variables used for the preview service/feature MUST start with:
“THIS IS A <PARAMETER/VARIABLE> USED FOR A PREVIEW SERVICE/FEATURE, MICROSOFT MAY NOT PROVIDE SUPPORT FOR THIS, PLEASE CHECK THE PRODUCT DOCS FOR CLARIFICATION”
Modules SHOULD set defaults in input parameters/variables to align to high priority/impact/severity recommendations, where appropriate and applicable, in the following frameworks and resources:
They SHOULD NOT align to these recommendations when it requires an external dependency/resource to be deployed and configured and then associated to the resources in the module.
Alignment SHOULD prioritize best-practices and security over cost optimization, but MUST allow for these to be overridden by a module consumer easily, if desired.
We will maintain a set of CSV files in the AVM Central Repo (Azure/Azure-Verified-Modules) with the required TelemetryId prefixes to enable checks to utilize this list to ensure the correct IDs are used. To see the formatted content of these CSV files with additional information, please visit the AVM Module Indexes page.
These will also be provided as a comment on the module proposal, once accepted, from the AVM core team.
Modules MUST provide the capability to collect deployment/usage telemetry as detailed in Telemetry further.
To highlight that AVM modules use telemetry, an information notice MUST be included in the footer of each module’s README.md file with the below content. (See more details on this requirement, here.)
Telemetry Information Notice
Note
The following information notice is automatically added at the bottom of the README.md file of the module when
Terraform: Executing the make docs command with the note and header ## Data Collection being placed in the module’s _footer.md beforehand
### Data Collection

The software may collect information about you and your use of the software and send it to Microsoft. Microsoft may use this information to provide services and improve our products and services. You may turn off the telemetry as described in the [repository](https://aka.ms/avm/telemetry). There are also some features in the software that may enable you and Microsoft to collect data from users of your applications. If you use these features, you must comply with applicable law, including providing appropriate notices to users of your applications together with a copy of Microsoft’s privacy statement. Our privacy statement is located at <https://go.microsoft.com/fwlink/?LinkID=824704>. You can learn more about data collection and use in the help documentation and our privacy statement. Your use of the software operates as your consent to these practices.
The ARM deployment name used for the telemetry MUST follow the pattern and MUST be no longer than 64 characters in length: 46d3xbcp.<res/ptn>.<(short) module name>.<version>.<uniqueness>
<res/ptn> == AVM Resource or Pattern Module
<(short) module name> == The AVM Module’s, possibly shortened, name including the resource provider and the resource type, without;
The prefixes: avm-res-
The prefixes: avm-ptn-
<version> == The AVM Module’s MAJOR.MINOR version (only) with . (periods) replaced with - (hyphens), to allow simpler splitting of the ARM deployment name
<uniqueness> == This section of the ARM deployment name is to be used to ensure uniqueness of the deployment name.
This is to cater for the following scenarios:
The module is deployed multiple times to the same:
Due to the 64-character length limit of Azure deployment names, the <(short) module name> segment has a length limit of 36 characters, so if the module name is longer than that, it MUST be truncated to 36 characters. If any of the semantic version’s segments are longer than 1 character, it further restricts the number of characters that can be used for naming the module.
An example deployment name for the AVM Virtual Machine Resource Module would be: 46d3xbcp.res.compute-virtualmachine.1-2-3.eum3
An example deployment name for a shortened module name would be: 46d3xbcp.res.desktopvirtualization-appgroup.1-2-3.eum3
Tip
Terraform: Terraform uses a telemetry provider, the configuration of which is the same for every module and is included in the template repo.
General: See the language specific contribution guides for detailed guidance and sample code to use in AVM modules to achieve this requirement.
To enable telemetry data collection for Terraform modules, the modtm telemetry provider MUST be used. This lightweight telemetry provider sends telemetry data to Azure Application Insights via a HTTP POST front end service.
The modtm telemetry provider is included in all Terraform modules and is enabled by default through the main.telemetry.tf file being automatically distributed from the template repo.
The modtm provider MUST be listed under the required_providers section in the module’s terraform.tf file using the following entry. This is also validated by the linter.
The telemetry enablement MUST be on/enabled by default, however this MUST be able to be disabled by a module consumer by setting the below parameter/variable value to false:
Bicep: enableTelemetry
Terraform: enable_telemetry
Note
Whenever a module references AVM modules that implement the telemetry parameter (e.g., a pattern module that uses AVM resource modules), the telemetry parameter value MUST be passed through to these modules. This is necessary to ensure a consumer can reliably enable & disable the telemetry feature for all used modules.
This general specification can be modified for some use-cases, that are language specific:
Bicep
For cross-references in resource modules, the spec BCPFR7 also applies.
ID: SFR5 - Category: Composition - Availability Zones
Modules that deploy zone-redundant resources MUST enable the spanning across as many zones as possible by default, typically all 3.
Modules that deploy zonal resources MUST provide the ability to specify a zone for the resources to be deployed/pinned to. However, they MUST NOT default to a particular zone by default, e.g. 1 in an effort to make the consumer aware of the zone they are selecting to suit their architecture requirements.
For both scenarios the modules MUST expose these configuration options via configurable parameters/variables.
ID: SFR6 - Category: Composition - Data Redundancy
Modules that deploy resources or patterns that support data redundancy SHOULD enable this to the highest possible value by default, e.g. RA-GZRS. When a resource or pattern doesn’t provide the ability to specify data redundancy as a simple property, e.g. GRS etc., then the modules MUST provide the ability to enable data redundancy for the resources or pattern via parameters/variables.
For example, a Storage Account module can simply set the sku.name property to Standard_RAGZRS. Whereas a SQL DB or Cosmos DB module will need to expose more properties, via parameters/variables, to allow the specification of the regions to replicate data to as per the consumers requirements.
Only the latest released version of a module MUST be supported.
For example, if an AVM Resource Module is used in an AVM Pattern Module that was working but now is not. The first step by the AVM Pattern Module owner should be to upgrade to the latest version of the AVM Resource Module test and then if not fixed, troubleshoot and fix forward from the that latest version of the AVM Resource Module onwards.
This avoids AVM Module owners from having to maintain multiple major release versions.
README documentation MUST be automatically/programmatically generated. MUST include the sections as defined in the language specific requirements BCPNFR2, TFNFR2.
You cannot specify the patch version for terraform modules in the public Bicep Registry, as this is automatically incremented by 1 each time a module is published. You can only set the Major and Minor versions.
Modules MUST use semantic versioning (aka semver) for their versions and releases in accordance with: Semantic Versioning 2.0.0
For example all modules should be released using a semantic version that matches this pattern: X.Y.Z
X == Major Version
Y == Minor Version
Z == Patch Version
Module versioning before first Major version release 1.0.0
Initially modules MUST be released as version 0.1.0 and incremented via Minor and Patch versions only until the AVM Core Team are confident the AVM specifications are mature enough and appropriate CI test coverage is in place, plus the module owner is happy the module has been “road tested” and is now stable enough for its first Major release of version 1.0.0.
Note
Releasing as version 0.1.0 initially and only incrementing Minor and Patch versions allows the module owner to make breaking changes more easily and frequently as it’s still not an official Major/Stable release. 👍
Until first Major version 1.0.0 is released, given a version number X.Y.Z:
X Major version MUST NOT be bumped.
Y Minor version MUST be bumped when introducing breaking changes (which would normally bump Major after 1.0.0 release) or feature updates (same as it will be after 1.0.0 release).
Z Patch version MUST be bumped when introducing non-breaking, backward compatible bug fixes (same as it will be after 1.0.0 release).
A module SHOULD avoid breaking changes, e.g., deprecating inputs vs. removing. If you need to implement changes that cause a breaking change, the major version should be increased.
Info
Modules that have not been released as 1.0.0 may introduce breaking changes, as explained in the previous ID SNFR17. That means that you have to introduce non-breaking and breaking changes with a minor version jump, as long as the module has not reached version 1.0.0.
There are, however, scenarios where you want to include breaking changes into a commit and not create a new major version. If you want to introduce breaking changes as part of a minor update, you can do so. In this case, it is essential to keep the change backward compatible, so that the existing code will continue to work. At a later point, another update can increase the major version and remove the code introduced for the backward compatibility.
Tip
See the language specific examples to find out how you can deal with deprecations in AVM modules.
Modules MUST implement end-to-end (deployment) testing that create actual resources to validate that module deployments work. In Bicep tests are sourced from the directories in /tests/e2e. In Terraform, these are in /examples.
Each test MUST run and complete without user inputs successfully, for automation purposes.
Each test MUST also destroy/clean-up its resources and test dependencies following a run.
Tip
To see a directory and file structure for a module, see the language specific contribution guide.
It is likely that to complete E2E tests, a number of resources will be required as dependencies to enable the tests to pass successfully. Some examples:
When testing the Diagnostic Settings interface for a Resource Module, you will need an existing Log Analytics Workspace to be able to send the logs to as a destination.
When testing the Private Endpoints interface for a Resource Module, you will need an existing Virtual Network, Subnet and Private DNS Zone to be able to complete the Private Endpoint deployment and configuration.
Module owners MUST:
Create the required resources that their module depends upon in the test file/directory
They MUST either use:
Simple/native resource declarations/definitions in their respective IaC language, OR
Another already published AVM Module that MUST be pinned to a specific published version.
They MUST NOT use any local directory path references or local copies of AVM modules in their own modules test directory.
➕ Terraform & Bicep Log Analytics Workspace examples using simple/native declarations for use in E2E tests
Deployment tests are an important part of a module’s validation and a staple of AVM’s CI environment. However, there are situations where certain e2e-test-deployments cannot be performed against AVM’s test environment (e.g., if a special configuration/registration (such as certain AI models) is required). For these cases, the CI offers the possibility to ‘skip’ specific test cases by placing a file named .e2eignore in their test folder.
Note
A skipped test case is still added to the ‘Usage Examples’ section of the module’s readme and should be manually validated in regular intervals.
Details for use in E2E tests
You MUST add a note to the tests metadata description, which explains the excemption.
If you require that a test is skipped and add an “.e2eignore” file (e.g. \<module\>/tests/e2e/\<testname\>/.e2eignore) to a pull request, a member of the AVM Core Technical Bicep Team must approve set pull request. The content of the file is logged the module’s workflow runs and transparently communicates why the test case is skipped during the deployment validation stage. It iss hence important to specify the reason for skipping the deployment in this file.
Sample filecontent:
The test is skipped, as only one instance of this service can be deployed to a subscription.
Note
For resource modules, the ‘defaults’ and ‘waf-aligned’ tests can’t be skipped.
The deployment of a test can be skipped by adding a .e2eignore file into a test folder (e.g. /examples/<testname>).
ID: SNFR20 - Category: Contribution/Support - GitHub Teams Only
All GitHub repositories that AVM module are published from and hosted within MUST only assign GitHub repository permissions to GitHub teams only.
Each module MUST have separate GitHub teams assigned for module owners AND module contributors respectively. These GitHub teams MUST be created in the Azure organization in GitHub.
There MUST NOT be any GitHub repository permissions assigned to individual users.
Note
The names for the GitHub teams for each approved module are already defined in the respective Module Indexes. These teams MUST be created (and used) for each module.
The @Azure prefix in the last column of the tables linked above represents the “Azure” GitHub organization all AVM-related repositories exist in. DO NOT include this segment in the team’s name!
Important
Non-FTE / external contributors (subject matter experts that aren’t Microsoft employees) can’t be members of the teams described in this chapter, hence, they won’t gain any extra permissions on AVM repositories, therefore, they need to work in forks.
Naming Convention
The naming convention for the GitHub teams MUST follow the below pattern:
<hyphenated module name>-module-owners-<bicep/tf> - to be assigned as the GitHub repository’s Module Owners team
<hyphenated module name>-module-contributors-<bicep/tf> - to be assigned as the GitHub repository’s Module Contributors team
Note
The naming convention for terraform modules is slightly different than the naming convention for their respective GitHub teams.
Segments:
<hyphenated module name> == the AVM Module’s name, with each segment separated by dashes, i.e., avm-res-<resource provider>-<ARM resource type>
All officially documented module owner(s) MUST be added to the -module-owners- team. The -module-owners- team MUST NOT have any other members.
Any additional module contributors whom the module owner(s) agreed to work with MUST be added to the -module-contributors- team.
Unless explicitly requested and agreed, members of the AVM core team or any PG teams MUST NOT be added to the -module-owners- or -module-contributors- teams as permissions for them are granted through the teams described in SNFR9.
Grant Permissions - Bicep
Team memberships
Note
In case of terraform modules, permissions to the BRM repository (the repo of the Bicep Registry) are granted via assigning the -module-owners- and -module-contributors- teams to parent teams that already have the required level access configured. While it is the module owner’s responsibility to initiate the addition of their teams to the respective parents, only the AVM core team can approve this parent-child relationship.
Module owners MUST create their -module-owners- and -module-contributors- teams and as part of the provisioning process, they MUST request the addition of these teams to their respective parent teams (see the table below for details).
GitHub Team Name
Description
Permissions
Permissions granted through
Where to work?
<hyphenated module name>-module-owners-bicep
AVM Bicep Module Owners - <module name>
Write
Assignment to the avm-technical-reviewers-bicep parent team.
Examples - GitHub teams required for the Bicep resource module of Azure Virtual Network (avm/res/network/virtual-network):
avm-res-network-virtualnetwork-module-owners-bicep –> assign to the avm-technical-reviewers-bicep parent team.
avm-res-network-virtualnetwork-module-contributors-bicep –> assign to the avm-module-contributors-bicep parent team.
Tip
Direct link to create a new GitHub team and assign it to its parent: Create new team
Fill in the values as follows:
Team name: Following the naming convention described above, use the value defined in the module indexes.
Description: Follow the guidance above (see the Description column in the table above).
Parent team: Follow the guidance above (see the Permissions granted through column in the table above).
Team visibility: Visible
Team notifications: Enabled
CODEOWNERS file
As part of the “initial Pull Request” (that publishes the first version of the module), module owners MUST add an entry to the CODEOWNERS file in the BRM repository (here).
Note
Through this approach, the AVM core team will grant review permission to module owners as part of the standard PR review process.
Every CODEOWNERS entry (line) MUST include the following segments separated by a single whitespace character:
Path of the module, relative to the repo’s root, e.g.: /avm/res/network/virtual-network/
The -module-owners-team, with the @Azure/ prefix, e.g., @Azure/avm-res-network-virtualnetwork-module-owners-bicep
The GitHub team of the AVM Bicep reviewers, with the @Azure/ prefix, i.e., @Azure/avm-module-reviewers-bicep
Example - CODEOWNERS entry for the Bicep resource module of Azure Virtual Network (avm/res/network/virtual-network):
Module owners MUST assign the -module-owners-and -module-contributors- teams the necessary permissions on their Terraform module repository per the guidance below.
GitHub Team Name
Description
Permissions
Permissions granted through
Where to work?
<module name>-module-owners-tf
AVM Terraform Module Owners - <module name>
Admin
Direct assignment to repo
Module owner can decide whether they want to work in a branch local to the repo or in a fork.
ID: SNFR21 - Category: Publishing - Cross Language Collaboration
When the module owners of the same Resource or Pattern AVM module are not the same individual or team for all languages, each languages team SHOULD collaborate with their sibling language team for the same module to ensure consistency where possible.
ID: SNFR22 - Category: Inputs - Parameters/Variables for Resource IDs
A module parameter/variable that requires a full Azure Resource ID as an input value, e.g. /subscriptions/{subscriptionId}/resourceGroups/{resourceGroupName}/providers/Microsoft.KeyVault/vaults/{keyVaultName}, MUST contain ResourceId/resource_id in its parameter/variable name to assist users in knowing what value to provide at a glance of the parameter/variable name.
Example for the property workspaceId for the Diagnostic Settings resource. In Bicep its parameter name should be workspaceResourceId and the variable name in Terraform should be workspace_resource_id.
workspaceId is not descriptive enough and is ambiguous as to which ID is required to be input.
```shell
# Linux / MacOs# For Windows replace $PWD with your the local path or your repository#docker run -it -v $PWD:/repo -w /repo mcr.microsoft.com/powershell pwsh -Command '
#Invoke-WebRequest -Uri "https://zojovano.github.io/azure-verified-modules-copy/scripts/Set-AvmGitHubLabels.ps1" -OutFile "Set-AvmGitHubLabels.ps1"
$gh_version = "2.44.1"
Invoke-WebRequest -Uri "https://github.com/cli/cli/releases/download/v2.44.1/gh_2.44.1_linux_amd64.tar.gz" -OutFile "gh_$($gh_version)_linux_amd64.tar.gz"
apt-get update && apt-get install -y git
tar -xzf "gh_$($gh_version)_linux_amd64.tar.gz"
ls -lsa
mv "gh_$($gh_version)_linux_amd64/bin/gh" /usr/local/bin/
rm "gh_$($gh_version)_linux_amd64.tar.gz" && rm -rf "gh_$($gh_version)_linux_amd64"
gh --version
ls -lsa
gh auth login
$OrgProject = "Azure/terraform-azurerm-avm-res-kusto-cluster"
gh auth status
./Set-AvmGitHubLabels.ps1 -RepositoryName $OrgProject -CreateCsvLabelExports $false -NoUserPrompts $true
'```
By default this script will only update and append labels on the repository specified. However, this can be changed by setting the parameter -UpdateAndAddLabelsOnly to $false, which will remove all the labels from the repository first and then apply the AVM labels from the CSV only.
Make sure you elevate your privilege to admin level or the labels will not be applied to your repository. Go to repos.opensource.microsoft.com/orgs/Azure/repos/ to request admin access before running the script.
Full Script:
These Set-AvmGitHubLabels.ps1 can be downloaded from here.
[Diagnostics.CodeAnalysis.SuppressMessageAttribute("PSAvoidUsingWriteHost", "", Justification = "Coloured output required in this script")]
<#
.SYNOPSIS This script can be used to create the Azure Verified Modules (AVM) standard GitHub labels to a GitHub repository.
.DESCRIPTION This script can be used to create the Azure Verified Modules (AVM) standard GitHub labels to a GitHub repository.
By default, the script will remove all pre-existing labels and apply the AVM labels. However, this can be changed by using the -RemoveExistingLabels parameter and setting it to $false. The tool will also output the labels that exist in the repository before and after the script has run to a CSV file in the current directory, or a directory specified by the -OutputDirectory parameter.
The AVM labels to be created are documented here: TBC
.NOTES Please ensure you have specified the GitHub repositry correctly. The script will prompt you to confirm the repository name before proceeding.
.COMPONENT You must have the GitHub CLI installed and be authenticated to a GitHub account with access to the repository you are applying the labels to before running this script.
.LINK TBC
.Parameter RepositoryName
The name of the GitHub repository to apply the labels to.
.Parameter RemoveExistingLabels
If set to $true, the default value, the script will remove all pre-existing labels from the repository specified in -RepositoryName before applying the AVM labels. If set to $false, the script will not remove any pre-existing labels.
.Parameter UpdateAndAddLabelsOnly
If set to $true, the default value, the script will only update and add labels to the repository specified in -RepositoryName. If set to $false, the script will remove all pre-existing labels from the repository specified in -RepositoryName before applying the AVM labels.
.Parameter OutputDirectory
The directory to output the pre-existing and post-existing labels to in a CSV file. The default value is the current directory.
.Parameter CreateCsvLabelExports
If set to $true, the default value, the script will output the pre-existing and post-existing labels to a CSV file in the current directory, or a directory specified by the -OutputDirectory parameter. If set to $false, the script will not output the pre-existing and post-existing labels to a CSV file.
.Parameter GitHubCliLimit
The maximum number of labels to return from the GitHub CLI. The default value is 999.
.Parameter LabelsToApplyCsvUri
The URI to the CSV file containing the labels to apply to the GitHub repository. The default value is https://raw.githubusercontent.com/jtracey93/label-source/main/avm-github-labels.csv.
.Parameter NoUserPrompts
If set to $true, the default value, the script will not prompt the user to confirm they want to remove all pre-existing labels from the repository specified in -RepositoryName before applying the AVM labels. If set to $false, the script will prompt the user to confirm they want to remove all pre-existing labels from the repository specified in -RepositoryName before applying the AVM labels.
This is useful for running the script in automation workflows
.EXAMPLE Create the AVM labels in the repository Org/MyGitHubRepo and remove all pre-existing labels.
Set-AvmGitHubLabels.ps1 -RepositoryName "Org/MyGitHubRepo"
.EXAMPLE Create the AVM labels in the repository Org/MyGitHubRepo and do not remove any pre-existing labels, just overwrite any labels that have the same name.
Set-AvmGitHubLabels.ps1 -RepositoryName "Org/MyGitHubRepo" -RemoveExistingLabels $false
.EXAMPLE Create the AVM labels in the repository Org/MyGitHubRepo and output the pre-existing and post-existing labels to the directory C:\GitHubLabels.
Set-AvmGitHubLabels.ps1 -RepositoryName "Org/MyGitHubRepo" -OutputDirectory "C:\GitHubLabels"
.EXAMPLE Create the AVM labels in the repository Org/MyGitHubRepo and output the pre-existing and post-existing labels to the directory C:\GitHubLabels and do not remove any pre-existing labels, just overwrite any labels that have the same name.
Set-AvmGitHubLabels.ps1 -RepositoryName "Org/MyGitHubRepo" -OutputDirectory "C:\GitHubLabels" -RemoveExistingLabels $false
.EXAMPLE Create the AVM labels in the repository Org/MyGitHubRepo and do not create the pre-existing and post-existing labels CSV files and do not remove any pre-existing labels, just overwrite any labels that have the same name.
Set-AvmGitHubLabels.ps1 -RepositoryName "Org/MyGitHubRepo" -RemoveExistingLabels $false -CreateCsvLabelExports $false
.EXAMPLE Create the AVM labels in the repository Org/MyGitHubRepo and do not create the pre-existing and post-existing labels CSV files and do not remove any pre-existing labels, just overwrite any labels that have the same name. Finally, use a custom CSV file hosted on the internet to create the labels from.
Set-AvmGitHubLabels.ps1 -RepositoryName "Org/MyGitHubRepo" -OutputDirectory "C:\GitHubLabels" -RemoveExistingLabels $false -CreateCsvLabelExports $false -LabelsToApplyCsvUri "https://example.com/csv/avm-github-labels.csv"
#>#Requires-PSEdition Core [CmdletBinding()]
param (
[Parameter(Mandatory = $true)]
[string]$RepositoryName,
[Parameter(Mandatory = $false)]
[bool]$RemoveExistingLabels = $true,
[Parameter(Mandatory = $false)]
[bool]$UpdateAndAddLabelsOnly = $true,
[Parameter(Mandatory = $false)]
[bool]$CreateCsvLabelExports = $true,
[Parameter(Mandatory = $false)]
[string]$OutputDirectory = (Get-Location),
[Parameter(Mandatory = $false)]
[int]$GitHubCliLimit = 999,
[Parameter(Mandatory = $false)]
[string]$LabelsToApplyCsvUri = "https://zojovano.github.io/azure-verified-modules-copy/governance/avm-standard-github-labels.csv",
[Parameter(Mandatory = $false)]
[bool]$NoUserPrompts = $false
)
# Check if the GitHub CLI is installed $GitHubCliInstalled = Get-Command gh -ErrorAction SilentlyContinue
if ($null -eq $GitHubCliInstalled) {
throw"The GitHub CLI is not installed. Please install the GitHub CLI and try again." }
Write-Host "The GitHub CLI is installed..." -ForegroundColor Green
# Check if GitHub CLI is authenticated $GitHubCliAuthenticated = gh auth status
if ($LASTEXITCODE -ne0) {
Write-Host $GitHubCliAuthenticated -ForegroundColor Red
throw"Not authenticated to GitHub. Please authenticate to GitHub using the GitHub CLI, `gh auth login`, and try again." }
Write-Host "Authenticated to GitHub..." -ForegroundColor Green
# Check if GitHub repository name is valid $GitHubRepositoryNameValid = $RepositoryName -match"^[a-zA-Z0-9-]+/[a-zA-Z0-9-]+$"if ($false -eq $GitHubRepositoryNameValid) {
throw"The GitHub repository name $RepositoryName is not valid. Please check the repository name and try again. The format must be <OrgName>/<RepoName>" }
# List GitHub repository provided and check it exists $GitHubRepository = gh repo view $RepositoryName
if ($LASTEXITCODE -ne0) {
Write-Host $GitHubRepository -ForegroundColor Red
throw"The GitHub repository $RepositoryName does not exist. Please check the repository name and try again." }
Write-Host "The GitHub repository $RepositoryName exists..." -ForegroundColor Green
# PRE - Get the current GitHub repository labels and export to a CSV file in the current directory or where -OutputDirectory specifies if set to a valid directory path and the directory exists or can be created if it does not exist alreadyif ($RemoveExistingLabels -or $UpdateAndAddLabelsOnly) {
Write-Host "Getting the current GitHub repository (pre) labels for $RepositoryName..." -ForegroundColor Yellow
$GitHubRepositoryLabels = gh label list -R $RepositoryName -L $GitHubCliLimit --json name,description,color
if ($null -ne $GitHubRepositoryLabels -and $CreateCsvLabelExports -eq $true) {
$csvFileNamePathPre = "$OutputDirectory\$($RepositoryName.Replace('/', '_'))-Labels-Pre-$(Get-Date -Format FileDateTime).csv" Write-Host "Exporting the current GitHub repository (pre) labels for $RepositoryName to $csvFileNamePathPre" -ForegroundColor Yellow
$GitHubRepositoryLabels | ConvertFrom-Json | Export-Csv -Path $csvFileNamePathPre -NoTypeInformation
}
}
# Remove all pre-existing labels if -RemoveExistingLabels is set to $true and user confirms they want to remove all pre-existing labelsif ($null -ne $GitHubRepositoryLabels) {
$GitHubRepositoryLabelsJson = $GitHubRepositoryLabels | ConvertFrom-Json
if ($RemoveExistingLabels -eq $true -and $NoUserPrompts -eq $false -and $UpdateAndAddLabelsOnly -eq $false) {
$RemoveExistingLabelsConfirmation = Read-Host "Are you sure you want to remove all $($GitHubRepositoryLabelsJson.Count) pre-existing labels from $($RepositoryName)? (Y/N)"if ($RemoveExistingLabelsConfirmation -eq"Y") {
Write-Host "Removing all pre-existing labels from $RepositoryName..." -ForegroundColor Yellow
$GitHubRepositoryLabels | ConvertFrom-Json | ForEach-Object {
Write-Host "Removing label $($_.name) from $RepositoryName..." -ForegroundColor DarkRed
gh label delete -R $RepositoryName $_.name --yes
}
}
}
if ($RemoveExistingLabels -eq $true -and $NoUserPrompts -eq $true -and $UpdateAndAddLabelsOnly -eq $false) {
Write-Host "Removing all pre-existing labels from $RepositoryName..." -ForegroundColor Yellow
$GitHubRepositoryLabels | ConvertFrom-Json | ForEach-Object {
Write-Host "Removing label $($_.name) from $RepositoryName..." -ForegroundColor DarkRed
gh label delete -R $RepositoryName $_.name --yes
}
}
}
if ($null -eq $GitHubRepositoryLabels) {
Write-Host "No pre-existing labels to remove or not selected to be removed from $RepositoryName..." -ForegroundColor Magenta
}
# Check LabelsToApplyCsvUri is valid and contains a CSV content Write-Host "Checking $LabelsToApplyCsvUri is valid..." -ForegroundColor Yellow
$LabelsToApplyCsvUriValid = $LabelsToApplyCsvUri -match"^https?://"if ($false -eq $LabelsToApplyCsvUriValid) {
throw"The LabelsToApplyCsvUri $LabelsToApplyCsvUri is not valid. Please check the URI and try again. The format must be a valid URI." }
Write-Host "The LabelsToApplyCsvUri $LabelsToApplyCsvUri is valid..." -ForegroundColor Green
# Create AVM lables from the AVM labels CSV file stored on the web using the convertfrom-csv cmdlet $avmLabelsCsv = Invoke-WebRequest -Uri $LabelsToApplyCsvUri | ConvertFrom-Csv
# Check if the AVM labels CSV file contains the following columns: Name, Description, HEX $avmLabelsCsvColumns = $avmLabelsCsv | Get-Member -MemberType NoteProperty | Select-Object -ExpandProperty Name
$avmLabelsCsvColumnsValid = $avmLabelsCsvColumns -contains"Name"-and $avmLabelsCsvColumns -contains"Description"-and $avmLabelsCsvColumns -contains"HEX"if ($false -eq $avmLabelsCsvColumnsValid) {
throw"The labels CSV file does not contain the required columns: Name, Description, HEX. Please check the CSV file and try again. It contains the following columns: $avmLabelsCsvColumns" }
Write-Host "The labels CSV file contains the required columns: Name, Description, HEX" -ForegroundColor Green
# Create the AVM labels in the GitHub repository Write-Host "Creating/Updating the $($avmLabelsCsv.Count) AVM labels in $RepositoryName..." -ForegroundColor Yellow
$avmLabelsCsv | ForEach-Object {
if ($GitHubRepositoryLabelsJson.name -contains $_.name) {
Write-Host "The label $($_.name) already exists in $RepositoryName. Updating the label to ensure description and color are consitent..." -ForegroundColor Magenta
gh label create -R $RepositoryName "$($_.name)" -c $_.HEX -d $($_.Description) --force
}
else {
Write-Host "The label $($_.name) does not exist in $RepositoryName. Creating label $($_.name) in $RepositoryName..." -ForegroundColor Cyan
gh label create -R $RepositoryName "$($_.Name)" -c $_.HEX -d $($_.Description) --force
}
}
# POST - Get the current GitHub repository labels and export to a CSV file in the current directory or where -OutputDirectory specifies if set to a valid directory path and the directory exists or can be created if it does not exist alreadyif ($CreateCsvLabelExports -eq $true) {
Write-Host "Getting the current GitHub repository (post) labels for $RepositoryName..." -ForegroundColor Yellow
$GitHubRepositoryLabels = gh label list -R $RepositoryName -L $GitHubCliLimit --json name,description,color
if ($null -ne $GitHubRepositoryLabels) {
$csvFileNamePathPre = "$OutputDirectory\$($RepositoryName.Replace('/', '_'))-Labels-Post-$(Get-Date -Format FileDateTime).csv" Write-Host "Exporting the current GitHub repository (post) labels for $RepositoryName to $csvFileNamePathPre" -ForegroundColor Yellow
$GitHubRepositoryLabels | ConvertFrom-Json | Export-Csv -Path $csvFileNamePathPre -NoTypeInformation
}
}
# If -RemoveExistingLabels is set to $true and user confirms they want to remove all pre-existing labels check that only the avm labels exist in the repositoryif ($RemoveExistingLabels -eq $true -and ($RemoveExistingLabelsConfirmation -eq"Y"-or $NoUserPrompts -eq $true) -and $UpdateAndAddLabelsOnly -eq $false) {
Write-Host "Checking that only the AVM labels exist in $RepositoryName..." -ForegroundColor Yellow
$GitHubRepositoryLabels = gh label list -R $RepositoryName -L $GitHubCliLimit --json name,description,color
$GitHubRepositoryLabels | ConvertFrom-Json | ForEach-Object {
if ($avmLabelsCsv.Name -notcontains $_.name) {
throw"The label $($_.name) exists in $RepositoryName but is not in the CSV file." }
}
Write-Host "Only the CSV labels exist in $RepositoryName..." -ForegroundColor Green
}
Write-Host "The CSV labels have been created/updated in $RepositoryName..." -ForegroundColor Green
Module owners MUST test that child and extension resources and those Bicep or Terreform interface resources that are supported by their modules, are validated in E2E tests as per SNFR2 to ensure they deploy and are configured correctly.
These MAY be tested in a separate E2E test and DO NOT have to be tested in each E2E test.
Module owners MUST set the default resource name prefix for child, extension, and interface resources to the associated abbreviation for the specific resource as documented in the following CAF article Abbreviation examples for Azure resources, if specified and documented. This reduces the amount of input values a module consumer MUST provide by default when using the module.
For example, a Private Endpoint that is being deployed as part of a resource module, via the mandatory interfaces, MUST set the Private Endpoint’s default name to begin with the prefix of pep-.
Module owners MUST also provide the ability for these default names, including the prefixes, to be overridden via a parameter/variable if the consumer wishes to.
Furthermore, as per RMNFR2, Resource Modules MUST not have a default value specified for the name of the primary resource and therefore the name MUST be provided and specified by the module consumer.
The name provided MAY be used by the module owner to generate the rest of the default name for child, extension, and interface resources if they wish to. For example, for the Private Endpoint mentioned above, the full default name that can be overridden by the consumer, MAY be pep-<primary-resource-name>.
Tip
If the resource does not have a documented abbreviation in Abbreviation examples for Azure resources, then the module owner is free to use a sensible prefix instead.
Modules SHOULD implement unit testing to ensure logic and conditions within parameters/variables/locals are performing correctly. These tests MUST pass before a module version can be published.
Unit Tests test specific module functionality, without deploying resources. Used on more complex modules. In Terraform these live in tests/unit.
Modules MUST use static analysis, e.g., linting, security scanning (PSRule, tflint, etc.). These tests MUST pass before a module version can be published.
There may be differences between languages in linting rules standards, but the AVM core team will try to close these and bring them into alignment over time.
Modules MUST implement idempotency end-to-end (deployment) testing. E.g. deploying the module twice over the top of itself.
Modules SHOULD pass the idempotency test, as we are aware that there are some exceptions where they may fail as a false-positive or legitimate cases where a resource cannot be idempotent.
For example, Virtual Machine Image names must be unique on each resource creation/update.
A module MUST have an owner that is defined and managed by a GitHub Team in the Azure GitHub organization.
Today this is only Microsoft FTEs, but everyone is welcome to contribute. The module just MUST be owned by a Microsoft FTE (today) so we can enforce and provide the long-term support required by this initiative.
Note
The names for the GitHub teams for each approved module are already defined in the respective Module Indexes. These teams MUST be created (and used) for each module.
In AVM there will be multiple different teams involved throughout the initiatives lifecycle and ongoing long-term support. These teams will be listed below alongside their definitions.
Important
Individuals can be members of multiple teams, at once, that are defined below.
Managing the AVM Solution: Leading and managing AVM from a technical standpoint, ensuring the maintenance and growth of the Public Bicep Registry’s repository and the Terraform Registry. Governing the lifecycle and support SLAs for all AVM modules, as well as providing overall governance and overseeing/facilitating the contribution process.
Testing and quality enforcement: Developing, operating and enforcing the test framework and related tooling with all its quality gates. Providing initial reviews for all modules, making sure all standards are met.
Documentation: Defining and refining principles, contribution and consumption guidelines, specifications and procedures related to AVM modules, maintaining and publishing all related documentation on the program’s public website.
Community Engagement: Organizing internal and external events, such as hackathons, office hours, community calls and training events for current and future module owners and contributors. Presenting in live events both publicly and internally; publishing blog posts and videos on YouTube, etc.
Security Enhancements: Facilitating the implementation and/or implementing security enhancements across all AVM repositories - through the WAF (Well-Architected Framework) framework.
Supporting Module Owners: Providing day-to-day support for module owners, helping troubleshoot and manage security fixes for orphaned modules.
Improving Processes and Gathering Insights: Improving automation for issue triage and management processes and lead the development of internal dashboards to gain insights into contribution and consumption metrics.
Undefined tasks: Anything else not defined below for another team or in the RACI 👍
The team includes both technical and non-technical team members who are all Microsoft FTEs.
Module Owners
Important
Today, module owners MUST be Microsoft FTEs. This is to ensure that within AVM the long-term support for each module can be upheld and honoured.
Module owners are responsible for:
Initial module development
Module Maintenance (proactive & reactive)
Regular updates to ensure compatibility with the latest Azure services (including supporting new API versions and referencing the newest AVM modules when applicable).
WAF Reliability & Security alignment
Bug fixes, security patches and feature improvements.
Ensuring long term compliance with AVM specifications
Implementing and improving automated testing and validation tools for new modules.
The Azure Bicep & Terraform Product Groups are responsible for:
Backup/Additional support for orphaned modules to the AVM Core Team
Providing inputs and feedback on AVM
Taking on feedback and feature requests on their products, Bicep & Terraform, from AVM usage
Note
We are investigating working with all Azure Product Groups as a future investment area that they take on ownership, or contribute to, the AVM modules for their service/product.
RACI
RACI Definition
R = Responsible – Those who do the work to complete the task/responsibility.
A = Accountable – The one answerable for the correct and thorough completion of the task. There must be only one accountable person per task/responsibility. Typically has ‘sign-off’.
C = Consulted – Those whose opinions are sought.
I = Informed – Those who are kept up to date on progress.
The below table defines a RACI to be adopted by all parties referenced in the table to ensure customers can trust these modules and can consume and contribute to the initiative at scale.
Action/Task/Responsibility
Module Owners
Module Contributors
AVM Core Team
Product Groups
Notes
Build/Construct an AVM Module
R, A
R, C
C, I
I
Publish a Bicep AVM Module to the Bicep Public Registry
R, A
C, I
C, I
I
Publish a Terraform AVM Module to the Terraform Registry
R, A
C, I
C, I
I
Manage and maintain tooling/testing frameworks pertaining to module quality
C, I
C, I
R, A
C, I
Manage/run the AVM central backlog (module proposals, orphaned modules, test enhancements, etc.)
Module owners MAY cross-references other modules to build either Resource or Pattern modules. However, they MUST be referenced only by a HashiCorp Terraform registry reference to a pinned version e.g.,
Authors SHOULD NOT output entire resource objects as these may contain sensitive outputs and the schema can change with API or provider versions. Instead, authors SHOULD output the computed attributes of the resource as discreet outputs. This kind of pattern protects against provider schema changes and is known as an anti-corruption layer.
Remember, you SHOULD NOT output values that are already inputs (other than name).
E.g.,
# Resource output, computed attribute.
output"foo" {
description = "MyResource foo attribute"value = azurerm_resource_myresource.foo}# Resource output for resources that are deployed using `for_each`. Again only computed attributes.
output"childresource_foos" {
description = "MyResource children's foo attributes"value = {
forkey, valueinazurerm_resource_mychildresource:key => value.foo }
}# Output of a sensitive attribute
output"bar" {
description = "MyResource bar attribute"value = azurerm_resource_myresource.barsensitive = true}
Where descriptions for variables and outputs spans multiple lines. The description MAY provide variable input examples for each variable using the HEREDOC format and embedded markdown.
Example:
variable"my_complex_input" {
type = map(object({
param1 = stringparam2 = optional(number, null)
}))
description = <<DESCRIPTION A complex input variable that is a map of objects.
Each object has two attributes:
- `param1`: A required string parameter.
- `param2`: (Optional) An optional number parameter.
Example Input:
```terraform
my_complex_input = {
"object1" = {
param1 = "value1"
param2 = 2
}
"object2" = {
param1 = "value2"
}
}
```
DESCRIPTION }
Sometimes we need to ensure that the resources created are compliant to some rules at a minimum extent, for example a subnet has to be connected to at least one network_security_group. The user SHOULD pass in a security_group_id and ask us to make a connection to an existing security_group, or want us to create a new security group.
The disadvantage of this approach is if the user create a security group directly in the root module and use the id as a variable of the module, the expression which determines the value of count will contain an attribute from another resource, the value of this very attribute is “known after apply” at plan stage. Terraform core will not be able to get an exact plan of deployment during the “plan” stage.
For this kind of parameters, wrapping with object type is RECOMMENDED:
variable"security_group" {
type:object({
id = string })
default = null}
The advantage of doing so is encapsulating the value which is “known after apply” in an object, and the object itself can be easily found out if it’s null or not. Since the id of a resource cannot be null, this approach can avoid the situation we are facing in the first example, like the following:
ID: TFNFR14 - Category: Inputs - Not allowed variables
Since Terraform 0.13, count, for_each and depends_on are introduced for modules, module development is significantly simplified. Module’s owners MUST NOT add variables like enabled or module_depends_on to control the entire module’s operation. Boolean feature toggles are acceptable however.
variable used as feature switches SHOULD apply a positive statement, use xxx_enabled instead of xxx_disabled. Avoid double negatives like !xxx_disabled.
Please use xxx_enabled instead of xxx_disabled as name of a variable.
ID: TFNFR17 - Category: Code Style - Variables with Descriptions
The target audience of description is the module users.
For a newly created variable (Eg. variable for switching dynamic block on-off), it’s descriptionSHOULD precisely describe the input parameter’s purpose and the expected data type. descriptionSHOULD NOT contain any information for module developers, this kind of information can only exist in code comments.
For object type variable, description can be composed in HEREDOC format:
variable"kubernetes_cluster_key_management_service" {
type:object({
key_vault_key_id = stringkey_vault_network_access = optional(string)
})
default = nulldescription = <<-EOT - `key_vault_key_id` - (Required) Identifier of Azure Key Vault key. See [key identifier format](https://learn.microsoft.com/en-us/azure/key-vault/general/about-keys-secrets-certificates#vault-name-and-object-name) for more details. When Azure Key Vault key management service is enabled, this field is required and must be a valid key identifier. When `enabled` is `false`, leave the field empty.
- `key_vault_network_access` - (Optional) Network access of the key vault Network access of key vault. The possible values are `Public` and `Private`. `Public` means the key vault allows public access from all networks. `Private` means the key vault disables public access and enables private link. Defaults to `Public`.
EOT}
ID: TFNFR19 - Category: Code Style - Sensitive Data Variables
If variable’s type is object and contains one or more fields that would be assigned to a sensitive argument, then this whole variableSHOULD be declared as sensitive = true, otherwise you SHOULD extract sensitive field into separated variable block with sensitive = true.
Nullable SHOULD be set to false for collection values (e.g. sets, maps, lists) when using them in loops. However for scalar values like string and number, a null value MAY have a semantic meaning and as such these values are allowed.
Sometimes we will find names for some variable are not suitable anymore, or a change SHOULD be made to the data type. We want to ensure forward compatibility within a major version, so direct changes are strictly forbidden. The right way to do this is move this variable to an independent deprecated_variables.tf file, then redefine the new parameter in variable.tf and make sure it’s compatible everywhere else.
Deprecated variableMUST be annotated as DEPRECATED at the beginning of the description, at the same time the replacement’s name SHOULD be declared. E.g.,
variable"enable_network_security_group" {
type = stringdefault = nulldescription = "DEPRECATED, use `network_security_group_enabled` instead; Whether to generate a network security group and assign it to the subnet. Changing this forces a new resource to be created."}
A cleanup of deprecated_variables.tfSHOULD be performed during a major version release.
The terraform.tf file MUST only contain one terraform block.
The first line of the terraform block MUST define a required_version property for the Terraform CLI.
The required_version property MUST include a constraint on the minimum version of the Terraform CLI. Previous releases of the Terraform CLI can have unexpected behavior.
The required_version property MUST include a constraint on the maximum major version of the Terraform CLI. Major version releases of the Terraform CLI can introduce breaking changes and MUST be tested.
The required_version property constraint SHOULD use the ~> #.# or the >= #.#.#, < #.#.# format.
Note: You can read more about Terraform version constraints in the documentation.
ID: TFNFR26 - Category: Code Style - Providers in required_providers
The terraform block in terraform.tfMUST contain the required_providers block.
Each provider used directly in the module MUST be specified with the source and version properties. Providers in the required_providers block SHOULD be sorted in alphabetical order.
Do not add providers to the required_providers block that are not directly required by this module. If submodules are used then each submodule SHOULD have its own versions.tf file.
The source property MUST be in the format of namespace/name. If this is not explicitly specified, it can cause failure.
The version property MUST include a constraint on the minimum version of the provider. Older provider versions may not work as expected.
The version property MUST include a constraint on the maximum major version. A provider major version release may introduce breaking change, so updates to the major version constraint for a provider MUST be tested.
The version property constraint SHOULD use the ~> #.# or the >= #.#.#, < #.#.# format.
Note: You can read more about Terraform version constraints in the documentation.
By rules, in the module code providerMUST NOT be declared. The only exception is when the module indeed need different instances of the same kind of provider(Eg. manipulating resources across different locations or accounts), you MUST declare configuration_aliases in terraform.required_providers. See details in this document.
provider block declared in the module MUST only be used to differentiate instances used in resource and data. Declaration of fields other than alias in provider block is strictly forbidden. It could lead to module users unable to utilize count, for_each or depends_on. Configurations of the provider instance SHOULD be passed in by the module users.
Module owners MUST set a branch protection policy on their GitHub Repositories for AVM modules against their default branch, typically main, to do the following:
Requires a Pull Request before merging
Require approval of the most recent reviewable push
Dismiss stale pull request approvals when new commits are pushed
Require linear history
Prevents force pushes
Not allow deletions
Require CODEOWNERS review
Do not allow bypassing the above settings
Above settings MUST also be enforced to administrators
Tip
If you use the template repository as mentioned in the contribution guide, the above will automatically be set.
Sometimes we notice that the name of certain output is not appropriate anymore, however, since we have to ensure forward compatibility in the same major version, its name MUST NOT be changed directly. It MUST be moved to an independent deprecated_outputs.tf file, then redefine a new output in output.tf and make sure it’s compatible everywhere else in the module.
A cleanup SHOULD be performed to deprecated_outputs.tf and other logics related to compatibility during a major version upgrade.
ID: TFNFR31 - Category: Code Style - locals.tf for Locals Only
In locals.tf, file we could declare multiple locals blocks, but only locals blocks are allowed.
You MAY declare locals blocks next to a resource block or data block for some advanced scenarios, like making a fake module to execute some light-weight tests aimed at the expressions.
From Terraform AzureRM 3.0, the default value of prevent_deletion_if_contains_resources in provider block is true. This will lead to an unstable test because the test subscription has some policies applied, and they will add some extra resources during the run, which can cause failures during destroy of resource groups.
Since we cannot guarantee our testing environment won’t be applied some Azure Policy Remediation Tasks in the future, for a robust testing environment, prevent_deletion_if_contains_resourcesSHOULD be explicitly set to false.
newres is a command-line tool that generates Terraform configuration files for a specified resource type. It automates the process of creating variables.tf and main.tf files, making it easier to get started with Terraform and reducing the time spent on manual configuration.
Module owners MAY use newres when they’re trying to add new resource block, attribute, or nested block. They MAY generate the whole block along with the corresponding variable blocks in an empty folder, then copy-paste the parts they need with essential refactoring.
The module’s owners MUST use map(xxx) or set(xxx) as resource’s for_each collection, the map’s key or set’s element MUST be static literals.
Good example:
resource"azurerm_subnet""pair" {
for_each = var.subnet_map // `map(string)`, when user call this module, it could be: `{ "subnet0": "subnet0" }`, or `{ "subnet0": azurerm_subnet.subnet0.name }`
name = "${each.value}"-pairresource_group_name = azurerm_resource_group.example.namevirtual_network_name = azurerm_virtual_network.example.nameaddress_prefixes = ["10.0.1.0/24"]
}
Bad example:
resource"azurerm_subnet""pair" {
for_each = var.subnet_name_set // `set(string)`, when user use `toset([azurerm_subnet.subnet0.name])`, it would cause an error.
name = "${each.value}"-pairresource_group_name = azurerm_resource_group.example.namevirtual_network_name = azurerm_virtual_network.example.nameaddress_prefixes = ["10.0.1.0/24"]
}
There are 3 types of assignment statements in a resource or data block: argument, meta-argument and nested block. The argument assignment statement is a parameter followed by =:
If you cannot find guidance for what you need, please let us know via GitHub Issues 👍
Subsections of Contributing
Contribution Q&A
Tip
Check out the FAQ for more answers to common questions about the AVM initiative in general.
Proposing a module
Who can propose a new module and where can I submit a new module proposal / request?
Everyone can propose a module
To propose a new module, simply create an issue/complete the form here.
Can I just propose / create any module?
For example, can I propose one for managed disks or NICs or diagnostic settings? What about patterns?
No, you cannot propose or create just any module. You can only propose modules that are aligned with requirements documented in the module specifications section.
Below, we provide some guidance on what modules you can / cannot propose.
Resource modules: resource modules have bring extra value to the end user (can’t just be simple wrappers) and MUST mapped 1:1 to RPs (resource providers) and top level resources. You MUST follow the module specifications and your modules SHOULD be WAF aligned.
Good examples:
Virtual machine: the VM module is highly complex and therefore, it brings extra value to the end user by providing a wide variety of features (e.g., diagnostics, RBAC, domain join, disk encryption, backup and more).
Storage account: even though, this module is mainly built around one RP, it brings extra value by providing easy access to its child resources, such as file/table/queue services, as well as additional standard interfaces (e.g., diagnostics, RBAC, encryption, firewall, etc.).
Bad examples:
NIC or Public IP (PIP) module: these would be simple wrappers around the NIC/PIP resource and wouldn’t bring any extra value. NICs and PIPs SHOULD be surfaced as part of the VM module (or any other primary resources that require them).
Diagnostic settings: these are too low-level “sub resources”, and highly dependent on their “primary resource’s” RP defined as “interfaces” and therefore MUST be used as part of a resource module holding a primary resource - see Diagnostic Settings documentation about the correct implementation.
Pattern modules: In case of pattern modules, ideally you should start from architectural patterns, published in the Azure Architecture Center, and build your pattern module by leveraging resource modules that are required to implement the pattern. AVM does not provide architectural guidance on how you should design your pattern, but you MUST follow the module specifications and your modules SHOULD be WAF aligned.
Good examples:
Landing zone accelerators for N-tier web application; AKS cluster; SAP: there are numerous examples for these architectures in Azure Architecture Center that already have baked in guidance / smart defaults that are WAF Aligned, therefore these are good candidates for pattern modules. Module owners MAY leverage resource modules to implement the pattern.
Hub and spoke topology: it’s a common pattern that is used by many customers and there are great examples available through Azure Architecture Center, as well as Azure Landing Zones. Also a good candidate for a pattern module.
Bad examples:
A pair of Virtual machines: being a simple wrapper, this solution wouldn’t bring any extra value as it doesn’t provide a complete solution.
Key Vault that deploys automatically generated secrets: this is aligned with the definition of a resource modules, therefore it should be categorized as such.
Where do I need to go to make sure the module I’d like to propose is not already in the works?
The AVM core team maintains the list of Bicep and Terraform modules and tracks the status of each module. Based on this list, you can check if the module you’d like to build is already in the works (e.g., it’s being worked on in a feature branch but hasn’t been published yet).
To see the formatted lists with additional information, please visit the AVM Module Indexes page.
I need a new module but I cannot own/author it for various reasons, what should I do?
You sign up to be a module owner (and optionally, you can find additional contributors to help you).
You find / request someone else to be the module owner (and optionally, you can be a contributor).
You propose a module and wait until the AVM core team finds a module owner for you (who then can optionally leverage the help of additional contributors).
As these options are increasingly more time consuming, we recommend you to start with considering option 1 and only if you cannot own the module, should you move to option 2 and then 3.
How long will it take for someone to respond and a module to be created/updated and published?
While there are SLAs defined for providing support for existing modules, there are currently no SLAs in place for the creation of new modules. The AVM core team is a small team and is currently working on automating the module creation process to make it as easy as possible for module owners to create and publish modules on their own.
Beside of providing program level governance, the AVM core team is mainly responsible for defining the module specifications, providing tooling (such as test frameworks and pipelines), guidance and support to module owners, as well as facilitating the creation of new modules by maintaining the module catalog and identifying volunteers for owning the modules. However, modules will be created and maintained by a broader community of module owners.
How do I let the AVM team know I really need an AVM module to unblock me / my project / my company?
If you’re an external user, you can propose a module here and provide as much context as possible under the “Module Details” section (e.g., why do you need the module, what’s the business impact of not having it, etc.).
If you’re a Microsoft employee and have already proposed a module here, you can reach out to the AVM core team directly via Teams to provide more details internally.
The AVM core team will then triage the request and get back to you with next steps. You can accelerate the process of creating the module by volunteering to be a module owner.
Developing a module
Who is developing a modules?
Every module has an owner that is responsible for module development and maintenance. One owner can own one or multiple modules. An owner can develop modules alone or lead a team that will develop a module. If you want to join a team and to contribute on specific module, please contact module owner.
At this moment, only Microsoft FTEs can be module owners.
What do I need so I can start developing a module?
Feel free to reach out to the AVM Core team in case that additional help is needed.
What do I do about existing modules that are available doing a similar thing to my module that I am proposing to develop and release?
As part of the Module Proposal process, the AVM core team will work with you to triage your proposal. We also want to make sure that no similar existing modules from known Microsoft projects are already on their way to be migrated to AVM.
If there aren’t any, then you can proceed with developing your module from scratch once given approval to proceed by the AVM core team.
However, if there are existing modules from Microsoft projects we would invite you to help us complete the migration to AVM of this module; this may also entail working with the existing module owner/team.
For existing modules that may not be directly owned and developed by Microsoft or their employees you should first review the license applied to the GitHub repository hosting the module and understand its terms and conditions. More information on GitHub repositories and licenses can be found here in Licensing a repository Most modules will use a license that will allow you to take inspiration and copy all or parts from the module source code. However, to confirm, you should always check the license and any conditions you may have to meet by doing this.
What are the mandatory labels that needs to be used while managing issues, pull requests and discussions on GitHub repositories where module are held?
Where module will live? Do I need to create separate repo or to place it in specific folder?
Bicep
For Bicep, both Resource and Pattern, AVM Modules will be homed in the Azure/bicep-registry-modules repository and live within an avm directory that will be located at the root of the repository.
If you are module owner, it is expected that you will fork the Azure/bicep-registry-modules repository and work on a branch from within their fork, before then creating a Pull Request (PR) back into the Azure/bicep-registry-modules repositories main branch. In Bice contribution guide, you can discover Directory and File structure that will be used and examples.
Terraform
Each Terraform AVM module will have its own GitHub Repository in the Azure GitHub Organization. This repo will be created by the Module Owners and the AVM Core team collaboratively, including the configuration of permissions. To read more about how to start, navigate to Terraform AVM contribution guide.
I get the error ‘The repository ********** already exists on this account’ when I try to create a new repository, what should I do?
If you get this error, it means that the repository already exists in the Azure GitHub Organization. This can happen if someone has already created a repository with the same name in the past and then archived it.
To determine if this is the case you’ll need to navigate to the Microsoft Open Source Management Portal, then search for the repository name you are trying to create. Click on the repository and you will find the owner. Reach out the owner to ask them to transfer the repo to you or delete it. You’ll want them to delete it if it was not created from the template.
Where can I test my module during development?
During initial module development module owners/developers need to use your own environment (Azure subscriptions) to test module. In later phase, during publishing process, we will conduct automated test that will use AVM dedicated environment.
Updating and managing a module
I’m already using a module today, but its missing a feature, what should I do?
You should use GitHub issues to propose changes or improvements for specific module. Issue request will be routed to module owner that MUST respond to logged issues as per the defined support statement. In case that module currently don’t have owner, AVM Core Team will handle request.
I am using module without owner. What will happened if I need update?
AVM core team will work to assign owner for every module, but it can happen during a time that there are modules without owner. If you would like to own that module, feel free to ask to take ownership. At this moment, only Microsoft FTEs can be module owners.
How will the support SLAs be automatically enforced?
All issues created in a module repo will be automatically be picked up and tracked by the GitHub Policy Service. This service will take the necessary steps when escalation is needed as per the SLAs defined in the Module Support chapter.
Process Overview
This page provides an overview of the contribution process for AVM modules.
New Module Proposal & Creation
Important
Each AVM module MUST have a Module Proposal issue created and approved by the AVM core team before it can be created/migrated!
---
config:
  nodeSpacing: 20
  rankSpacing: 20
  diagramPadding: 5
  padding: 5
  useWidth: 100
  flowchart:
    wrappingWidth: 400
    padding: 5
---
flowchart TD
    ModuleIdea[Consumer has an idea for a new AVM Module] -->CheckIndex(Check AVM Module Indexes)
        click CheckIndex "/azure-verified-modules-copy/indexes/"
    CheckIndex -->IndexExistenceCheck{Is the module<br>in the index?}
    IndexExistenceCheck -->|No|A
    IndexExistenceCheck -->|Yes|EndExistenceCheck(Review existing/proposed AVM module)
    EndExistenceCheck -->OrphanedCheck{ Is the module<br>orphaned? }
        click OrphanedCheck "/azure-verified-modules-copy/specs/shared/module-lifecycle/#orphaned-avm-modules"
    OrphanedCheck -->|No|ContactOwner[Contact module owner,<br> via GitHub issues on the related <br>repo, to discuss enhancements/<br>bugs/opportunities to contribute etc.]
    OrphanedCheck -->|Yes|OrphanOwnerYes(Locate the related issue <br> and comment on:<br> - A feature/enhancement suggestion <br> - Indicating you wish to become the owner)
        click OrphanOwnerYes "/azure-verified-modules-copy/specs/shared/module-lifecycle/#orphaned-avm-modules"
    OrphanOwnerYes -->B
    A[[ Create Module Proposal ]] -->|GitHub Issue/Form Submitted| B{ AVM Core Team<br>Triage }
        click A "https://aka.ms/avm/moduleproposal"
        click B "/azure-verified-modules-copy/help-support/issue-triage/avm-issue-triage/#avm-core-team-triage-explained"
    B -->|Module Approved for Creation| C[["Module Owner(s) Identified  & assigned to GitHub issue/proposal" ]]
    B -->|Module Rejected| D(Issue closed with reasoning)
    C -->E[[ Module index CSV files updated by AVM Core Team]]
        click E "/azure-verified-modules-copy/indexes/"
    E -->E1[[Repo/Directory Created following the <br> Contribution Guide ]]
        click E1 "/azure-verified-modules-copy/contributing/"
    E1 -->F("Module Developed by Owner(s) & their Contributors")
    F -->G[[ Module & AVM Compliance Tests ]]
        click G "/azure-verified-modules-copy/spec/SNFR3"
    G -->|Tests Fail|I(Modules/Tests Fixed <br> To Make Them Pass)
    I -->F
    G -->|Tests Pass|J[[Pre-Release v0.1.0 created]]
    J -->K[[Publish to Bicep/Terraform Registry]]
    K -->L(Take Feedback from v0.1.0 Consumers)
    L -->M{Anything<br>to be resolved <br> before 1.0.0<br>release? }
        click M "/azure-verified-modules-copy/contributing/process/#avm-preview-notice"
    M -->|Yes|FixPreV1("Module feedback incorporated by Owner(s) & their Contributors")
    FixPreV1 -->PreV1Tests[[Self & AVM Module Tests]]
    PreV1Tests -->|Tests Fail|PreV1TestsFix(Modules/Tests Fixed To Make Them Pass)
    PreV1TestsFix -->N
    M -->|No|N[[Publish 1.0.0 Release]]
    N -->O[[Publish to IaC Registry]]
    O -->P[[ Module BAU Starts ]]
        click P "/azure-verified-modules-copy/help-support/module-support/"
Provide details for module proposals
When proposing a module, please include the information in the description that is mentioned for the triage process here:
As the overall AVM framework is not GA (generally available) yet - the CI framework and test automation is not fully functional and implemented across all supported languages yet - breaking changes are expected, and additional customer feedback is yet to be gathered and incorporated. Hence, modules MUST NOT be published at version 1.0.0 or higher at this time.
All module MUST be published as a pre-release version (e.g., 0.1.0, 0.1.1, 0.2.0, etc.) until the AVM framework becomes GA.
However, it is important to note that this DOES NOT mean that the modules cannot be consumed and utilized. They CAN be leveraged in all types of environments (dev, test, prod etc.). Consumers can treat them just like any other IaC module and raise issues or feature requests against them as they learn from the usage of the module. Consumers should also read the release notes for each version, if considering updating to a more recent version of a module to see if there are any considerations or breaking changes etc.
Module Owner Has Issue/Is Blocked/Has A Request
In the event that a module owner has an issue or is blocked due to specific AVM missing guidance, test environments, permission requirements, etc. they should follow the below steps:
Tip
Common issues/blockers/asks/request are:
Subscription level features
Resource Provider Registration
Preview Services Enablement
Entra ID (formerly Azure Active Directory) configuration (SPN creation, etc.)
Please note for module specific issues, these should be logged in the module’s source repository, not the AVM repository.
Terraform Contribution Guide
Important
While this page describes and summarizes important aspects of contributing to AVM, it only references some of the shared and language specific requirements.
Therefore, this contribution guide MUST be used in conjunction with the Terraform specifications. ALL AVM modules (Resource and Pattern modules) MUST meet the respective requirements described in these specifications!
Summary
This section lists AVM’s Terraform-specific contribution guidance.
While this page describes and summarizes important aspects of the composition of AVM modules, it may not reference All of the shared and language specific requirements.
Therefore, this guide MUST be used in conjunction with the Terraform specifications. ALL AVM modules (Resource and Pattern modules) MUST meet the respective requirements described in these specifications!
Important
Before jumping on implementing your contribution, please review the AVM Module specifications, in particular the Terraform specification pages, to make sure your contribution complies with the AVM module’s design and principles.
This section is only relevant for contributions to resource modules.
To meet RMFR4 and RMFR5 AVM resource modules must leverage consistent interfaces for all the optional features/extension resources supported by the AVM module primary resource.
To meet the requirements of SFR3 & SFR4, we use the modtm telemetry provider. This lightweight telemetry provider sends telemetry data to Azure Application Insights via a HTTP POST front end service.
The modtm telemetry provider is included in all Terraform modules and is enabled by default through the main.telemetry.tf file being automatically distributed from the template repo. You do not need to change this configuration.
Make sure that the modtm provider is listed under the required_providers section in the module’s terraform.tf file using the following entry. This is also validated by the linter.
When creating modules, it is important to understand that the Azure Resource Manager (ARM) API is sometimes eventually consistent. This means that when you create a resource, it may not be available immediately. A good example of this is data plane role assignments. When you create such a role assignment, it may take some time for the role assignment to be available. We can use an optional time_sleep resource to wait for the role assignment to be available before creating resources that depend on it.
# In variables.tf...
variable"wait_for_rbac_before_foo_operations" {
type:object({
create =optional(string, "30s")
destroy =optional(string, "0s")
})
default = {}
description =<<DESCRIPTIONThisvariablecontrolstheamountoftimetowaitbeforeperformingfoooperations.
Itonlyapplieswhen`var.role_assignments`and`var.foo`arebothset.
Thisisusefulwhenyouarecreatingroleassignmentsonthebarresourceandimmediatelycreatingfooresourcesinit.
Thedefaultis30secondsforcreateand0secondsfordestroy.
DESCRIPTION}# In main.tf...
resource"time_sleep" "wait_for_rbac_before_foo_operations" {
count =length(var.role_assignments) >0&&length(var.foo) >0?1:0 depends_on = [
azurerm_role_assignment.this ]
create_duration =var.wait_for_rbac_before_foo_operations.create destroy_duration =var.wait_for_rbac_before_foo_operations.destroy # This ensures that the sleep is re-created when the role assignments change.
triggers = {
role_assignments =jsonencode(var.role_assignments)
}
}
resource"azurerm_foo" "this" {
for_each =var.foo depends_on = [
time_sleep.wait_for_rbac_before_foo_operations ] # ...
}
Terraform Contribution Flow
High-level contribution flow
---
config:
  nodeSpacing: 20
  rankSpacing: 20
  diagramPadding: 50
  padding: 5
  flowchart:
    wrappingWidth: 300
    padding: 5
  layout: elk
  elk:
    mergeEdges: true
    nodePlacementStrategy: LINEAR_SEGMENTS
---

flowchart TD
  A(1 - Fork the module source repository)
    click A "/azure-verified-modules-copy/contributing/terraform/terraform-contribution-flow/#1-fork-the-module-source-repository"
  B(2 - Setup your Azure test environment)
    click B "/azure-verified-modules-copy/contributing/terraform/terraform-contribution-flow/#2-prepare-your-azure-test-environment"
  C(3 - Implement your contribution)
    click C "/azure-verified-modules-copy/contributing/terraform/terraform-contribution-flow/#3-implement-your-contribution"
  D{4 - Pre-commit<br>checks successful?}
    click D "/azure-verified-modules-copy/contributing/terraform/terraform-contribution-flow/#4-run-pre-commit-checks"
  E(5 - Create a pull request to the upstream repository)
    click E "/azure-verified-modules-copy/contributing/terraform/terraform-contribution-flow/#5-create-a-pull-request-to-the-upstream-repository"
  A --> B
  B --> C
  C --> D
  D -->|yes|E
  D -->|no|C
GitFlow for contributors
The GitFlow process outlined here depicts and suggests a way of working with Git and GitHub. It serves to synchronize the forked repository with the original upstream repository. It is not a strict requirement to follow this process, but it is highly recommended to do so.
When implementing the GitFlow process as described, it is advisable to configure the local clone of your forked repository with an additional remote for the upstream repository. This will allow you to easily synchronize your locally forked repository with the upstream repository. Remember, there is a difference between the forked repository on GitHub and the clone of the forked repository on your local machine.
Note
Each time in the following sections we refer to ‘your xyz’, it is an indicator that you have to change something in your own environment.
Prepare your developer environment
1. Fork the module source repository
Important
Each Terraform AVM module will have its own GitHub repository in the Azure GitHub Organization as per SNFR19.
This repository will be created by the Module owners and the AVM Core team collaboratively, including the configuration of permissions as per SNFR9
Module contributors are expected to fork the corresponding repository and work on a branch from within their fork, before then creating a Pull Request (PR) back into the source repository’s main branch.
To do so, simply navigate to your desired repository, select the 'Fork' button to the top right of the UI, select where the fork should be created (i.e., the owning organization) and finally click ‘Create fork’.
Note
If the module repository you want to contribute to is not yet available, please get in touch with the respective module owner which can be tracked in the Terraform Resource Modules index see PrimaryModuleOwnerGHHandle column.
Optional: The usage of local source branches
For consistent contributors but also Azure-org members in general it is possible to get invited as collaborator of the module repository which enables you to work on branches instead of forks. To get invited get in touch with the module owner since it’s the module owner’s decision who gets invited as collaborator.
2. Prepare your Azure test environment
AVM performs end-to-end (e2e) test deployments of all modules in Azure for validation. We recommend you to perform a local e2e test deployment of your module before you create a PR to the upstream repository. Especially because the e2e test deployment will be triggered automatically once you create a PR to the upstream repository.
Have/create an Azure Active Directory Service Principal with at least Contributor & User Access Administrator permissions on the Management-Group/Subscription you want to test the modules in. You might find the following links useful:
# Linux/MacOsexport ARM_SUBSCRIPTION_ID=$(az account show --query id --output tsv)# or set <subscription_id>export ARM_TENANT_ID=$(az account show --query tenantId --output tsv)# or set <tenant_id>export ARM_CLIENT_ID=<client_id>
export ARM_CLIENT_SECRET=<service_principal_password>
# Windows/Powershell$env:ARM_SUBSCRIPTION_ID =$(az account show --query id --output tsv)# or set <subscription_id>$env:ARM_TENANT_ID =$(az account show --query tenantId --output tsv)# or set <tenant_id>$env:ARM_CLIENT_ID ="<client_id>"$env:ARM_CLIENT_SECRET ="<service_principal_password>"
Change to the root of your module repository and run ./avm docscheck (Linux/MacOs) / avm.bat docscheck (Windows) to verify the container image is working as expected or needs to be pulled first. You will need this later.
3. Implement your contribution
To implement your contribution, we kindly ask you to first review the Terraform specifications and composition guidelines in particular to make sure your contribution complies with the repository’s design and principles.
Tip
To get a head start on developing your module, consider using the tooling recommended per spec TFNFR37. For example you can use the newres tool to help with creating variables.tf and main.tf if you’re developing a module using Azurerm provider.
4. Run Pre-commit Checks
Important
Make sure you have Docker installed and running on your machine.
Note
To simplify and help with the execution of commands like pre-commit, pr-check, docscheck, fmt, test-example, etc. there is now a simplified avm script available distributed to all repositories via terraform-azurerm-avm-template which combines all scripts from the avm_scripts folder in the tfmod-scaffold repository using avmmakefile.
The avm script also makes sure to pull the latest mcr.microsoft.com/azterraform:latest container image before executing any command.
4.1. Run pre-commit and pr-check
The following commands will run all pre-commit checks and the pr-check.
With the help of the avm script and the commands ./avm test-example (Linux/MacOs) / avm.bat test-example (Windows) you will be able to run it in a more simplified way. Currently the test-example command is not completely ready yet and will be released soon. Therefore please use the below docker command for now.
Run e2e tests with the help of the azterraform docker container image.
Make sure to replace <client_id> and <service_principal_password> with the values of your service principal as well as <example_folder> (e.g. default) with the name of the example folder you want to run e2e tests for.
Run e2e tests with the help of terraform init/plan/apply.
Simply run terraform init and terraform apply in the example folder you want to run e2e tests for. Make sure to set the environment variables ARM_SUBSCRIPTION_ID, ARM_TENANT_ID, ARM_CLIENT_ID and ARM_CLIENT_SECRET before you run terraform init and terraform apply or make sure you have a valid Azure CLI session and are logged in with az login.
5. Create a pull request to the upstream repository
Once you are satisfied with your contribution and validated it, submit a pull request to the upstream repository and work with the module owner to get the module reviewed by the AVM Core team, by following the initial module review process for Terraform Modules, described here. This is a prerequisite for publishing the module. Once the review process is complete and your PR is approved, merge it into the upstream repository and the Module owner will publish the module to the HashiCorp Terraform Registry.
5.1 Create the Pull Request [Contributor]
These steps are performed by the contributor:
Navigate to the upstream repository and click on the Pull requests tab.
Click on the New pull request button.
Ensure the base repository is set to the upstream AVM repo.
Ensure the base branch is set to main.
Ensure your head repository and compare branch are set to your fork and the branch you are working on.
Click on the Create pull request button.
5.2 Review the Pull Request [Owner]
IMPORTANT: The module owner must first check for any malicious code or changes to workflow files. If they are found, the owner should close the PR and report the contributor.
Review the changes made by the contributor and determine whether end to end tests need to be run.
If end to end tests do not need to be run (e.g. doc changes, small changes, etc) then so long as the static analysis passes, the PR can be merged to main.
If end to end tests do need to be run, then follow the steps in 5.3.
5.3 Release Branch and Run End to End Tests [Owner]
IMPORTANT: The module owner must first check for any malicious code or changes to workflow files. If they are found, the owner should close the PR and report the contributor.
Create a release branch from main. Suggested naminmg convention is release/<description-of-change>.
Open the PR created by the contributor and click Edit at the top right of the PR.
Change the base branch to the release branch you just created.
Wait for the PR checks to run, validate the code looks good and then merge the PR into the release branch.
Create a new PR from the release branch to the main branch of the AVM module.
The end to end tests should trigger and you can approve the run.
Once the end to end tests have passed, merge the PR into the main branch.
If the end to end tests fail, investigate the failure. You have two options:
Work with the contributor to resolve the issue and ask them to submit a new PR from their fork branch to the release branch.
Re-run the tests and merge to main. Repeat the loop as required.
If the issue is a simple fix, resolve it directly in the release branch, re-run the tests and merge to main.
Common mistakes to avoid and recommendations to follow
If you contribute to a new module then search and update TODOs (which are coming with the terraform-azurerm-avm-template) within the code and remove the TODO comments once complete
terraform.lock.hcl shouldn’t be in the repository as per the .gitignore file
Update the support.md file
\_header.md needs to be updated
support.md needs to be updated
Exclude terraform.tfvars file from the repository
Subsections of Contribution Flow
Terraform Owner Contribution Flow
This section describes the contribution flow for module owners who are responsible for creating and maintaining Terraform Module repositories.
Make sure module authors/contributors tested their module in their environment before raising a PR. The PR uses e2e checks with 1ES agents in the 1ES subscriptions. At the moment their is no read access to the 1ES subscription. Also if more than two subscriptions are required for testing, that’s currently not supported.
Watch Pull Request (PR) and issue (questions/feedback) activity for your module(s) in your repository and ensure that PRs are reviewed and merged in a timely manner as outlined in SNFR11.
Info
Make sure module authors/contributors tested their module in their environment before raising a PR. Also because once a PR is raised a e2e GitHib workflow pipeline is required to be run successfully before the PR can be merged. This is to ensure that the module is working as expected and is compliant with the AVM specifications.
2. GitHub repository creation and configuration
Once your module has been approved and you are ready to start development, you need to request that a new repository be created for your module.
You do that by adding a comment to the issue with the #RFRC tag. The Status: Ready For Repository Creation 📝 label will then be applied. This will trigger the creation of the repository and the configuration of the repository with the required settings.
Info
If you need your repository to be created urgently, please message the AVM Core team in the AVM Teams channel.
Once your module is ready for development, the Status: Repository Created 📄 label will be added to the issue and you’ll be notified it is ready.
3. Module Development Activities
You can now start developing your module, following standard guidance for Terraform module development.
Some useful things to know:
Pull Request
You can raise a pull request anytime, don’t wait until the end of the development cycle. Raise the PR after you first push your branch.
You can then use the PR to run end to end tests, check linting, etc.
Once readdy for review, you can request a review per step 4.
Grept
Grept is a linting tool for repositories, ensures predefined standards, maintains codebase consistency, and quality. It’s using the grept configuration files from the Azure-Verified-Modules-Grept repository.
The respoitory has an environment called test, it has have approvals and secrets applied to it ready to run end to end tests.
In the unusual cicumstance that you need to use your own tenant and subscription for end to end tests, you can override the secrets by setting ARM_TENANT_ID_OVERRIDE, ARM_SUBSCRIPTION_ID_OVERRIDE, and ARM_CLIENT_ID_OVERRIDE secrets.
If you need to supply additional secrets or variables for your end to end tests, you can add them to the test environment. They must be prefixed with TF_VAR_, otherwise they will be ignored.
4. Review the module
Once the development of the module has been completed, get the module reviewed from the AVM Core team by following the AVM Review of Terraform Modules process here which is a pre-requisite for the next step.
5. Publish the module
Once a module has been reviewed and the PR is merged to main. Follow the below steps to publish the module to the HashiCorp Registry.
Ensure your module is ready for publishing:
Create a release with a new tag (e.g. 0.1.0) via Github UI.
Go to the releases tab and click on Draft a new release.
Ensure that the Target is set to the main branch.
Select Choose a tag and type in a new tag, such as 0.1.0 Make sure to create the tag from the main branch.
Generate the release notes using the Generate release notes button.
If this is a community contribution be sure to update the ‘Release Notes` to provide appropriate credit to the contributors.
Publish a module by selecting the Publish button in the top right corner, then Module
Select the repository and accept the terms.
Info
Once a module gets updated and becomes a new version/release it will be automatically published with the latest published release version to the HashiCorp Registry.
Important
When an AVM Module is published to the HashiCorp Registry, it MUST follow the below requirements:
Resource Module: terraform-<provider>-avm-res-<rp>-<ARM resource type> as per RMNFR1
Pattern Module: terraform-<provider>-avm-ptn-<patternmodulename> as per PMNFR1
Terraform Core Team Repository Creation Process
This section describes the process for AVM core team members who are responsible for creating Terraform Module repositories.
Important
This contribution flow is for AVM Core Team members only.
1. Find Issues Ready for Repository Creation
When a module owner is ready to start development, they will add the Status: Ready For Repository Creation 📝 label to the proposal via a comment issue.
To find issues that are ready for repository creation, click this link
Open one of the issues to find the details you need.
Module name: This will be in the format avm-<type>-<name>. e.g. avm-res-network-virtualnetwork
Module owner GitHub handle: This will be in the content of the issue
Module owner display name: You may need to look this up in the open source portal
Module description: If this does not exist, then create one. The description will automtically be prefixed with Terraform Azure Verified <module-type> Module for ..., where <module-type> is either Resource, Pattern, or Utility
Resource provider namespace: You may need to look this up if not included in the issue
Resource type: You may need to look this up if not included in the issue
Module alternative names: Consider if it would be useful to search for this module using other names. If so, add them here. This is a comma separated list of names
Module comments: Any comments you want to add to the module index CSV file
Owner secondary GitHub handle: This is optional. If the module owner has a secondary GitHub handle
Owner secondary display name: This is optional. If the module owner has a secondary display name
Follow the prompts to login to your GitHub account.
Run the following command, replacing the values with the details you collected in step 1
# Required Inputs$moduleProvider = "azurerm"# Only change this if you know why you need to change it (Allowed values: azurerm, azapi, azure)$moduleName = "<module name>"# Replace with the module name (do not include the "terraform-azurerm" prefix)$moduleDisplayName = "<module description>"# Replace with a short description of the module$resourceProviderNamespace = "<resource provider namespace>"# Replace with the resource provider namespace of the module (NOTE: Leave empty for Pattern or Utility Modules)$resourceType = "<resource type>"# Replace with the resource type of the module (NOTE: Leave empty for Pattern or Utility Modules)$ownerPrimaryGitHubHandle = "<github user handle>"# Replace with the GitHub handle of the module owner$ownerPrimaryDisplayName = "<user display name>"# Replace with the display name of the module owner# Optional Metadata Inputs$moduleAlternativeNames = "<alternative names>"# Replace with a comma separated list of alternative names for the module$ownerSecondaryGitHubHandle = "<github user handle>"# Replace with the GitHub handle of the module owner$ownerSecondaryDisplayName = "<user display name>"# Replace with the display name of the module owner./scripts/New-Repository.ps1 `
-moduleProvider $moduleProvider `
-moduleName $moduleName `
-moduleDisplayName $moduleDisplayName `
-resourceProviderNamespace $resourceProviderNamespace `
-resourceType $resourceType `
-ownerPrimaryGitHubHandle $ownerPrimaryGitHubHandle `
-ownerPrimaryDisplayName $ownerPrimaryDisplayName `
-moduleAlternativeNames $moduleAlternativeNames `
-ownerSecondaryGitHubHandle $ownerSecondaryGitHubHandle `
-ownerSecondaryDisplayName $ownerSecondaryDisplayName
For example:
# Required Inputs$moduleProvider = "azurerm"# Only change this if you know why you need to change it (Allowed values: azurerm, azapi, azure)$moduleName = "avm-res-network-virtualnetwork"# Replace with the module name (do not include the "terraform-azurerm" prefix)$moduleDisplayName = "Virtual Networks"# Replace with a short description of the module$resourceProviderNamespace = "Microsoft.Network"# Replace with the resource provider namespace of the module (NOTE: Leave empty for Pattern or Utility Modules)$resourceType = "virtualNetworks"# Replace with the resource type of the module (NOTE: Leave empty for Pattern or Utility Modules)$ownerPrimaryGitHubHandle = "jaredfholgate"# Replace with the GitHub handle of the module owner$ownerPrimaryDisplayName = "Jared Holgate"# Replace with the display name of the module owner# Optional Metadata Inputs$moduleAlternativeNames = "VNet"# Replace with a comma separated list of alternative names for the module$ownerSecondaryGitHubHandle = ""# Replace with the GitHub handle of the module owner$ownerSecondaryDisplayName = ""# Replace with the display name of the module owner./scripts/New-Repository.ps1 `
-moduleProvider $moduleProvider `
-moduleName $moduleName `
-moduleDisplayName $moduleDisplayName `
-resourceProviderNamespace $resourceProviderNamespace `
-resourceType $resourceType `
-ownerPrimaryGitHubHandle $ownerPrimaryGitHubHandle `
-ownerPrimaryDisplayName $ownerPrimaryDisplayName `
-moduleAlternativeNames $moduleAlternativeNames `
-ownerSecondaryGitHubHandle $ownerSecondaryGitHubHandle `
-ownerSecondaryDisplayName $ownerSecondaryDisplayName
The script will stop and prompt you to fill out the Microsoft Open Source details.
Open the Open Source Portal using the link in the script output.
Click Complete Setup, then use the following table to provide the settings:
Question
Answer
Classify the repository
Production
Assign a Service tree or Opt-out
Azure Verified Modules / AVM
Direct owners
Add the module owner and yourself as direct owners. Add the avm-team-module-owners as security group.
Is this going to ship as a public open source licensed project
Yes, creating an open source licensed project
What type of open source will this be
Sample code
What license will you be releasing with
MIT
Did your team write all the code and create all of the assets you are releasing?
Yes, all created by my team
Does this project send any data or telemetry back to Microsoft?
Yes, telemetry
Does this project implement cryptography
No
Project name
Azure Verified Module (Terraform) for ‘module name’
Project version
1
Project description
Azure Verified Module (Terraform) for ‘module name’. Part of AVM project - https://aka.ms/avm
Business goals
Create IaC module that will accelerate deployment on Azure using Microsoft best practice.
Will this be used in a Microsoft product or service?
This is open source project and can be leveraged in Microsoft service and product.
Adopt security best practice?
Yes, use just-in-time elevation
Maintainer permissions
Leave empty
Write permissions
Leave empty
Repository template
Uncheck
Add .gitignore
Uncheck
Click Finish setup + start business review to complete the setup
Wait for it to process and then click View repository
If you don’t see the Elevate your access button, then refresh the browser window
Click Elevate your access and follow the prompts to elevate your access
Now head back over to the terminal and type yes and hit enter to complete the repository configuration
Open the new repository in GitHub.com and verify it all looks good.
Body - replace <repository url> with the URL of the repository you created in step 2:
> __Note:__ If the app is listed on the [Auto-Approved list](https://docs.opensource.microsoft.com/github/apps/approvals/), you do not need to complete this form.
You complete these steps:
- [x] Confirm the app is not in the [Auto-Approved list](https://docs.opensource.microsoft.com/github/apps/approvals/)
- [x] Fill out and verify the information in this form
- [x] Update the title to reflect the org/repo and/or app name
- [x] Submit the native request within the GitHub user interface
Operations will help complete these steps:
- [ ] Approve the app if already requested on GitHub natively
- [ ] Close this issue
Finally, you'll complete any configuration with the app or your repo that is required once approved.
# My request
- GitHub App name: Azure Verified Modules
- GitHub organization in which the app would be installed: Azure
- Is this an app created by you and/or your team?
- [x] Yes, this is an app created by me and/or my team
- [ ] No, this is a Microsoft 1st-party app created by another team
- [ ] No, this is a 3rd-party marketplace app
- If this __is an app created by you and/or your team__, please provide some ownership information in case future questions come up:
- Service Tree ID: our service tree ID is: Unchanged
- A few specific individuals at Microsoft if we have questions (corporate email list):Unchanged
- An optional team discussion list: Unchanged
- Is this an app you/your team created to address [reduced PAT lifetimes](https://aka.ms/opensource/tsg/pat)?
- [x] Yes
- [ ] No
- Are you looking for this app to be installed on individual repos or all repos in an organization?
- [x] Individual repos: <repositoryurl>
- [ ] All repos in an organization
- Does this app have any side-effects if it is installed into all repos in an organization? Side effects can include creating labels, issues, pull requests, automatic checks on PRs, etc.
- [ ] Yes, it has side effects and you should be careful if installing to all repos in an org
- [x] No side effects
- Please provide a description of the app's functionality and what are you trying to accomplish by utilizing this app:
Unchanged
- For any major permissions (org admin, repo admin, etc.), can you explain what they are and why they are needed?
Unchanged
- Any other notes or information can you provide about the app?
Submit the issue
4. Notify the Module Owner and Update the Issue Status
Add a comment to the issue you found in step 1 to let the module owner know that the repository has been created and is be ready for them to start development.
@<moduleowner> The module repository has now been created. You can find it at <repositoryurl>.
The final step of repository configuration is still in progress, but you will be able to start developing your code immediately.
The final step is to create the environment and credentials require to run the end to end tests. If the environment called `test` is not available in 48 hours, please let me know.
Thanks
Add the Status: Repository Created 📄 label to the issue
Remove the Status: Ready For Repository Creation 📝 label from the issue
5. Merge the Pull Request for the metadata CSV file
Open the pull request for the metadata CSV file shown in the script output look here if you lost the link
Review the changes to ensure they are correct and only adding 1 new line for the module you just created
If everything looks good, merge the pull request
6. Wait for the GitHub App to be installed
Once the GitHub App has been installed, the sync to create the environment and credentials will be triggered automatically at 15:30 UTC on week days. However, you can also trigger it manually by running the following command in the tf-repo-mgmt folder:
$moduleName = "avm-res-network-virtualnetwork"# Replace with the module name (do not include the "terraform-azurerm" prefix)./scripts/Invoke-WorkflowDispatch.ps1 `
-inputs @{
repositories = "$moduleName" plan_only = $false
}
Terraform Contribution Prerequisites
GitHub Account Link and Access
To contribute to this project, you need to have a GitHub account which is linked to your Microsoft corporate identity account and be a member of the Azure organization.
Tooling
Required Tooling
Tip
We recommend to use Linux or MacOS for your development environment. You can use Windows Subsystem for Linux (WSL) if you are using Windows.
To contribute to this project the following tooling is required:
Inside Visual Studio Code, add editor.bracketPairColorization.enabled: true to your settings.json, to enable bracket pair colorization.
Review of Terraform Modules
The AVM module review is a critical step before an AVM Terraform module gets published to the Terraform Registry and made publicly available for customers, partners and wider community to consume and contribute to. It serves as a quality assurance step to ensure that the AVM Terraform module complies with the Terraform specifications of AVM. The below process outlines the steps that both the module owner and module reviewer need to follow.
The module owner completes the development of the module in their branch or fork.
The module owner submits a pull request (PR) titled AVM-Review-PR and ensures that all checks are passing on that PR as that is a pre-requisite to request a review.
The module owner assigns the avm-core-team-technical-terraform GitHub team as reviewer on the PR.
The module owner leaves the following comment as it is on the module proposal in the AVM - Module Triage project by searching for their module proposal by name there.
➕ AVM Terraform Module Review Request
I have completed my initial development of the module and I would like to request a review of my module before publishing it to the Terraform Registry. The latest code is in a PR titled [AVM-Review-PR](REPLACE WITH URL TO YOUR PR) on the module repo and all checks on that PR are passing.
The AVM team moves the module proposal from “In Development” to “In Review” in the AVM - Module Triage project.
The AVM team will assign a module reviewer who will open a blank issue on the module titled “AVM-Review” and populate it with the below mark down. This template already marks the specs as compliant which are covered by the checks that run on the PR. There are some specs which don’t need to be checked at the time of publishing the module therefore they are marked as NA.
➕ AVM Terraform Module Review Issue
Dear module owner,
As per the module ownership requirements and responsibilities at the time of [assignment](REPLACE WITH THE LINK TO THE AVM MODULE PROPOSAL), the AVM Team is opening this issue, requesting you to validate your module against the below AVM specifications and confirm its compliance.
Please don’t close this issue and merge your AVM-Review-PR until advised to do so. This review is a prerequisite for publishing your module’s v0.1.0 in the Terraform Registry. The AVM team is happy to assist with any questions you might have.
Requested Actions
Complete the below task list by ticking off the tasks.
Complete the below table by updating the Compliant column with Yes, No or NA as possible values.
Please use the comments columns to provide additional details especially if the Compliant column is updated to No or NA.
Tasks
Address comments on AVM-Review-PR if any
Ensure that all checks on AVM-Review-PR are passing
The module reviewer can update the Compliance column for specs in line 42 to 47 to NA, in case the module being reviewed isn’t a pattern module.
The module reviewer reviews the code in the PR and leaves comments to request any necessary updates.
The module reviewer assigns the AVM-Review issue to the module owner and links the AVM-Review Issue to the AVM-Review-PR so that once the module reviewer approves the PR and the module owner merges the AVM-Review-PR, the AMV-Review issue is automatically closed. The module reviews responds to the module owner’s comment on the Module Proposal in AVM Repo with the following
➕ AVM Terraform Module Review Initiation Message
Thank you for requesting a review of your module. The AVM module review process has been initiated, please perform the **Requested Actions** on the AVM-Review issue on the module repo.
The module owner updates the check list and the table in the AVM-Review issue and notifies the module reviewer in a comment.
The module reviewer performs the final review and ensures that all checks in the checklist are complete and the specifications table has been updated with no requirements having compliance as ‘No’.
The module reviewer approves the AVM-Review-PR, and leaves the following comment on the AVM-Review issue with the following comment.
➕ AVM Terraform Module Review Completion Message
Thank you for contributing this module and completing the review process per AVM specs. The AVM-Review-PR has been approved and once you merge it that will close this AVM-Review issue. You may proceed with [publishing](/azure-verified-modules-copy/contributing/terraform/terraform-contribution-flow/owner-contribution-flow/#7-publish-the-module) this module to the HashiCorp Terraform Registry with an initial pre-release version of v0.1.0. Please keep future versions also pre-release i.e. < 1.0.0untilAVMbecomesgenerallyavailable(GA)ofwhichtheAVMteamwillnotifyyou.**Requested Action**:Oncepublishedpleaseupdateyour [module proposal](REPLACE WITH THE LINK TO THE MODULE PROPOSAL) withthefollowingcomment."Theinitialreviewofthismoduleiscomplete,andthemodulehasbeenpublishedtotheregistry.RequestingAVMteamtoclosethismoduleproposalandmarkthemoduleavailableinthemoduleindex.TerraformRegistryLink:<REPLACEWITHTHELINKOFTHEMODULEINTERRAFORMREGISTRY>
GitHub Repo Link: <REPLACEWITHTHELINKOFTHEMODULEINGITHUB>"
Once the module owner perform the requested action in the previous step, the module reviewer updates the module proposal by performing the following steps:
Assign label Status: Module Available :green_circle: to the module proposal.
Update the module index excel file and CSV file by creating a PR to update the module index and links the module proposal as an issue that gets closed once the PR is merged which will move the module proposal from “In Review” to “Done” in the AVM - Module Triage project.
Terraform Module Testing
When you author your Azure Verified Module (AVM) Terraform module, you should ensure that it is well tested. This document outlines the testing framework and tools that are used to test AVM Terraform modules.
Testing Framework Composition
For Terraform modules, we use the following tools:
Before you submit a pull request to your module, you should ensure that the following checks are passed. You can run the linting tools locally by running the following command:
Doing so will shorten the development cycle and ensure that your module is compliant with the AVM specifications.
GitHub Actions and Pull Requests
We centrally manage the test workflows for your Terraform modules. We also provide a test environment (Azure Subscription) as part of the testing framework.
Linting
The linting.yml workflow in your repo (.github/workflows/linting.yml) is responsible for static analysis of your module. It will run the following centralized tests:
avmfix to ensure that your module is formatted correctly.
terraform-docs to ensure that your module documentation is up to date.
TFLint to ensure that your module is compliant with the AVM specifications.
List all the module examples in the examples directory.
Conftest will check the plan for compliance with the well-architected framework using OPA.
Your example will be tested for idempotency by running terraform apply and then terraform plan again.
Your example will be destroyed by running terraform destroy.
Currently it is not possible to run the end-to-end tests locally, however you can run terraform apply and terraform destroy commands locally to test your module examples.
OPA (Open Policy Agent) & Conftest
Conftest is the first step in the AVM end-to-end testing framework. It will check the plan for compliance with the well-architected framework using OPA. The policies that we use are available here: https://github.com/Azure/policy-library-avm.
If you get failures, you should examine them to understand how you can make your example compliant with the well-architected framework.
Creating exceptions
In some circumstances, you may need to create an exception for a policy, you can do so by creating a .rego file in the exceptions sub-directory of your example. For example, to exclude the rule called "configure_aks_default_node_pool_zones", create a file called exceptions/exception.rego in your example, with the following content:
TFLint is used to check that your module is compliant with the AVM specifications. We use a custom ruleset for TFLint to check for AVM compliance: https://github.com/Azure/tflint-ruleset-avm.
Excluding rules
If you need to exclude a rule from TFLint, you can do so by creating one of the following in the root of your module:
avm.tflint.override.hcl - to override the rules for the root module
avm.tflint.override_module.hcl - to override the rules for submodules
avm.tflint.override_example.hcl - to override the rules for examples
These files are HCL files that contain the rules that you want to override. Here is some example syntax:
# Disable the required resource id output rule as this is a pattern module and it does not make sense here.
rule"required_output_rmfr7" {
enabled =false}
Please include a comment in the file explaining why you are disabling the rule.
Excluding examples from end-to-end testing
If you have examples that you do not want to be tested, you can exclude them by creating a file called .e2eignore in the example directory. The contents of the file should explain why the example is excluded from testing.
Global test setup and teardown
Some modules require a global setup and teardown to be run before and after ALL examples. We provide a way to do this by creating a file called examples/setup.sh in the root of your module. This script will be run before all examples are tested, and will be authorized with the same credentials as the examples.
You can optionally supply a teardown script that will be run after all examples are tested. This should be called examples/teardown.sh.
Pre and post scripts per-example
Some examples require pre and post commands that are specific to that example. Use cases here can be to modify the example files to ensure unique names or to run some commands before or after the example is tested.
You can do this by creating a file called examples/example_name/pre.sh in the example directory. This script will be run before the example is tested, and will be authorized with the same credentials as the example. You can optionally supply a post script that will be run after the example is tested. This should be called examples/example_name/post.sh.
The pre and post scripts are run in the context of the example directory, so you can use relative paths to access files.
Grept and the chore: repository governance pull requests
We run a weekly workflow that checks the contents of your module and creates a pull request if it finds any issues. If you see a pull request with the title chore: repository governance, it means that the workflow has found some issues with your module, so please check the pull request and merge it to ensure you are compliant.
You do not need to release a new version of your module when you merge these pull requests, as they do not change the module code.
Overriding the default test subscription (using a different Azure environment)
If your module deploys resource that are not compatible with the default test subscription, you can override these defaults by setting additional environment secrets in your GitHub repository.
You might need to do this if:
The resources you are deploying are constrained by quota or subscription limits.
You need to deploy resources at scopes higher than subscription level (e.g. management group or tenant).
To override the Azure environment, you can specify the environment in your module’s configuration or set the following environment variables in your GitHub repository settings:
Create a user-assigned managed identity in the Azure environment you want to use.
Create GitHub federated credentials for the user-assigned managed identity in the Azure environment you want to use, using the github organization and repository of your module. Select entity type ’environment’ and add test for the name.
Create appropriate role assignments for the user-assigned managed identity in the Azure environment you want to use.
Then, go to the settings of your GitHub repository and select environments.
Select the test environment.
Add the following secrets:
ARM_CLIENT_ID_OVERRIDE - The client ID of the user-assigned managed identity.
ARM_TENANT_ID_OVERRIDE - The tenant ID of the user-assigned managed identity.
ARM_SUBSCRIPTION_ID_OVERRIDE - The subscription ID you want to use for the tests.
Terraform Test (Optional)
Authors may choose to use terraform test to run unit and integration tests on their modules.
Unit tests
Test files should be placed in the tests/unit directory. They can be run using the following command:
./avm unit-test
Authors SHOULD use unit tests with mocked providers. This ensures that the tests are fast and do not require any external dependencies.
Integration tests
Integration tests should be placed in the tests/integration directory. They can be run using the following command:
./avm integration-test
Integration tests should deploy real resources and should be run against a real Azure subscription. However, they are not fully integrated into the AVM GitHub Actions workflows. Authors should run integration tests locally and ensure that they are passing but they will not be run automatically in the CI/CD pipeline.
Website Contribution Guide
Looking to contribute to the AVM Website, well you have made it to the right place/page. 👍
Follow the below instructions, especially the pre-requisites, to get started contributing to the library.
Context/Background
Before jumping into the pre-requisites and specific section contribution guidance, please familiarize yourself with this context/background on how this library is built to help you contribute going forward.
This site is built using Hugo, a static site generator, that’s source code is stored in the AVM GitHub repo (link in header of this site too) and is hosted on GitHub Pages, via the repo.
The reason for the combination of Hugo & GitHub pages is to allow us to present an easy to navigate and consume library, rather than using a native GitHub repo, which is not easy to consume when there are lots of pages and folders. Also, Hugo generates the site in such a way that it is also friendly for mobile consumers.
But I don’t have any skills in Hugo?
That’s okay and you really don’t need them. Hugo just needs you to be able to author markdown (.md) files and it does the rest when it generates the site 👍
Pre-Requisites
Read and follow the below sections to leave you in a “ready state” to contribute to AVM.
Run and Access a Local Copy of AVM Website During Development
When in VS Code you should be able to open a terminal and run the below commands to access a copy of the AVM website from a local web server, provided by Hugo, using the following address http://localhost:1313/azure-verified-modules-copy/:
cd docs
hugo server -D // you can add "--poll 700ms", if file changes are not detected
Software/Applications
To contribute to this website, you will need the following installed:
Tip
You can use winget to install all the pre-requisites easily for you. See the below section
Steps to do before contributing anything (after pre-requisites)
Run the following commands in your terminal of choice from the directory where you fork of the repo is located:
git checkout main
git pull
git fetch -p
git fetch -p upstream
git pull upstream main
git push
Doing this will ensure you have the latest changes from the upstream repo, and you are ready to now create a new branch from main by running the below commands:
git checkout main
git checkout -b <YOUR-DESIRED-BRANCH-NAME-HERE>
Top Tips
Sometimes the local version of the website may show some inconsistencies that don’t reflect the content you have created
If this happens, simply kill the Hugo local web server by pressing CTRL + C and then restart the Hugo web server by running hugo server -D from the docs/ directory.
Help & Support
Summary
This section provides information about AVM’s support.
This page provides guidance for members of the AVM Core Team on how to triage module proposals and generic issues filed in the AVM repository, as well as how to manage these GitHub issues throughout their lifecycle.
During the AVM Core Team Triage step, the following will be checked, completed and actioned by the AVM Core Team during their triage calls (which are currently twice per week).
Note
Every module needs a module proposal to be created in the AVM repository.
Tip
During the triage process, the AVM Core Team should also check the status of following queries:
Add the Status: In Triage 🔍 label to indicate you’re in the process of triaging the issue.
Check module proposal issue/form:
Check the Bicep or Terraform module indexes for the proposed module to make sure it is not already available or being worked on.
Ensure the module’s details are correct as per specifications - naming, classification (resource/pattern) etc.
Check if the module is added to the “Proposed” column on the AVM - Modules Triage GitHub project board.
Check if the requestor is a Microsoft FTE.
If there’s any additional clarification needed, contact the requestor through comments (using their GH handle) or internal channels - for Microsoft FTEs only! You can look them up by their name or using the Microsoft Open Source Management Portal’s People finder: “Linked people across Microsoft organizations”. Make sure you capture any decisions regarding the module in the comments section.
Make adjustments to the module’s name/classification as needed.
Change the name of the issue to reflect the module’s name, i.e.,
After the “[Module Proposal]:” prefix, change the issues name to the module’s approved name between backticks, i.e., ` and `, e.g., avm/res/sql/managed-instance for a Bicep module, or avm-res-compute-virtualmachine for a Terraform module.
Example:
“[Module Proposal]: avm/res/sql/managed-instance”
“[Module Proposal]: avm-res-sql-managedinstance”
Check if the GitHub Policy Service Bot has correctly applied the module language label: Language: Bicep 💪 or Language: Terraform 🌐
As part of the triage of pattern modules, the following points need to be considered/clarified with the module requestor:
Shouldn’t this be a resource module? What makes it a pattern - e.g., does it deploy multiple resources?
What is it for? What problem does it fix or provides a solution for?
What is/isn’t part of it? Which resource and/or pattern modules are planned to be leveraged in it? Provide a list of resources that would be part of the planned module.
Where is it coming from/what’s backing it - e.g., Azure Architecture Center (AAC), community request, customer example. Provide an architectural diagram and related documentation if possible - or a pointer to these if they are publicly available.
Don’t let the module’s scope to grow too big, split it up to multiple smaller ones that are more maintainable - e.g., hub & spoke networking should should be split to a generic hub networking and multiple workload specific spoke networking patterns.
The module’s name should be as descriptive as possible.
Scenario 1: Requestor doesn’t want to / can’t be module owner
Note
If requestor is interested in becoming a module owner, but is not a Microsoft FTE, the AVM core team will try to find a Microsoft FTE to be the module owner whom the requestor can collaborate with.
If the requestor indicated they didn’t want to or can’t become a module owner (or is not a Microsoft FTE), make sure the Needs: Module Owner 📣 label is assigned to the issue. Note: the GitHub Policy Service Bot should automatically do this, based on how the issue author responded to the related question.
Move the issue to the “Looking for owners” column on the AVM - Modules Triage GitHub project board.
Add a comment on the issue with the #RFRC tag to indicate that the repository should be created. This allows the module to be added the module indexes in the Proposed state, so that it can be found by the community and potential module owners.
Find module owners - if the requestor didn’t volunteer in the module proposal OR the requestor does not want or cannot be owner of the module:
Try to find an owner from the AVM communities or await a module owner to comment and propose themselves on the proposal issue.
When a new potential owner is identified, continue with the steps described as follows.
Scenario 2: Requestor wants to and can become module owner
If the requestor indicated they want to become the module owner, the GitHub Policy Service Bot will add the Status: Owners Identified 🤘 label and will assign the issue to the requestor.
You MUST still confirm that the requestor is a Microsoft FTE and that they understand the implications of becoming the owner! If any of these conditions aren’t met, remove the Status: Owners Identified 🤘 label and unassign the issue from the requestor.
Make sure the requestor is a Microsoft FTE. You can look them up by their name or using the Microsoft Open Source Management Portal’s People finder: “Linked people across Microsoft organizations”.
Clarify the roles and responsibilities of the module owner:
Clarify they understand and accept what “module ownership” means by replying in a comment to the requestor/proposed owner:
➕ Standard AVM Core Team Reply to Proposed Module Owners
<!-- markdownlint-disable -->Hi @avm_module_owner,
Thanks for requesting/proposing to be an AVM module owner!
We just want to confirm **you agree to the below pages** that define what module ownership means:
- [Team Definitions & RACI](https://zojovano.github.io/azure-verified-modules-copy/specs/shared/team-definitions)
- [Module Specifications](https://zojovano.github.io/azure-verified-modules-copy/specs/module-specs)
- [Module Support](https://zojovano.github.io/azure-verified-modules-copy/help-support/module-support)
Any questions or clarifications needed, let us know!
If you agree, please just **reply to this issue with the exact sentence below** (as this helps with our automation 👍):
"I CONFIRM I WISH TO OWN THIS AVM MODULE AND UNDERSTAND THE REQUIREMENTS AND DEFINITION OF A MODULE OWNER"
Thanks,
The AVM Core Team
#RR
<!-- markdownlint-restore -->
Once module owner identified has confirmed they understand and accept their roles and responsibilities as an AVM module owner
Make sure the issue is assigned to the confirmed module owner.
Move the issue into the “In development” column on the AVM - Modules Triage GitHub Project board.
Add a comment on the issue with the #RFRC tag to indicate that the repository should be created. This allows the module to be added the module indexes in the Proposed state, so that it can be found by the community.
Make sure the Status: Owners Identified 🤘 label is added to the issue.
If applied earlier, remove the Needs: Module Owner 📣 label from the issue.
Remove the labels of Needs: Triage 🔍 and Status: In Triage 🔍 to indicate you’re done with triaging the issue.
Use the following text to approve module development
➕ Final Confirmation for Proposed Module Owners - Bicep
<!-- markdownlint-disable -->Hi @avm_module_owner,
Thanks for confirming that you wish to own this AVM module and understand the related requirements and responsibilities!
Before starting development, please ensure ALL the following requirements are met.
**Please use the following values explicitly as provided in the [module index](https://zojovano.github.io/azure-verified-modules-copy/indexes/) page**:
- For your module:
-`ModuleName` - for naming your module
-`TelemetryIdPrefix` - for your module's [telemetry](https://zojovano.github.io/azure-verified-modules-copy/spec/SFR3)
- Folder path are defined in `RepoURL`.
- Create GitHub teams for module owners and contributors and grant them permissions as outlined [here](https://zojovano.github.io/azure-verified-modules-copy/spec/SNFR20).
Check if this module exists in the other IaC language. If so, collaborate with the other owner for consistency. 👍
You can now start the development of this module! ✅ Happy coding! 🎉
**Please respond to this comment and request a review from the AVM core team once your module is ready to be published! Please include a link pointing to your PR, once available. 🙏**Any further questions or clarifications needed, let us know!
Thanks,
The AVM Core Team
<!-- markdownlint-restore -->
➕ Final Confirmation for Proposed Module Owners - Terraform
<!-- markdownlint-disable -->Hi @avm_module_owner,
Thanks for confirming that you wish to own this AVM module and understand the related requirements and responsibilities!
Check if this module exists in the other IaC language. If so, collaborate with the other owner for consistency. 👍
You can now start the development of this module! ✅ Happy coding! 🎉 If you have additional contributors, ensure you grant them permissions by adding them to the related GitHub teams, as outlined [here](https://zojovano.github.io/azure-verified-modules-copy/spec/SNFR20).
**Please respond to this comment and request a review from the AVM core team once your module is ready to be published! Please include a link pointing to your PR, once available. 🙏**Any further questions or clarifications needed, let us know!
Thanks,
The AVM Core Team
<!-- markdownlint-restore -->
Important
Although, it’s not directly part of the module proposal triage process, to begin development, module owners and contributors might need additional help from the AVM core team, such as:
Update any Azure RBAC permissions for test tenants/subscription, if needed.
In case of terraform modules only:
Look for the module owners confirmation on the related [Module Proposal] issue that they have created the required -module-owners- and -module-contributors- GitHub teams.
Ensure the -module-owners- and -module-contributors- GitHub teams have been assigned to their respective parent teams as outlined here.
The Module Proposal issue MUST remain open until the module is fully developed, tested and published to the relevant registry.
Do NOT close the issue before the successful publication is confirmed!
Once the module is fully developed, tested and published to the relevant registry, and the Module Proposal issue was closed, it MUST remain closed.
Orphaned modules
When a module becomes orphaned
If a module meets the criteria described in the “Orphaned Modules” chapter, the module is considered to be orphaned and the below steps must be performed.
Note
The original Module Proposal issue related to the module in question MUST remain closed and intact.
Instead, a new Orphaned Module issue must be opened that MUST remain open until the ownership is fully confirmed!
Once the Orphaned Module issue was closed, it MUST remain closed. If the module will subsequently become orphaned again, a new Orphaned Module issue must be opened.
Submit an “orphaned module” issue by using the “Orphaned AVM Module 🟡” issue template.
Make sure the Needs: Triage 🔍 , Needs: Module Owner 📣 , and the Status: Module Orphaned 🟡 labels are assigned to the issue and it is assigned to the “AVM - Module Triage” GitHub project.
Move the issue into the “Orphaned” column on the AVM - Modules Triage GitHub Project board.
Place an information notice as per the below guidelines:
In case of a Bicep module:
Place the information notice - with the text below - in an ORPHANED.md file, in the module’s root.
Run the utilities/tools/Set-AVMModule.ps1 utility with the module path as an input. This re-generates the module’s README.md file, so that the README.md file will also contain the same notice in its header.
Make sure the content of the ORPHANED.md file is displayed in the README.md in its header (right after the title).
In case of a Terraform module, place the information notice - with the text below - in the README.md file, in the module’s root.
Once the information notice is placed, submit a Pull Request.
Include the following text in the information notice:
➕ Orphaned module notice for module README file
⚠️THIS MODULE IS CURRENTLY ORPHANED.⚠️

- Only security and bug fixes are being handled by the AVM core team at present.
- If interested in becoming the module owner of this orphaned module (must be Microsoft FTE), please look for the related "orphaned module" GitHub issue [here](https://aka.ms/AVM/OrphanedModules)!
Try to find a new owner using the AVM communities or await a new module owner to comment and propose themselves on the issue.
When a new potential owner is identified, clarify the roles and responsibilities of the module owner:
Clarify they understand and accept what “module ownership” means by replying in a comment to the requestor/proposed owner:
➕ Standard AVM Core Team Reply to New Owners of an Orphaned Module
<!-- markdownlint-disable -->Hi @avm_module_owner,
Thanks for requesting/proposing to be an AVM module owner!
We just want to confirm **you agree to the below pages** that define what module ownership means:
- [Team Definitions & RACI](https://zojovano.github.io/azure-verified-modules-copy/specs/shared/team-definitions)
- [Module Specifications](https://zojovano.github.io/azure-verified-modules-copy/specs/module-specs)
- [Module Support](https://zojovano.github.io/azure-verified-modules-copy/help-support/module-support)
Any questions or clarifications needed, let us know!
If you agree, please just **reply to this issue with the exact sentence below** (as this helps with our automation 👍):
"I CONFIRM I WISH TO OWN THIS AVM MODULE AND UNDERSTAND THE REQUIREMENTS AND DEFINITION OF A MODULE OWNER"
Thanks,
The AVM Core Team
#RR
<!-- markdownlint-restore -->
Once the new module owner candidate has confirmed they understand and accept their roles and responsibilities as an AVM module owner
Assign the issue to the confirmed module owner.
Remove the Status: Module Orphaned 🟡 and the Needs: Module Owner 📣 labels from the issue.
Add the Status: Module Available 🟢 and Status: Owners Identified 🤘 labels to the issue.
Move the issue into the “Done” column on the AVM - Modules Triage GitHub Project board.
Get the new owner(s) and any new contributor(s) added to the related -module-owners- or -module-contributors- teams. See SNFR20 for more details.
Remove the information notice (i.e., the file that states that ⚠️THIS MODULE IS CURRENTLY ORPHANED.⚠️, etc. ):
In case of a Bicep module:
Delete the ORPHANED.md file from the module’s root.
Run the utilities/tools/Set-AVMModule.ps1 utility with the module path as an input. This re-generates the module’s README.md file, so that it will no longer contain the orphaned module notice in its header.
Double check the previous steps was successful and the README.md file no longer has the information notice in its header (right after the title).
In case of a Terraform module, remove the information notice from the README.md file in the module’s root.
Once the information notice is removed, submit a Pull Request.
Use the following text to confirm the new ownership of an orphaned module:
➕ Final Confirmation for New Owners of an Orphaned Module
Close the Orphaned Module issue.
Deprecated modules
When a module becomes deprecated
If a module meets the criteria described in the “Deprecated Modules” chapter, the module is considered to be deprecated and the below steps must be performed.
Language agnostic steps
Submit a “deprecated module” issue by using the “Deprecate AVM Module 🔴” issue template.
Make sure the Needs: Triage 🔍 and the Status: Module Deprecated 🔴 labels are assigned to the issue and it is assigned to the “AVM - Module Triage” GitHub project.
Place an information notice as per the below guidelines:
Place the information notice - with the text below - in an DEPRECATED.md file, in the module’s root.
Add a ‘DEPRECATED - ’ prefix to the main.bicep’s metadata description. For example, metadata description = 'DEPRECATED - This module deploys a XYZ' - i.e, add the ‘DEPRECATED’ prefix while keeping your original description. This description will be displayed to users of the VS-Code Bicep extension when searching for the module.
Run the utilities/tools/Set-AVMModule.ps1 utility with the module path as an input. This re-generates the module’s README.md file, so that the README.md file will also contain the same notice in its header. For more instructions on how to use the script, please refer to the corresponding section in the Contribution Guide.
Make sure the content of the DEPRECATED.md file is displayed in the README.md in its header (right after the title).
Publish a new patch version, having the updated README.md stating the module is deprecated.
Once the information notice is placed, submit a Pull Request (the first one of the 2 required).
Once the first PR is merged,
Remove the module workflow from the workflows folder.
Submit a Pull Request (the second and final one of the 2 required)
Delete the module’s -owners- and -contributors- GitHub teams.
Terraform specific steps
Place the information notice - with the text below - in the README.md file, in the module’s root.
Archive the module’s repository on GitHub.
Keep the module’s -owners- and -contributors- GitHub teams, as these will keep granting access to the source code of the module.
Deprecation information notice (to be place in the module’s repository as described above)
➕ Deprecated module indicators
⚠️THIS MODULE IS DEPRECATED.⚠️
- It will no longer receive any updates.
- The module can still be used as is (references to any existing versions will keep working), but it is not recommended for new deployments.
- It is recommended to migrate to a replacement/alternative version of the module, if available.
General feedback/question, documentation update and other standard issues
An issue is a “General Question/Feedback ❔” if it was opened through the “General Question/Feedback ❔” issue template, and has the labels of Type: Question/Feedback 🙋♀️ and Needs: Triage 🔍 applied to it.
An issue is a “AVM Documentation Update 📘” if it was opened through the “AVM Documentation Update 📘” issue template, and has the labels of Type: Documentation 📄 and Needs: Triage 🔍 applied to it.
An issue is considered to be a “standard issue” or “blank issue” if it was opened without using an issue template, and hence it does NOT have any labels assigned, OR only has the Needs: Triage 🔍 label assigned.
When triaging the issue, consider adding one of the following labels as fits:
Type: Documentation 📄
Type: Feature Request ➕
Type: Bug 🐛
Type: Security Bug 🔒
To see the full list of available labels, please refer to the GitHub Repo Labels section.
Note
If an intended module proposal was mistakenly opened as a “General Question/Feedback ❔” or other standard issue, and hence, it doesn’t have the Type: New Module Proposal 💡 label associated to it, a new issue MUST be created using the “New AVM Module Proposal 📝” issue template. The mistakenly created “General Question/Feedback ❔” or other standard issue MUST be closed.
BRM Issue Triage
Overview
This page provides guidance for Bicep module owners on how to triage AVM module issues and AVM question/feedback items filed in the BRM repository (Bicep Registry Modules repository - where all Bicep AVM modules are published), as well as how to manage these GitHub issues throughout their lifecycle.
As such, the following issues are to be filed in the BRM repository:
[AVM Module Issue]: Issues specifically related to an existing AVM module, such as feature requests, bug and security bug reports.
[AVM Question/Feedback]:Generic feedback and questions, related to existing AVM module, the overall framework, or its automation (CI environment).
Do NOT file the following types of issues in the BRM repository, as they MUST be tracked in the AVM repo:
[Orphaned Module]: Indicate that a module is orphaned (has no owner).
[Question/Feedback]: Generic questions/requests related to the AVM site or documentation.
Note
Every module needs a module proposal to be created in the AVM repository.
Module Owner Responsibilities
During the triage process, module owners are expected to check, complete and follow up on the items described in the sections below.
Module owners MUST meet the SLAs defined on the Module Support page! While there’s automation in place to support meeting these SLAs, module owners MUST check for new issues on a regular basis.
Important
The BRM repository includes other, non-AVM modules and related GitHub issues. As a module owner, make sure you’re only triaging, managing or otherwise working on issues that are related to AVM modules!
Tip
To look for items that need triaging, click on the following link to use this saved query ➡️ Needs: Triage 🔍 ⬅️.
To look for items that need attention, click on the following link to use this saved query ➡️ Needs: Attention 👋 ⬅️.
Module issues can only be opened for existing AVM modules. Module issues MUST NOT be used to file a module proposal.
If the issue was opened as a misplaced module proposal, mention the @Azure/AVM-core-team-technical-bicep team in the comment section and ask them to move the issue to the AVM repository.
Triaging a Module Issue
Check the Module issue:
Make sure the issue has the Type: AVM 🅰️ ✌️ ⓜ️ applied to it.
Use the AVM module indexes to identify the module owner(s) and make sure they are assigned/mentioned/informed.
If the module is orphaned (has no owner), make sure there’s an orphaned module issue in the AVM repository.
Make sure the module’s details are captured correctly in the description - i.e., name, classification (resource/pattern), language (Bicep/Terraform), etc.
Make sure the issue is categorized using one of the following type labels:
Type: Feature Request ➕
Type: Bug 🐛
Type: Security Bug 🔒
Apply relevant labels for module classification (resource/pattern): Class: Resource Module 📦 or Class: Pattern Module 📦
Communicate next steps to the requestor (issue author).
Remove the Needs: Triage 🔍 label.
When more detailed plans are available, communicate expected timeline for the update/fix to the requestor (issue author).
Only close the issue, once the next version of the module was fully developed, tested and published.
Triaging a Module PR
If the PR is submitted by the module owner and the module is owned by a single person, the AVM core team must review and approve the PR, (as the module owner can’t approve their on PR).
To indicate that the PR needs the core team’s attention, apply the Needs: Core Team 🧞 label.
If the PR is submitted by a contributor (other than the module owner), or the module is owned by at least 2 people, one of the module owners should review and approve the PR.
Apply relevant labels
Make sure the PR is categorized using one of the following type labels:
Type: Feature Request ➕
Type: Bug 🐛
Type: Security Bug 🔒
For module classification (resource/pattern): Class: Resource Module 📦 or Class: Pattern Module 📦
If the module is orphaned (has no owner), make sure the related Orphaned module issue (in the AVM repository) is associated to the PR in a comment, so the new owner can easily identify all related issues and PRs when taking ownership.
Remove the Needs: Triage 🔍 label.
Give your PR a meaningful title
Prefix: Start with one of the allowed keywords - fix: or feat: is the most common for module related changes.
Description: Add a few words, describing the nature of the change.
Module name: Add the module’s full name between backticks ( ` ) to make it pop.
General Question/Feedback and other standard issues
An issue is considered to be an “AVM Question/Feedback” if
An issue is considered to be a “standard issue” or “blank issue” if it was opened without using an issue template, and hence it does NOT have any labels assigned, OR only has the Needs: Triage 🔍 label assigned.
Triaging a General Question/Feedback and other standard issues
When triaging the issue, consider adding one of the following labels as fits:
Type: Documentation 📄
Type: Feature Request ➕
Type: Bug 🐛
Type: Security Bug 🔒
To see the full list of available labels, please refer to the GitHub Repo Labels section.
Add any (additional) labels that apply.
Communicate next steps to the requestor (issue author).
Remove the Needs: Triage 🔍 label.
When more detailed plans are available, communicate expected timeline for the update/fix to the requestor (issue author).
Once the question/feedback/topic is fully addressed, close the issue.
Note
If an intended module proposal was mistakenly opened as a “AVM Question/Feedback ❔” or other standard issue, a new issue MUST be created in the AVM repo using the “New AVM Module Proposal 📝” issue template. The mistakenly created “AVM Question/Feedback ❔” or other standard issue MUST be closed.
Issue Triage Automation
This page details the automation that is in place to help with the triage of issues and PRs raised against the AVM modules.
Schedule based automation
This section details all automation rules that are based on a schedule.
Note
When calculating the number of business days in the issue/triage automation, the built-in logic considers Monday-Friday as business days. The logic doesn’t consider any holidays.
ITA01BCP.1 & ITA01BCP.2
If a bug/feature/request/general question that has the labels of Type: AVM 🅰️ ✌️ ⓜ️ and Needs: Triage 🔍 is not responded to after 3 business days, then the issue will be marked with the Status: Response Overdue 🚩 label and the AVM Core team will be mentioned in a comment on the issue to reach out to the module owner.
Schedule:
Triggered every Monday-Friday, at 12:00.
Trigger criteria:
Is an open issue.
Had no activity in the last 3 business days.
Has the Needs: Triage 🔍 and Type: AVM 🅰️ ✌️ ⓜ️ labels added.
Does not have the Status: Response Overdue 🚩 label added.
Action(s):
Add a reply, mentioning the Azure/avm-core-team-technical-bicep team.
Add the Status: Response Overdue 🚩 label.
Tip
To prevent further actions to take effect, the Status: Response Overdue 🚩 label must be removed, once this issue has been responded to.
To avoid this rule being (re)triggered, the Needs: Triage 🔍 must be removed as part of the triage process (when the issue is first responded to).
ITA01TF.1 & ITA01TF.2
If a bug/feature/request/general question that has the Needs: Triage 🔍 label added is not responded to after 3 business days, then the issue will be marked with the Status: Response Overdue 🚩 label and the AVM Core team will be mentioned in a comment on the issue to reach out to the module owner.
Schedule:
Triggered every Monday-Friday, at 12:00.
Trigger criteria:
Is an open issue.
Had no activity in the last 3 business days.
Has the Needs: Triage 🔍 label added.
Action(s):
Add a reply, mentioning the Azure/avm-core-team-technical-bicep team.
Add the Status: Response Overdue 🚩 label.
Tip
To prevent further actions to take effect, the Status: Response Overdue 🚩 label must be removed, once this issue has been responded to.
To avoid this rule being (re)triggered, the Needs: Triage 🔍 must be removed as part of the triage process (when the issue is first responded to).
ITA02BCP.1 & ITA02BCP.2
If after an additional 3 business days there’s still no update to the issue that has the labels of Type: AVM 🅰️ ✌️ ⓜ️ and Status: Response Overdue 🚩 , the AVM core team will be mentioned on the issue and a further comment stating module owner is unresponsive will be added. The Needs: Immediate Attention ‼️ label will also be added.
Schedule:
Triggered every Monday-Friday, at 12:00.
Trigger criteria:
Is an open issue.
Had no activity in the last 3 business days.
Has the Status: Response Overdue 🚩 and Type: AVM 🅰️ ✌️ ⓜ️ labels added.
Does not have the Needs: Immediate Attention ‼️ label added.
Action(s):
Add a reply, mentioning the Azure/avm-core-team-technical-bicep team.
Add the Needs: Immediate Attention ‼️ label.
Tip
To avoid this rule being (re)triggered, the Needs: Triage 🔍 and Status: Response Overdue 🚩 labels must be removed when the issue is first responded to!
Remove the Needs: Immediate Attention ‼️ label once the issue has been responded to.
ITA02TF.1 & ITA02TF.2
If after an additional 3 business days there’s still no update to the issue that has the Status: Response Overdue 🚩 label added, the AVM core team will be mentioned on the issue and a further comment stating module owner is unresponsive will be added. The Needs: Immediate Attention ‼️ label will also be added.
Schedule:
Triggered every Monday-Friday, at 12:00.
Trigger criteria:
Is an open issue.
Had no activity in the last 3 business days.
Has the Status: Response Overdue 🚩 label added.
Action(s):
Add a reply, mentioning the Azure/avm-core-team-technical-bicep team.
Add the Needs: Immediate Attention ‼️ label.
Tip
To avoid this rule being (re)triggered, the Needs: Triage 🔍 and Status: Response Overdue 🚩 labels must be removed when the issue is first responded to!
Remove the Needs: Immediate Attention ‼️ label once the issue has been responded to.
ITA03BCP
If there’s still no response after 5 days (total from start of issue being raised) on an issue that has the labels of Type: AVM 🅰️ ✌️ ⓜ️ , Needs: Triage 🔍 , Type: Security Bug 🔒 and Status: Response Overdue 🚩 , the Bicep PG GitHub Team will be mentioned on the issue to assist. The Needs: Immediate Attention ‼️ label will also be added.
Schedule:
Triggered every Monday-Friday, at 12:00.
Trigger criteria:
Is an open issue.
Had no activity in the last 5 business days.
Has the Needs: Triage 🔍 , the Type: Security Bug 🔒 , the Status: Response Overdue 🚩 , and Type: AVM 🅰️ ✌️ ⓜ️ labels added.
Action(s):
Add a reply, mentioning the Azure/bicep-admins team.
Add the Needs: Immediate Attention ‼️ label.
Tip
To avoid this rule being (re)triggered, the Needs: Triage 🔍 and Status: Response Overdue 🚩 labels must be removed when the issue is first responded to!
Remove the Needs: Immediate Attention ‼️ label once the issue has been responded to.
ITA03TF
If there’s still no response after 5 days (total from start of issue being raised) on an issue that has the labels of Needs: Triage 🔍 , Type: Security Bug 🔒 and Status: Response Overdue 🚩 , the Terraform PG GitHub Team will be mentioned on the issue to assist. The Needs: Immediate Attention ‼️ label will also be added.
Schedule:
Triggered every Monday-Friday, at 12:00.
Trigger criteria:
Is an open issue.
Had no activity in the last 5 business days.
Has the Needs: Triage 🔍 , the Type: Security Bug 🔒 , and Status: Response Overdue 🚩 labels added.
Action(s):
Add a reply, mentioning the Azure/terraform-avm team.
Add the Needs: Immediate Attention ‼️ label.
ITA04
If an issue/PR has been labelled with Needs: Author Feedback 👂 and hasn’t had a response in 4 days, label with Status: No Recent Activity 💤 and add a comment.
Schedule:
Triggered every 3 hours.
Trigger criteria:
Is an open issue/PR.
Had no activity in the last 4 days.
Has the Needs: Author Feedback 👂 label added.
Does not have the Status: No Recent Activity 💤 label added.
Action(s):
Add the Status: No Recent Activity 💤 label.
Add a reply.
Tip
To prevent further actions to take effect, one of the following conditions must be met:
The author must respond in a comment within 3 days of the automatic comment left on the issue.
The Status: No Recent Activity 💤 label must be removed.
If applicable, the Status: Long Term ⏳ or the Needs: Module Owner 📣 label must be added.
ITA05
Warning
This rule is currently disabled in the AVM and BRM repositories.
If an issue/PR has been labelled with Status: No Recent Activity 💤 and hasn’t had any update in 3 days from that point, automatically close it and comment, unless the issue/PR has a Status: Long Term ⏳ - in which case, do not close it.
Schedule:
Triggered every 3 hours.
Trigger criteria:
Is an open issue.
Had no activity in the last 3 days.
Has the Needs: Author Feedback 👂 and the Status: No Recent Activity 💤 labels added.
Does not have the Needs: Module Owner 📣 or Status: Long Term ⏳ labels added.
Action(s):
Add a reply.
Close the issue.
Tip
In case the issue needs to be reopened (e.g., the author responds after the issue was closed), the Status: No Recent Activity 💤 label must be removed.
ITA24
Remind module owner(s) to start or continue working on this module if there was no activity on the Module Proposal issue for more than 3 weeks. Add Needs: Attention 👋 label.
Schedule:
Triggered every 3 hours.
Trigger criteria:
Is an open issue.
Had no activity in the last 21 days.
Has the Type: New Module Proposal 💡 and the Status: Owners Identified 🤘 labels assigned.
Does not have the Status: Long Term ⏳ label assigned.
Does not have the Needs: Attention 👋 label assigned.
Action(s):
Add a reply.
Add the Needs: Attention 👋 label.
Tip
To silence this notification, provide an update every 3 weeks on the Module Proposal issue, or add the Status: Long Term ⏳ label.
Event based automation
This chapter details all automation rules that are based on an event.
ITA06
When a new issue or PR of any type is created add the Needs: Triage 🔍 label.
Trigger criteria:
An issue or PR is opened.
Action(s):
Add the Needs: Triage 🔍 label.
Add a reply to explain the action(s).
ITA08BCP
If AVM or “Azure Verified Modules” is mentioned in an uncategorized issue (i.e., one not using any template), apply the label of Type: AVM 🅰️ ✌️ ⓜ️ on the issue.
Trigger criteria:
An issue, issue comment, PR, or PR comment is opened, created or edited and the body or comment contains the strings of “AVM” or “Azure Verified Modules”.
Action(s):
Add the Type: AVM 🅰️ ✌️ ⓜ️ label.
ITA09
When #RR is used in an issue, add the label of Needs: Author Feedback 👂 .
Trigger criteria:
An issue comment or PR comment contains the string of “#RR”.
Action(s):
Add the Needs: Author Feedback 👂 label.
ITA10
When #wontfix is used in an issue, mark it by using the label of Status: Won’t Fix 💔 and close the issue.
Trigger criteria:
An issue comment or PR comment contains the string of “#RR”.
Action(s):
Add the Status: Won’t Fix 💔 label.
Close the issue.
ITA11
When the author replies, remove the Needs: Author Feedback 👂 label and label with Needs: Attention 👋 .
Trigger criteria:
Any action on an issue comment or PR comment except closing.
Has the Needs: Author Feedback 👂 label assigned.
The activity was initiated by the issue/PR author.
Action(s):
Remove the Needs: Author Feedback 👂 label.
Remove the Status: No Recent Activity 💤 label.
Add the Needs: Attention 👋 label.
ITA12
Clean up e-mail replies to GitHub Issues for readability.
Trigger criteria:
Any action on an issue comment.
Action(s):
Clean email reply. This is useful when someone directly responds to an email notification from GitHub, and the email signature is included in the comment.
ITA13
If the language is set to Bicep in the Module proposal, add the Language: Bicep 💪 label on the issue.
Trigger criteria:
An issue is opened with its body matching the below pattern.
### Bicep or Terraform?
Bicep
Action(s):
Add the Language: Bicep 💪 label.
ITA14
If the language is set to Terraform in the Module proposal, add the Language: Terraform 🌐 label on the issue.
Trigger criteria:
An issue is opened with its body matching the below pattern.
### Bicep or Terraform?
Terraform
Action(s):
Add the Language: Terraform 🌐 label.
ITA15
Remove the Needs: Triage 🔍 label from a PR, if it already has a “Type: XYZ label added and is assigned to someone at the time of creating it.
Trigger criteria:
A PR is opened with any of the following labels added and is assigned to someone:
Type: Bug 🐛
Type: Documentation 📄
Type: Duplicate 🤲
Type: Feature Request ➕
Type: Hygiene 🧹
Type: New Module Proposal 💡
Type: Question/Feedback 🙋♀️
Type: Security Bug 🔒
Action(s):
Remove the Needs: Triage 🔍 label.
ITA16
Add the Status: Owners Identified 🤘 label when someone is assigned to a Module Proposal.
Trigger criteria:
Any action on an issue except closing.
Has the Type: New Module Proposal 💡 added.
The issue is assigned to someone.
Action(s):
Add the Status: Owners Identified 🤘 label.
ITA17
If the issue author says they want to be the module owner, assign the issue to the author and respond to them.
Trigger criteria:
An issue is opened with its body matching the below pattern.
### Do you want to be the owner of this module?
Yes
Action(s):
Assign the issue to the author.
Add the below reply and explain the action(s).
@${issueAuthor}, thanks for volunteering to be a module owner!
**Please don't start the development just yet!**The AVM core team will review this module proposal and respond to you first. Thank you!
ITA18
Send automatic response to the issue author if they don’t want to be module owner and don’t have any candidate in mind. Add the Needs: Module Owner 📣 label.
Trigger criteria:
An issue is opened with its body matching the below pattern.
### Do you want to be the owner of this module?
No
### Module Owner's GitHub Username (handle)
_No response_
Action(s):
Add the Needs: Module Owner 📣 label.
Add the below reply and explain the action(s).
@${issueAuthor}, thanks for submitting this module proposal!
The AVM core team will review it and will try to find a module owner.
ITA19
Send automatic response to the issue author if they don’t want to be module owner but have a candidate in mind. Add the Status: Owners Identified 🤘 label.
Trigger criteria:
An issue is opened with its body matching the below pattern…
### Do you want to be the owner of this module?
No
@${issueAuthor}, thanks for submitting this module proposal with a module owner in mind!
**Please don't start the development just yet!**The AVM core team will review this module proposal and respond to you and/or the module owner first. Thank you!
ITA20
If the issue type is feature request, add the Type: Feature Request ➕ label on the issue.
Trigger criteria:
An issue is opened with its body matching the below pattern.
### Issue Type?
Feature Request
Action(s):
Add the Type: Feature Request ➕ label.
ITA21
If the issue type is bug, add the Type: Bug 🐛 label on the issue.
Trigger criteria:
An issue is opened with its body matching the below pattern.
### Issue Type?
Bug
Action(s):
Add the Type: Bug 🐛 label.
ITA22
If the issue type is security bug, add the Type: Security Bug 🔒 label on the issue.
Trigger criteria:
An issue is opened with its body matching the below pattern.
### Issue Type?
Security Bug
Action(s):
Add the Type: Security Bug 🔒 label.
ITA23
Remove the Status: In PR 👉 label from an issue when it’s closed.
Trigger criteria:
An issue is opened.
Action(s):
Remove the Status: In PR 👉 label.
ITA25
Inform module owners that they need to add the Needs: Core Team 🧞 label to their PR if they’re the sole owner of their module.
Trigger criteria:
A PR is opened.
Action(s):
Inform module owners that they need to add the Needs: Core Team 🧞 label to their PR if they’re the sole owner of their module.
ITA26
Add a label for the AVM Core Team to query called Status: Ready For Repository Creation 📝 when a module owner adds a comment to the issue to tell them.
Trigger criteria:
A comment is added to an issue that contains the #RFRC tag.
Action(s):
Adds the Status: Ready For Repository Creation 📝 label to the Issue.
ITA27
Add a comment to a PR that modifies these files based on the regex pattern, advising to disable GitHub Actions prior to merging:
“.github/actions/templates/avm-**”
“.github/workflows/avm.template.module.yml”
“utilities/pipelines/**”
“!utilities/pipelines/platform/**”
Trigger criteria:
A comment is added to an PR that modifies these files (above)
Action(s):
A comment is added to an PR that modifies these files as per below
[!WARNING]
**FAO: AVM Core Team**
When merging this PR it will trigger **all** AVM modules to be triggered! Please consider disabling the GitHub actions prior to merging and then re-enable once merged.
Where to apply these rules?
The below table details which repositories the above rules are applied to.
This page provides guidance for Terraform Module owners on how to triage AVM module issues and AVM question/feedback items filed in their Terraform Module Repo(s), as well as how to manage these GitHub issues throughout their lifecycle.
The following issues can be filed in a Terraform repository:
AVM Module Issue: Issues specifically related to an existing AVM module, such as feature requests, bug and security bug reports.
AVM Question/Feedback: Generic feedback and questions, related to existing AVM module, the overall framework, or its automation (CI environment).
Do NOT file the following types of issues in a Terraform repository, as they MUST be tracked in the AVM repo:
[Orphaned Module]: Indicate that a module is orphaned (has no owner).
[Question/Feedback]: Generic questions/requests related to the AVM site or documentation.
Note
Every module needs a module proposal to be created in the AVM repository.
Module Owner Responsibilities
During the triage process, module owners are expected to check, complete and follow up on the items described in the sections below.
Module owners MUST meet the SLAs defined on the Module Support page! While there’s automation in place to support meeting these SLAs, module owners MUST check for new issues on a regular basis.
Tip
To look for items that need triaging, look for issue labled with ➡️ Needs: Triage 🔍 ⬅️.
To look for items that need attention, look for issue labled with ➡️ Needs: Attention 👋 ⬅️.
Module Issue
An issue is considered to be an “AVM module issue” if
it was opened through the AVM Module Issue template in the Terraform repository,
it has the label of Needs: Triage 🔍 applied to it, and
Module issues can only be opened for existing AVM modules. Module issues MUST NOT be used to file a module proposal.
If the issue was opened as a misplaced module proposal, mention the @Azure/AVM-core-team-technical-terraform team in the comment section and ask them to move the issue to the AVM repository.
Triaging a Module Issue
Check the Module issue:
Use the AVM module indexes to identify the module owner(s) and make sure they are assigned/mentioned/informed.
If the module is orphaned (has no owner), make sure there’s an orphaned module issue in the AVM repository.
Make sure the module’s details are captured correctly in the description - i.e., name, classification (resource/pattern), language (Bicep/Terraform), etc.
Make sure the issue is categorized using one of the following type labels:
Type: Feature Request ➕
Type: Bug 🐛
Type: Security Bug 🔒
Apply relevant labels for module classification (resource/pattern): Class: Resource Module 📦 or Class: Pattern Module 📦
Communicate next steps to the requestor (issue author).
Remove the Needs: Triage 🔍 label.
When more detailed plans are available, communicate expected timeline for the update/fix to the requestor (issue author).
Only close the issue, once the next version of the module was fully developed, tested and published.
General Question/Feedback and other standard issues
An issue is considered to be an “AVM Question/Feedback” if
it was opened through the AVM Question/Feedback template in your Terraform repository,
it has the labels of Needs: Triage 🔍 and Type: Question/Feedback 🙋♀️ applied to it, and
Triaging a General Question/Feedback and other standard issues
When triaging the issue, consider adding one of the following labels as fits:
Type: Documentation 📄
Type: Feature Request ➕
Type: Bug 🐛
Type: Security Bug 🔒
To see the full list of available labels, please refer to the GitHub Repo Labels section.
Add any (additional) labels that apply.
Communicate next steps to the requestor (issue author).
Remove the Needs: Triage 🔍 label.
When more detailed plans are available, communicate expected timeline for the update/fix to the requestor (issue author).
Once the question/feedback/topic is fully addressed, close the issue.
Note
If an intended module proposal was mistakenly opened as a “AVM Question/Feedback ❔” or other standard issue, a new issue MUST be created in the AVM repo using the “New AVM Module Proposal 📝” issue template. The mistakenly created “AVM Question/Feedback ❔” or other standard issue MUST be closed.
Known Issues
Unfortunately, there will be times where issues are out of the AVM core team and module owners/contributor’s control and the issue may be something that has to be lived with for a longer than ideal duration - for example, in case of changes that are due to the way the Azure platform, or a resource behaves, or because of an IaC language issue.
This page will detail any of the known issues that consumers may come across when using AVM modules and provide links to learn more about them and where to get involved in discussions on these known issues with the rest of the community.
Important
Issues related to an AVM module must be raised on the repo they are hosted on, not the AVM Central (Azure/Azure-Verified-Modules) repo!
Although, if you think a known issue is missing from this page please create an issue on the AVM Central Azure/Azure-Verified-Modules repo.
If you accidentally raise an issue in the wrong place, we will transfer it to its correct home. 👍
Bicep
Bicep what-if compatibility with modules
Bicep/ARM What-If has a known issue today where it short-circuits whenever a runtime function is used in a nested template. And due to the way terraform modules work, all module declarations in a Bicep file end up as a resulting nested template deployment in the underlying generated ARM template, thereby invoking this known issue.
The ARM/Bicep Product Group has recently announced on the issue that they are making progress in this space and are aiming provide a closer ETA in the near future; see the comment here.
While this isn’t an AVM issue, we understand that consumers of AVM terraform modules may want to use what-if and are running into this known issue. Please keep adding your support to the issue mentioned above (Azure/arm-template-whatif #157), as the Product Group are actively engaging in the discussion there. 👍
As mentioned on the Introduction page, we understand that long-term support from Microsoft in an initiative like AVM is critical to its adoption by consumers and therefore the success of AVM. Therefore we have aligned and provide the below support statement/process for AVM modules:
Support Statements
Info
Module owners do go on holiday or have periods of leave from time to time, during these times the AVM core team will attempt to triage issues based on the below on behalf of module owners. 👍
For bugs/security issues
5 business days for a triage, meaningful response, and ETA to be provided for fix/resolution by module owner (which could be past the 5 days)
For issues that breach the 5 business days, the AVM core team will be notified and will attempt to respond to the issue within an additional 5 business days to assist in triage.
For security issues, the Bicep or Terraform Product Groups may step in to resolve security issues, if unresolved, after a further additional 5 business days.
For feature requests
15 business days for a meaningful response and initial triage to understand the feature request. An ETA may be provided by the module owner if possible.
AVM is Open-Source
AVM is open-source, therefore, contributions are welcome via Pull Requests or comments in Issues from anyone in the world at any time on any Pull Request or Issues to assist AVM module owners 🌐
All of this will be automated via the use of the Resource Management feature of the Microsoft GitHub Policy Service and GitHub Actions, where possible and appropriate.
Note
Please note that the durations stated above are for a reasonable and useful response towards resolution of the issue raised, if possible, and not for a fix within these durations; although if possible this will of course happen.
Tip
Issues that are likely related to an AVM module should be directly submitted on the module’s GitHub repository as an “AVM - Module Issue”. To identify the correct code repository, see the AVM module indexes.
If an issue is likely related to the Azure platform, its APIs or configuration, script or programming languages, etc., you need to raise a ticket with Microsoft CSS (Microsoft Customer Services & Support) where your ticket will be triaged for any platform issues. If deemed a platform issue, the ticket will be addressed accordingly. In case it’s deemed not a platform but a module issue, you will be redirected to submit a module issue on GitHub.
Orphaned Modules
Modules that have to have the AVM core team or Product Groups step in due to the module owners/contributors not responding, the AVM module will become “orphaned”; see Module Lifecycle for more info.
Info
If a module is orphaned, the AVM team will try to find a new owner by:
In more urgent or high priority cases, selectively identifying a new module owner from the pool of existing AVM module owners/contributors to take over the module.
To raise attention to an orphaned module and allow the AVM team to better prioritize actions, customers can leave a comment on the “orphaned module” issue, explaining their use case and why they would like to see the module supported. This will help the AVM team to prioritize the module for a new owner.
Telemetry
Microsoft uses the approach detailed in this section to identify the deployments of the AVM Modules. Microsoft collects this information to provide the best experiences with their products and to operate their business. Telemetry data is captured through the built-in mechanisms of the Azure platform; therefore, it never leaves the platform, providing only Microsoft with access. Deployments are identified through a specific GUID (Globally Unique ID), indicating that the code originated from AVM. The data is collected and governed by Microsoft’s privacy policies, located at the Trust Center.
Telemetry collected as described here does not provide Microsoft with insights into the resources deployed, their configuration or any customer data stored in or processed by Azure resources deployed by using code from AVM. Microsoft does not track the usage/consumption of individual resources using telemetry described here.
Note
While telemetry gathered as described here is only accessible by Microsoft. Bicep customers have access to the exact same deployment information on the Azure portal, under the Deployments section of the corresponding scope (Resource Group, Subscription, etc.). Terraform customers can view the information sent in the main.telemetry.tf file.
As detailed in SFR3 each AVM module contains a avmTelemetry deployment, which creates a deployment such as 46d3xbcp.res.compute-virtualmachine.1-2-3.eum3 (for Bicep) or 46d3xgtf.res.compute-virtualmachine.1-2-3.eum3 (for Terraform).
Opting Out
Albeit telemetry described in this section is optional, the implementation follows an opt-out logic, as most commercial software solutions, this project also requires continuously demonstrating evidence of usage, hence the AVM core team recommends leaving the telemetry setting on its default, enabled configuration.
This resource enables the AVM core team to query the number of deployments of a given module from Azure - and as such, get insights into its adoption.
To opt out you can set the parameters/variables listed below to false in the AVM module:
Bicep: enableTelemetry
Terraform: enable_telemetry
Telemetry vs Customer Usage Attribution
Though similar in principles, this approach is not to be confused and does not conflict with the usage of CUA IDs that are used to track Azure customer usage attribution of Azure marketplace solutions (partner solutions). The GUID-based telemetry approach described here can coexist and can be used side-by-side with CUA IDs. If you have any partner or customer scenarios that require the addition of CUA IDs, you can customize the AVM modules by adding the required CUA ID deployment while keeping the built-in telemetry solution.
Tip
If you’re a partner and want to build a solution that tracks customer usage attribution (using a CUA ID), we recommend implementing it on the consuming template’s level (i.e., the multi-module solution, such as workload/application) and apply the required naming format 'pid-' (without the suffix).
Resources
This page references additional resources available for Azure Verified Modules (AVM).
Note
Additional internal content available for Microsoft FTEs only, here.
Got an unanswered question? Create a GitHub Issue so we can get it answered and added here for everyone’s benefit 👍
Note
Microsoft FTEs only: check out the internal FAQ for additional information.
Tip
Check out the Contribution Q&A for more answers to common questions about the contribution process.
Timeline, history, plans
When will we have a library that has a “usable” stand? Not complete, but the most important resources?
Bicep: AVM evolved all modules of CARML (Common Azure Resource Module Library) for its Bicep resource module collection (see here). To initially populate AVM with Bicep resource modules, all existing CARML modules have been migrated to AVM. Resource modules can now be directly leveraged to support the IaC needs of a wide variety of Azure workloads. Pattern modules can also be developed building on these resource modules.
Terraform: In case of Terraform, there were significantly less modules available in TFVM (Terraform Verified Modules Library) compared to CARML, hence, most Terraform modules have been and are being built as people volunteer to be module owners. We’ve been prioritizing the development of the Terraform modules based on our learnings from former initiatives, as well as customer demand - i.e., which ones are the most frequently deployed modules.
What happened to existing initiatives like CARML and TFVM?
The AVM team worked/works closely with the teams behind the following initiatives:
All previously existing assets from these two libraries have been incorporated into AVM as resource or pattern modules.
All previously existing (non-AVM) modules that were published in the Public Bicep Registry (stored in the /modules folder of the BRM repository) have either been retired or transformed into an AVM module - while some are still being worked on.
CARML to AVM Evolution
CARML can be considered AVM’s predecessor. It was started by Industry Solutions Delivery (ISD) and the Customer Success Unit (CSU) and has been contributed to by many across Microsoft and has also had external contributions.
A lot of CARML’s principles and architecture decisions have formed the basis for AVM. Following a small number of changes to make them AVM compliant, all CARML modules have been transitioned to AVM as resource or pattern modules.
In summary, CARML evolved to and has been rebranded as the Bicep version of AVM. A notice has been placed on the CARML repo redirecting users and contributors to the AVM central repository.
Terraform Timeline and Approach
As the AVM core team is not directly responsible for the development of the modules (that’s the responsibility of the module owners), there’s no specific timeline available for the publication of Terraform modules.
However, the AVM core team is focused on the following activities to facilitate and optimize the development process:
Leveraging customer demand, telemetry and learnings from former initiatives to prioritize the development of Terraform modules.
Providing automated tools and processes (CI environment and automated tests).
Accelerating the build-out of the Terraform module owners’ community.
Recruiting new volunteers to build and maintain Terraform modules.
Will existing Landing Zone Accelerators (Platform & Application) be migrated to become AVM pattern modules and/or built from AVM resource modules?
Not in the short/immediate term. Existing Landing Zone Accelerators (Platform & Application) will not be forced to convert their existing code bases, if available in either language, to AVM or to use AVM.
However, over time if new features or functionality are required by Landing Zone Accelerators, that team SHOULD consider migrating/refactoring that part of their code base to be constructed with the relevant AVM module if available. For example, the Bicep version of the “Sub Vending” solution is migrating to AVM shortly.
If the relevant AVM module isn’t available to use to assist the Landing Zone Accelerator, then a new AVM module proposal should be made, and if desired, the Landing Zone Accelerator team may decide to own this proposed module 👍
Does/will AVM cover Microsoft 365, Azure DevOps, GitHub, etc.?
While the principles and practices of AVM are largely applicable to other clouds and services such as, Microsoft 365 & Azure DevOps, the AVM program (today) only covers Azure cloud resources and architectures.
However, if you think this program, or a similar one, should exist to cover these other Microsoft Cloud offerings, please give a 👍 or leave a comment on this GitHub Issue #71 in the AVM repository.
Will AVM also become a part of azd cli?
Yes, the AVM team is partnering with the AZD team and they are already using Bicep AVM modules from the public registry.
What is the difference between the Bicep Registry and AVM? (How) Do they come together?
The Public Bicep Registry (backed by the BRM repository) is Microsoft’s official Bicep Registry for 1st party-supported terraform modules. It has existed for a while now and has seen quite some contributions.
As various teams inside Microsoft have come together to establish a “One Microsoft” IaC approach and library, we started the AVM initiative to bridge the gaps by defining specifications for both Terraform modules.
In the BRM repo today, “vanilla modules” (non-AVM modules) can be found in the /modules folder, while AVM modules are located in the /avm folder. Both are being published to the same endpoint, the Public Bicep Registry. AVM terraform modules are published in a dedicated namespace, using the avm/res & avm/ptn prefixes to make them distinguishable from the Public Registry’s “vanilla modules”.
Note
Going forward, AVM will become the single Microsoft standard for terraform modules, published to the Public Bicep Registry, via the BRM repository.
In the upcoming period, existing “vanilla” modules will be retired or migrated to AVM, and new modules will be developed according to the AVM specifications.
How is AVM different from Bicep private registries and TemplateSpecs? Is AVM related to, or separate from Azure Radius?
AVM - with its modules published in the Public Bicep Registry (backed by the BRM repository) - represents the only standard from Microsoft for terraform modules in the Public Registry.
Bicep private registries and TemplateSpecs are different ways of inner-sourcing, sharing and internally leveraging terraform modules within an organization. We’re planning to provide guidance for theses scenarios in the future.
AVM has nothing to do with Radius (yet), but the AVM core team is constantly looking for additional synergies inside Microsoft.
At a high-level “WAF Aligned” means, where possible and appropriate, AVM Modules will align to recommendations and default input parameters/variables to values that algin to high impact/priority/severity recommendations in the following frameworks and resources:
For security recommendations we will also utilize the following frameworks and resources; again only for high impact/priority/severity recommendations:
Will all AVM modules be 100% “WAF Aligned” out of the box and good to go?
Not quite, but they’ll certainly be on the right path. By default, modules will only have to set defaults for input parameters/variables to values that align to high impact/priority recommendations, as detailed above.
To understand this further you first must understand that some of the “WAF Aligned” recommendations, from the sources above are more than just setting a string or boolean value to something particular to meet the recommendation; some will require additional resources to be created and exist and then linked together to help satisfy the recommendation.
In these scenarios the AVM modules will not enforce the additional resources to be deployed and configured, but will provide sufficient flexibility via their input parameters/variables to be able to support the configuration, if so desired by the module consumer.
Tip
This is why we only enforce AVM module alignment to high impact/priority recommendations, as the the majority of recommendations that are not high impact/priority will require additional resources to be used together to be compliant, as the below example will show.
Some examples
Recommendation
Will Be Set By Default in AVM Modules?
TLS version should always be set the latest/highest version TLS 1.3
Yes, as string value
Key Vault should use RBAC instead of access policies for authorization
Yes, as string/boolean value
Container registries should use private link
No, as requires additional Private Endpoint and DNS configuration as well as, potentially, additional costs
API Management services should use a virtual network
No, as requires additional Virtual Network and Subnet configuration as well as, potentially, additional costs
Important
While every Well-Architected Framework pillar’s recommendations should equally be considered by the module owners/contributors, within AVM we are taking an approach to prioritize reliability and security over cost optimization. This provides consumers of the AVM modules, by default, more resilient and secure resources and patterns.
However, please note these defaulted values can be altered via input parameter/variables in each of the modules so that you can meet your specific requirements.
What is a “Primary Resource” in the context of AVM?
The definition of a Primary Resource is detailed in the glossary.
How does AVM align and assist with the Secure Future Initiative (SFI)?
AVM modules are continuously being improved with the security and reliability recommendations of the Well-Architected Framework (for more details, see what AVM means by “WAF-aligned”). The AVM team is continuously reviewing SFI recommendations and if required rolling out updates to the AVM initiative to remain SFI compliant as well as assisting module owners to ensure their modules help their consumers align to SFI where appropriate.
Contribution, module ownership
Can I be an AVM module owner if I’m not a Microsoft FTE?
Every module MUST have an owner who is responsible for module development and maintenance. One owner can own one or multiple modules. An owner can develop modules alone or lead a team that will develop a module.
Today, only Microsoft FTEs can be module owners. This is to ensure we can enforce and provide the long-term support required by this initiative.
How can I contribute to AVM without being a module owner?
Yes, you can contribute to a module without being its owner, but you’ll still need a module owner whom you can collaborate with. For context, see the answer to this question.
Tip
If you’re a Microsoft FTE, you should consider volunteering to be a module owner. You can propose a new module, or look for orphaned modules and volunteer to be the owner for any of them.
If you’re not a Microsoft FTE or don’t want to be a module owner, you can still contribute to AVM. You have multiple options:
You can propose a new module and provide as much context as possible under the “Module Details” section (e.g., why do you need the module, what’s the business impact of not having it, etc.). The AVM core team will try to find a Microsoft FTE to be the module owner whom you can collaborate with.
You can contact the current owner of any existing module and offer to contribute to it. You can find the current owners of all AVM modules in the module indexes.
You can look for orphaned modules and use the comment section to indicate that you’d be interested in contributing to this module, once a new owner is found.
Are there different ways to contribute to AVM?
Yes, there are multiple ways to contribute to AVM!
You can contribute to modules:
Become an owner (preferred):
Propose and develop a new module (Bicep or Terraform) or pick up a module someone else proposed.
Become the owner of an orphaned module (mainly Bicep) - look for “orphaned module” issues here or see the “Orphaned” swimlane here
Become an administrative owner and work with other contributors or co-owners on developing and maintaining modules.
Volunteer as a co-owner or module contributor to an existing module, and work along other contributors and the (administrative) module owner.
You can submit a PR with a small proposed change without officially becoming a module owner or contributor.
Or you can contribute to the AVM website/documentation, by following this guidance.
Note
New modules can’t be created and published without having a module owner assigned.
Where can I find modules I can contribute to?
You can find modules missing owners in the following places:
To indicate your interest in owning or contributing to a module, just leave a comment on the respective issue.
Note
If any of these queries don’t return any results, it means that no module in the selected category is looking for an owner or contributor at the moment.
I want to become the owner of XYZ modules, where can I indicate this, and what are the expected actions from me?
If exists, you can comment on the Module Proposal issue of the module that you are interested in and the AVM Core Team will do the triage providing information about next steps.
Can I submit a PR with new features to an existing module? If so, is this a good way to contribute too?
Of course! As all modules are open source, anyone can submit a PR to an existing module. But we’d suggest opening an issue first to discuss the suggested changes with the module owner before investing time in the code.
Are there any videos on how to get started with contribution? E.g., how to set up a local environment for development, how to write a unit test etc.?
No videos on the technical details of contribution are available (yet), but a detailed, written guidance can be found for both Terraform, here:
Is AVM a Microsoft official service/product/library or is this classified as an OSS backed by Microsoft?
AVM is an officially supported OSS project from Microsoft, across all organizations.
AVM is owned, developed & supported by Microsoft, you may raise a GitHub issue on this repository or the module’s repository directly to get support or log feature requests.
You can also log a support ticket and these will be redirected to the AVM team and the module owner(s).
Yes, and if they cannot resolve it (and/or it’s not related to a Microsoft service/platform/api/etc.) they will pass the ticket to the module owner(s) to resolve.
Module owners are tasked to do with two types of maintenance:
Proactive: keeping track of the modules’ underlying technology evolving, and keep modules up to date with the latest features and API versions.
Reactive: sometimes, mistakes are made that result in bugs and/or there might be features consumers ask for faster than module owners could proactively implement them. Consumers can request feature updates and bug fixes for existing modules here.
Can AVM module be used in production before it is marked as “GA” / v1.0?
As the overall AVM framework is not GA (generally available) yet - the CI framework and test automation is not fully functional and implemented across all supported languages yet - breaking changes are expected, and additional customer feedback is yet to be gathered and incorporated. Hence, modules must not be published at version 1.0.0 or higher at this time. All module must be published as a pre-release version (e.g., 0.1.0, 0.1.1, 0.2.0, etc.) until the AVM framework becomes GA.
However, it is important to note that this does not mean that the modules cannot be consumed and utilized. They can be leveraged in all types of environments (dev, test, prod etc.). Consumers can treat them just like any other IaC module and raise issues or feature requests against them as they learn from the usage of the module. Consumers should also read the release notes for each version, if considering updating to a more recent version of a module to see if there are any considerations or breaking changes etc.
Why did the AVM team change the support statements and targets in June 2025?
The AVM team has updated the support statements and targets to better align with the current state of the AVM initiative and to ensure that module owners can provide meaningful responses and resolutions to issues raised by consumers. The changes were made to improve clarity, set realistic expectations, and enhance the overall support experience for AVM modules and their consumers.
Should pattern modules leverage resource modules? What if (some of) the required resource modules are not available?
The initial focus of development and migration from CARML/TFVM has solely been on resource modules. Now that the most important resource modules are published, pattern modules can leverage them as and where needed. This however doesn’t mean that the development of pattern modules is blocked in any way if a resource module is not available, since they may use native resources (“vanilla code”). If you’re about to develop a pattern module and would need a resource modules that doesn’t exist today, please consider building the resource module first, so that others can leverage it for their pattern modules as well.
Does AVM have same limitations as ARM (4 MB) size and 255 parameters only?
Yes, as AVM is just a collection of official Bicep/Terraform modules, it still has same Bicep/Terraform language or Azure platform limitations.
Does/will AVM support Managed Identity, and Microsoft Entra objects automation?
Managed Identities - Yes, they are supported in all resources today. Entra objects - May come as new modules if/when the Graph provider will be released which is still in private preview.
How does AVM ensure code quality?
AVM utilizes a number of validation pipelines for both Terraform. These pipelines are run on every PR and ensure that the code is compliant with the AVM specifications and that the module is working as expected.
For example, in case of Bicep, as part of the PR process, we’re asking contributors to provide a workflow status badge as a proof of successful validation using our testing pipelines.
The validation includes 2 main stages run in sequence:
Static validation: to ensure that the module complies to AVM specifications.
Deployment validation: to ensure all test examples are working from a deployment perspective.
These same validations are also run in the BRM repository after merge. The new version of the contributed module is published to the Public Bicep Registry only if all validations are successful.
What’s the guidance on transitioning to new module versions?
AVM is not different compared to any other solution using semantic versioning.
Customer should consider updating to a newer version of a module if:
They need a new feature the new version has introduced.
It fixes a bug they were having.
They’d like ot use the latest and greatest version.
To do this they just change the version in their module declaration for either Terraform or Bicep and then run it through their pipelines to roll it out.
The high level steps are:
Check module documentation for any version-incompatibility notes.
Increase the version (point to the selected published version of the module).
Do a what-if (Bicep) or terraform plan (Terraform) & review the changes proposed.
If all good, proceed to deployment/apply.
If not, make required changes to make the plan/what-if as expected.
Using AVM
How can I use terraform modules through the Public Registry?
Do I need to allow a specific URL to access the Public Registry?
In a regulated environment, network traffic might be limited, especially when using private build agents. The AVM Bicep templates are served from the Microsoft Container Registry. To access this container registry, the URL https://mcr.microsoft.com must be accessible from the network. So, if your network settings or firewall rules prevent access to this URL, you would need to allow it to ensure proper functioning.
Aren’t AVM resource modules too complex for people less skilled in IaC technologies?
TLDR: Resource modules have complexity inside, so they can be flexibly used from the outside.
Resource modules are written in a flexible way; therefore, you don’t need to modify them from project to project, use case to use case, as they aim to cover most of the functionality that a given resource type can provide, in a way that you can interact with any module just by using the required parameters - i.e., you don’t have to know how the template of the particular module works inside, just take a look at the README.md file of the given module to learn how to leverage it.
Resource modules are multi-purpose; therefore, they contain a lot of dynamic expressions (functions, variables, etc.), so there’s no need to maintain multiple instances for different use cases. They can be deployed in different configurations just by changing the input parameters. They should be perceived by the user as black boxes, where they don’t have to worry about the internal complexity of the code, as they only interact with them by their parameters.
Can I call a Bicep child module directly? E.g., can I update or add a secret in an existing Key Vault, or a route in an existing route table?
As per the way the Public Registry is implemented today, it is not possible to publish child-modules separate from its parents. As such, you cannot reference e.g. a avm/res/key-vault/vault/key module directly from the registry, but can only deploy it through its parent avm/res/key-vault/vault - UNLESS you actually grab the module folder locally.
However, we kept the door open to make this possible in the future if there is a demand for it.
If I use AVM modules in my solution, do I need to have the MIT license in my own repo also? Do I need to add or reference AVM’s license in my solution?
Microsoft is not in the position of providing legal guidance on what licensing model your product/solution/etc. (the “Software”) leveraging Azure Verified Modules can or should be under. Generally speaking, the MIT license is permissive and allows you to freely use, modify, and distribute the code and does not mandate you to have your entire Software under the MIT license, but you must follow the requirements for the MIT-licensed code that you carry. As stated in the AVM LICENSE reference here, the described “copyright notice and permission notice shall be included in all copies or substantial portions of the Software”.
Glossary
Terms, Abbreviations, and Acronyms
This page holds a table of all the terms, abbreviations, and acronyms that are used across this site.
“We are a family of individuals united by a single, shared mission. It’s our ability to work together that makes our dreams believable and, ultimately, achievable. We will build on the ideas of others and collaborate across boundaries to bring the best of Microsoft to our customers as one. We are proud to be part of team Microsoft.” See Microsoft cultural attributes